How to Apply Lip-Syncing to Dubbed Videos
Dubbing your videos is a great way to use your content to reach many different audiences that may not speak your content's original language. But it might not look right if the dubbing doesn't match the speaker's mouth. Use lip syncing to help your video look even more professional and put together.
To apply lip syncing follow these steps:
- Dub your video. To dub your videos, first review this help center article by clicking here.
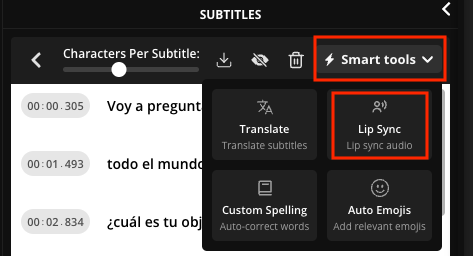
- Once the subtitles are complete, click "Smart Tools" on the top right of the subtitle panel. (image below)
- Select "Lip Sync".
- Confirm Lip Sync.
Editing your lip sync:
If you edit the subtitles and need to "regenerate" the dubbing, you will also need to re-apply the lip syncing to the video. While re-dubbing will only count the changed sections, re-lip syncing does count the whole video toward your limits as it re-lip syncs the entire video over again. You can learn more about your workspace usage by going to the Settings > Billing section of your account.
Please note that lip syncing is only available to Business and Enterprise workspaces. If you are a Free or Pro User, lip syncing will not show in your setting limits as you cannot use lip syncing in those workspaces.


