How to Post a Video on Instagram Reels, Stories, and Feed
Let's face it: Instagram is a video app now. Here's how to post a video on Instagram in three different ways.

Instagram used to be the place people went to share photos, but that’s not really the case anymore in the age of video. Alongside TikTok and YouTube Shorts, Instagram has emerged as one of the most popular platforms for sharing short-form video content.
If you’re looking to post a video on Instagram, there are a few different options:
- Post a video as an Instagram Reel
- Post a video to your Instagram Feed
- Post a video to your Instagram Story
We’ll walk you through how to post a video on Instagram using each of these different methods. Let’s get started.
How to post a video on Instagram Reels
The most common way to share a video on Instagram is by posting it as a Reel. Like TikToks and Shorts, Reels are 9:16 videos. There are a couple of ways you can create a Reel in the Instagram app.
Create a Reel from scratch
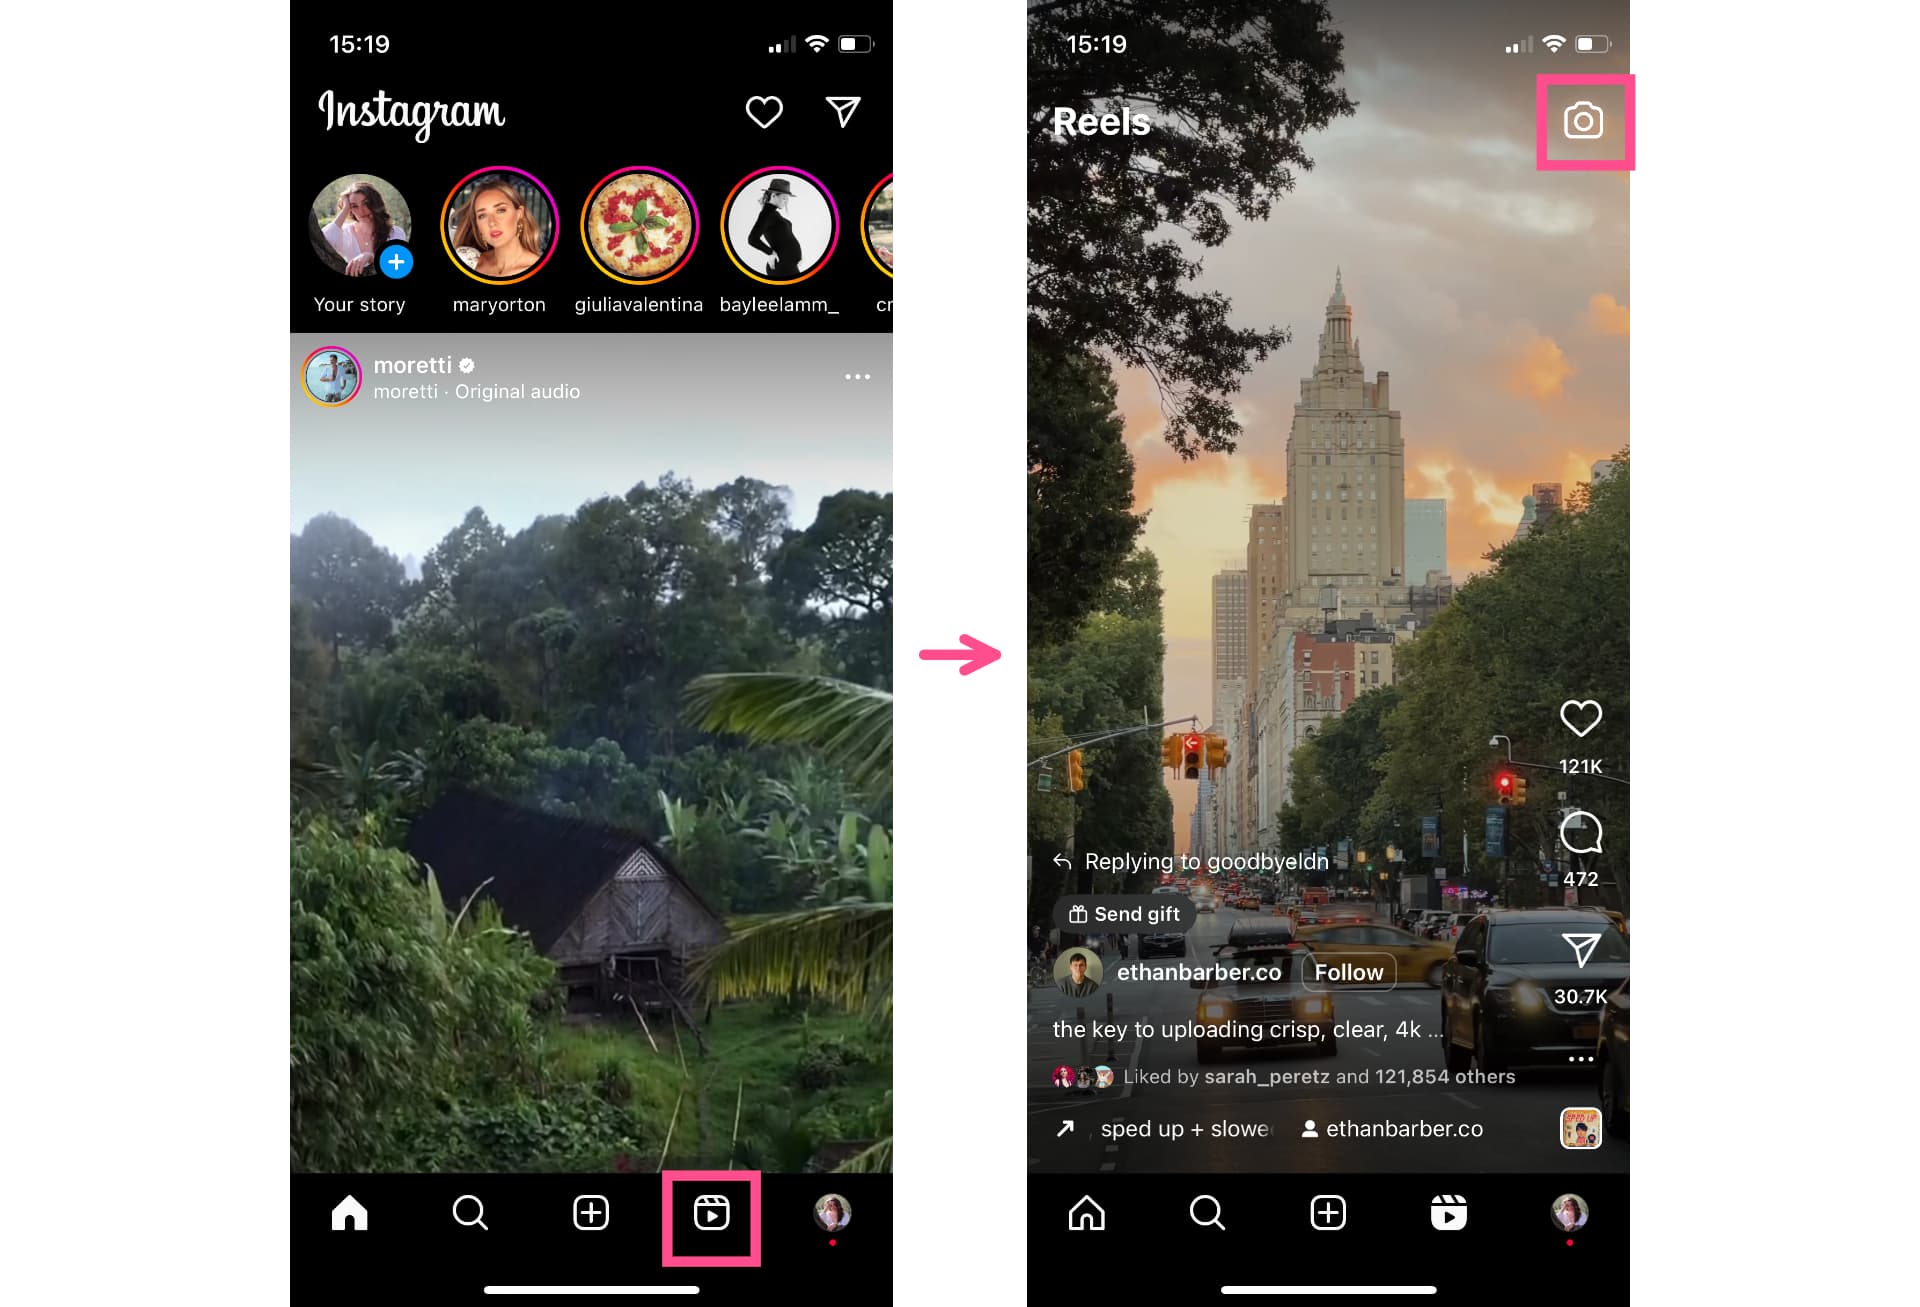
To create a Reel entirely from scratch within the Instagram app, open a new post and choose Reel. You can do this by tapping the plus button on your profile or the bottom of your feed, swiping right from the home page, or going into the Reels tab and hitting the camera button in the top right corner.
Before hitting the record button, there are some settings you can customize. Scroll through the nine buttons on the left side of the screen to:
- Add music
- Add a filter
- Add stickers
- Set the video length
- Set video speed
- Set a timer
- Change the layout
- Turn on dual camera mode
- Turn on gesture control
While you don’t have to use any of the other features, we do recommend choosing your video length setting before you record. Otherwise your recording might be cut off while you’re still in the middle of what you want to say.
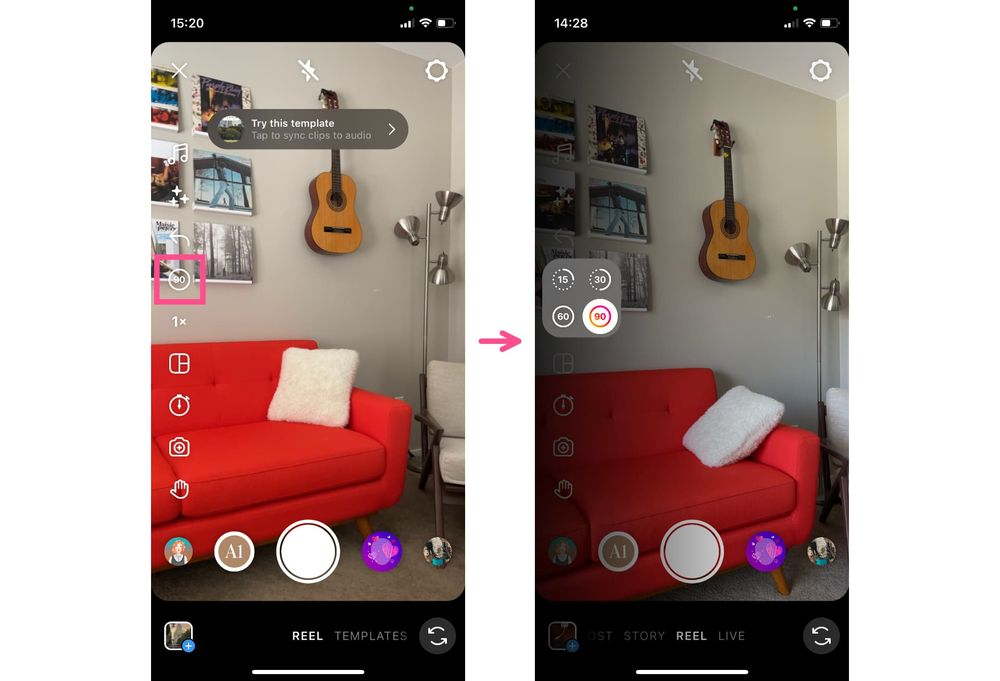
The current video length options for Instagram Reels are 15s, 30s, 60s, or 20m, although your video can be shorter than that.
Hit record and film your Reel or upload a video from your camera roll. If recording in the app, you can record all at once or record several short clips as the total length of all the clips together is less or equal to the length you selected on the previous screen. After filming, tap “Next” to watch back the video and make any edits.
In the Reels editor, you will be able to add many of the same features from before as well as some new features, like the ability to record a voiceover and add automatic subtitles.
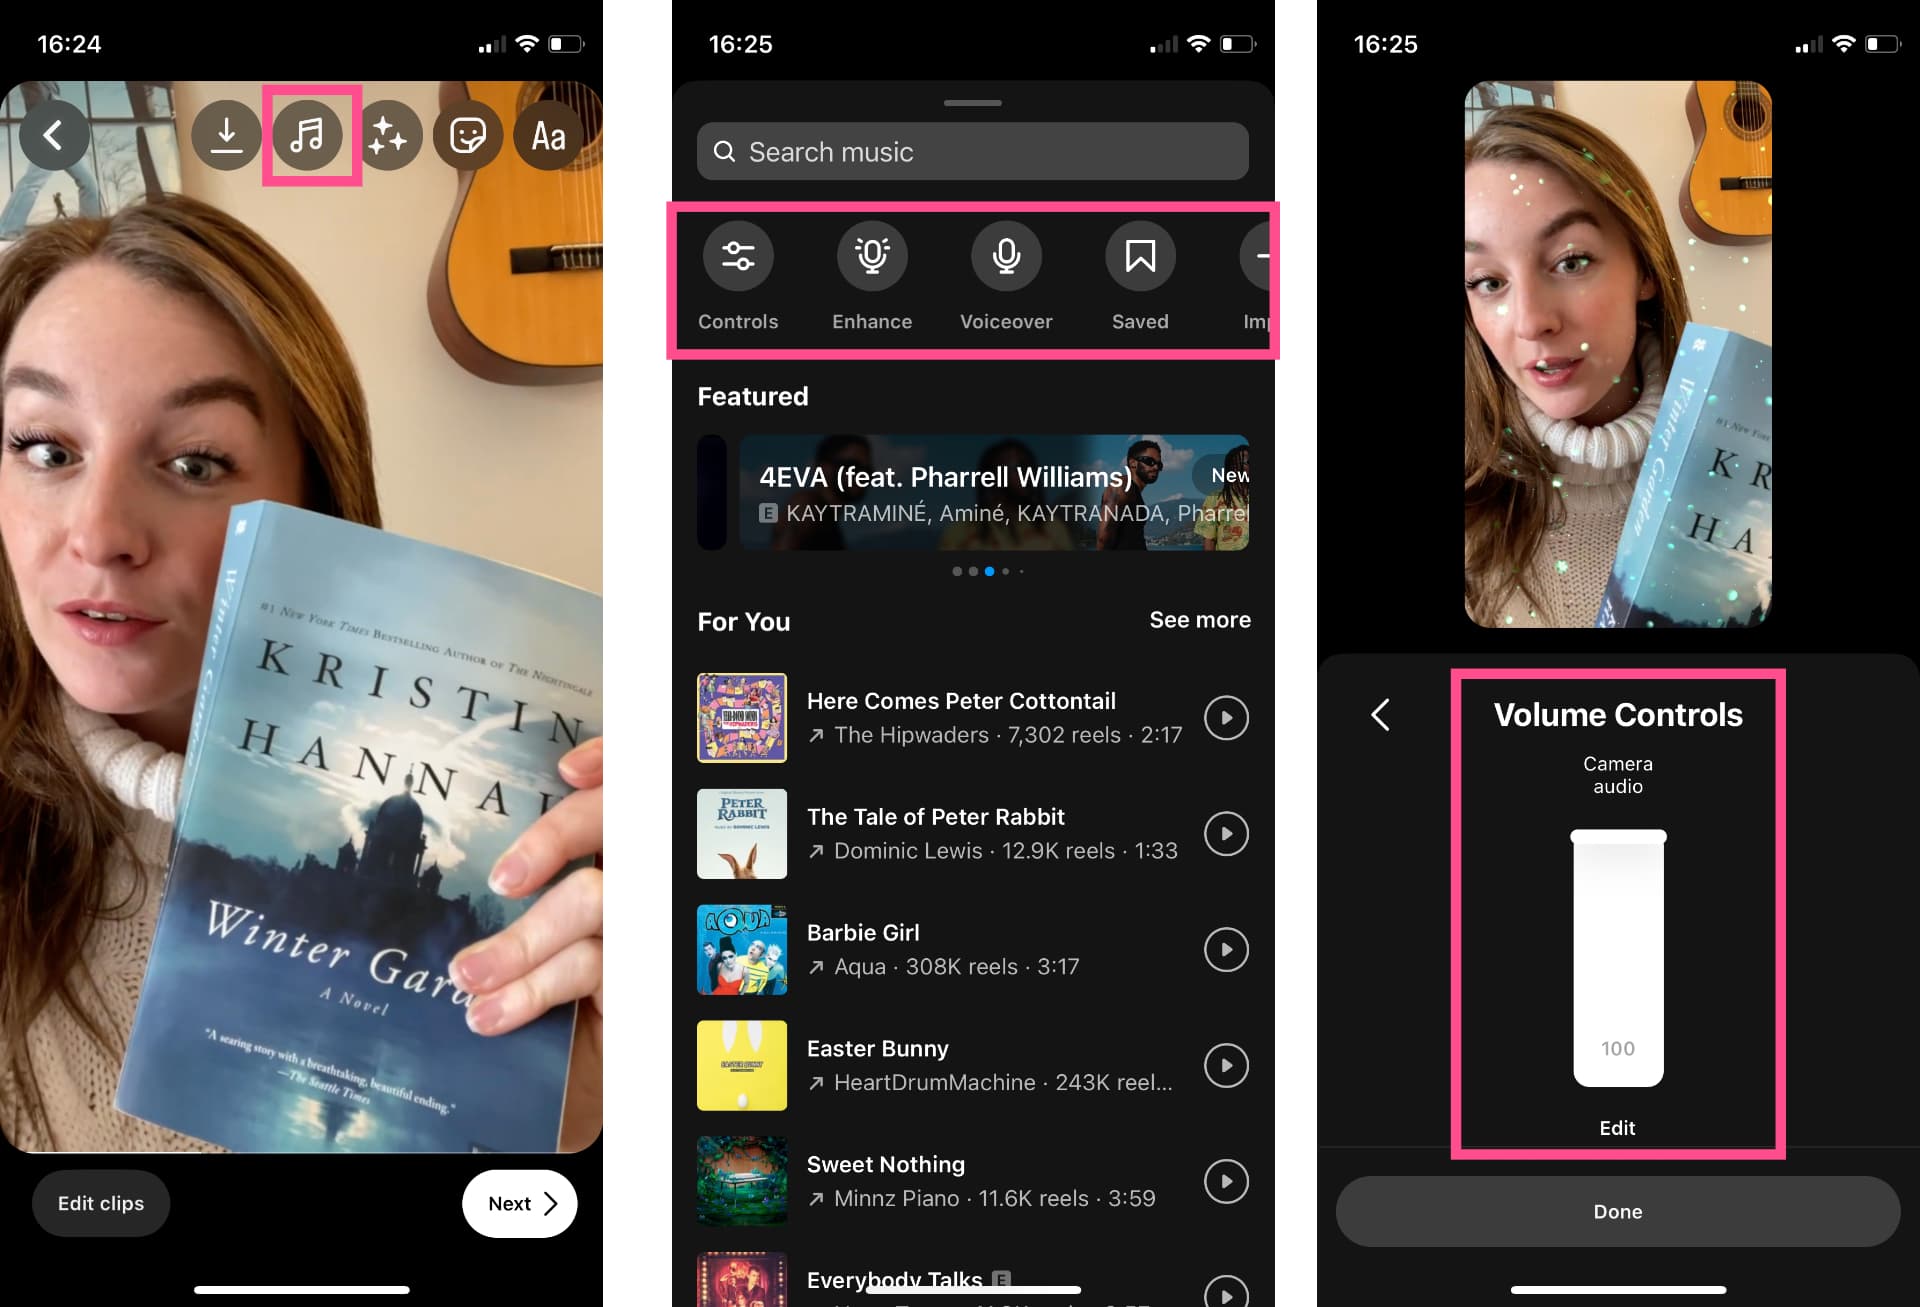
In the Reels editor, you will be able to add many of the same features from before as well as some new features, like voiceover recording and volume controls.
Finally, choose your share settings and post your Reel. This includes writing a caption, choosing a cover for the post, and customizing the privacy settings. Your Reels cover is what viewers will see on your profile grid after you publish the video.
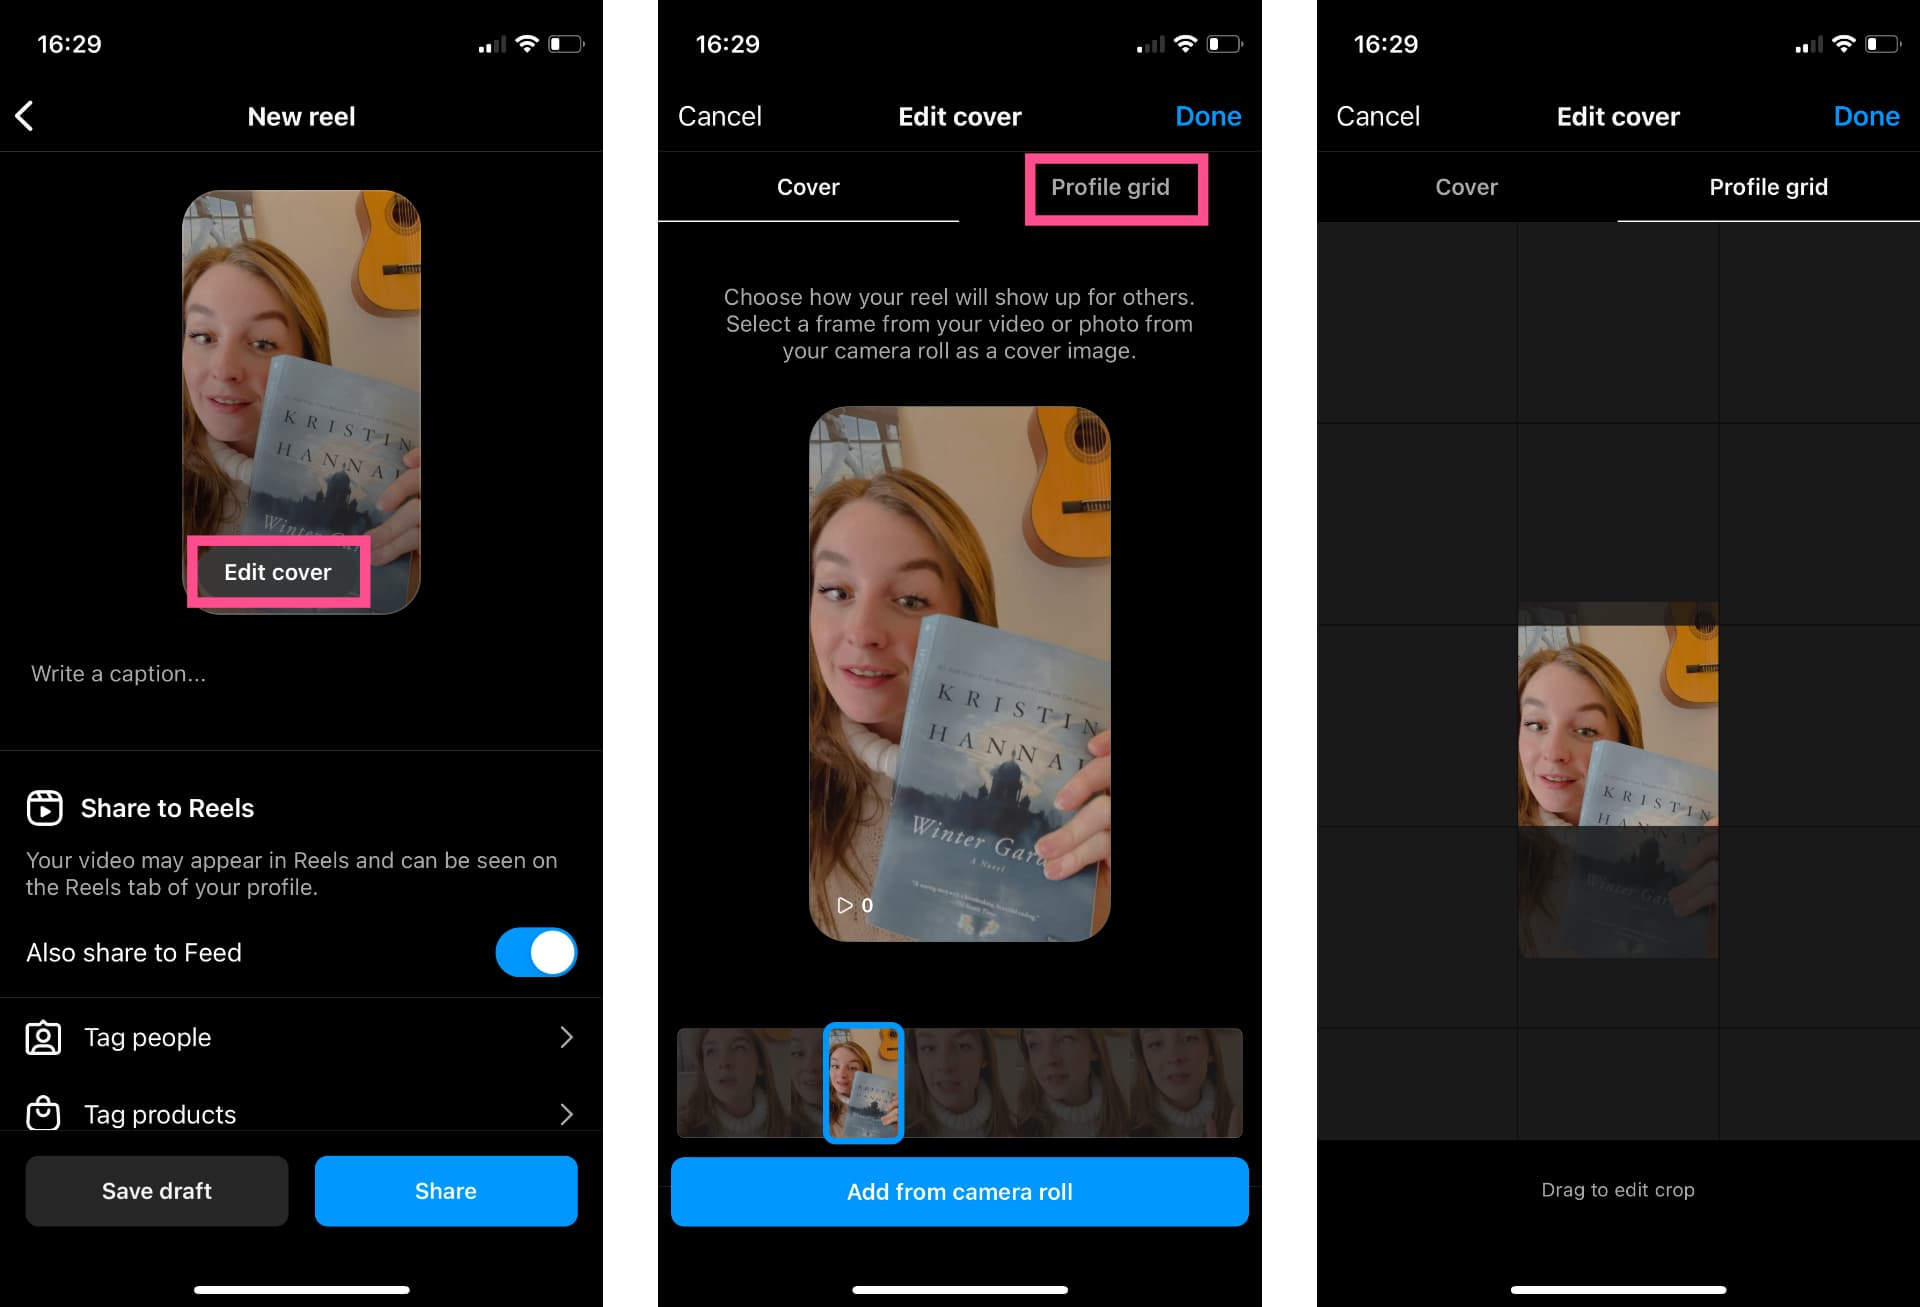
Because Reels are 9:16 and the grid is 1:1, we recommend customizing your cover image. You can upload an image from your camera roll or simply select a frame from the video to set as the cover image, then adjust the crop to make sure the most important parts of the thumbnail will be visible in the grid.
This method of creating a Reel is fairly straightforward, but there is an even simpler way, which is to use the Reels templates.
Create a Reel from templates
Instagram Reel Templates are a great way to find trending audios or edit styles to add to your content without a ton of effort. Finding them can be a little tricky. There are two places to look: 1) the Reels editor and 2) the Reels feed.
To find Templates inside the editor, open a new post from the Reels tab or from your profile. At the bottom of the screen you’ll see “REEL” and “TEMPLATE” with the template option grayed out. Tap on it to view templates.
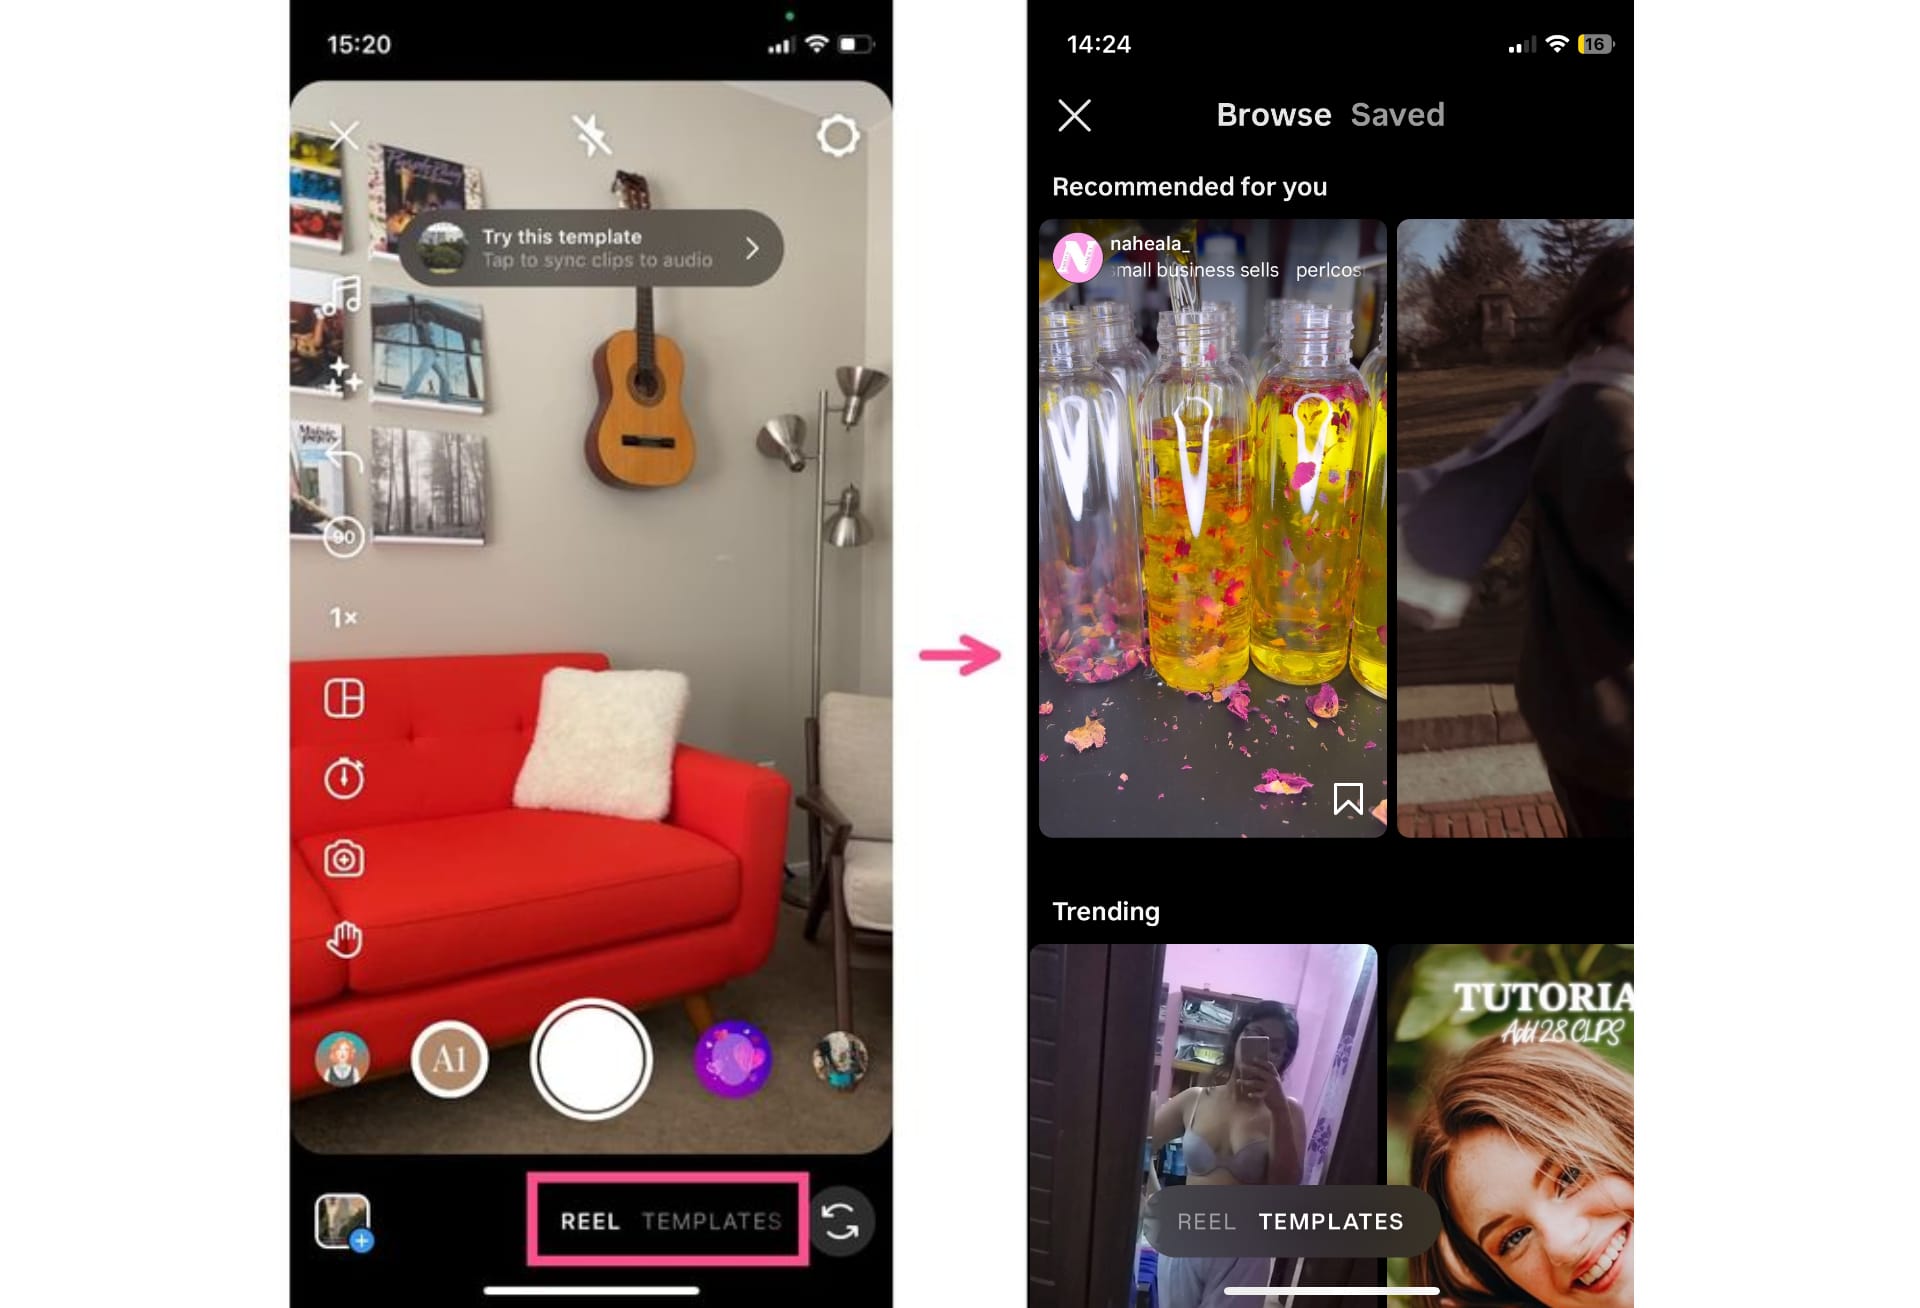
Here, you’ll see two scrollable carousels, one with templates specifically recommended for you, based on your browsing and posting habits, and the other with currently trending templates curated by the Instagram algorithm.
To use any of these templates, simply tap on it and an editable version will open.
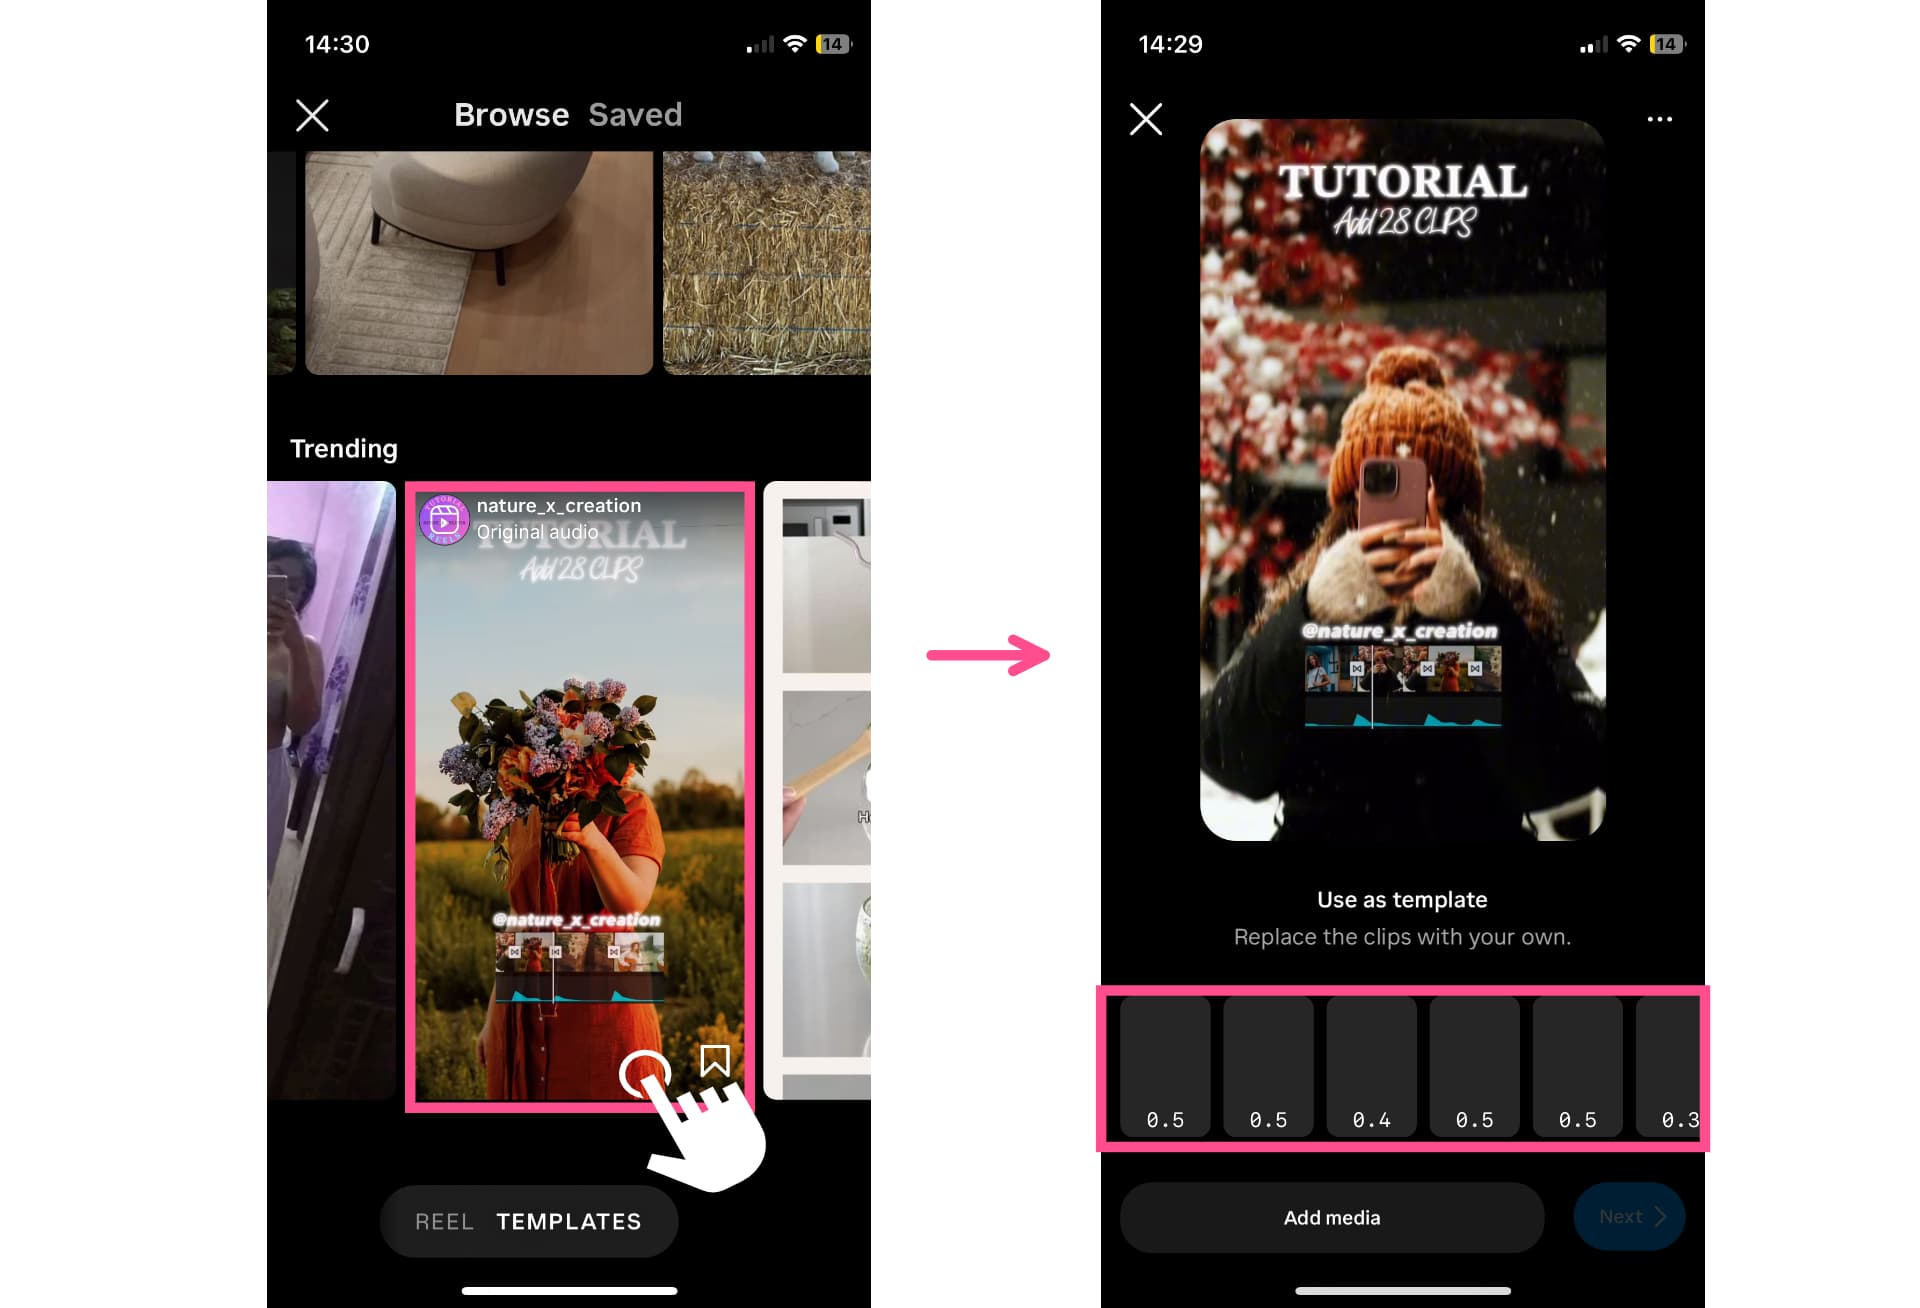
Tap the “Add Media” button or any of the timed frames in the template editor to upload your own clips or photos. Instagram will automatically trim the clips to fit the template.
You can also find Templates while browsing in the Reels feed. Simply browse Reels as normal but keep an eye out for posts with the “Use Template” button on them. To create your own Reel with that template, tap on the button and the Template editor will open.
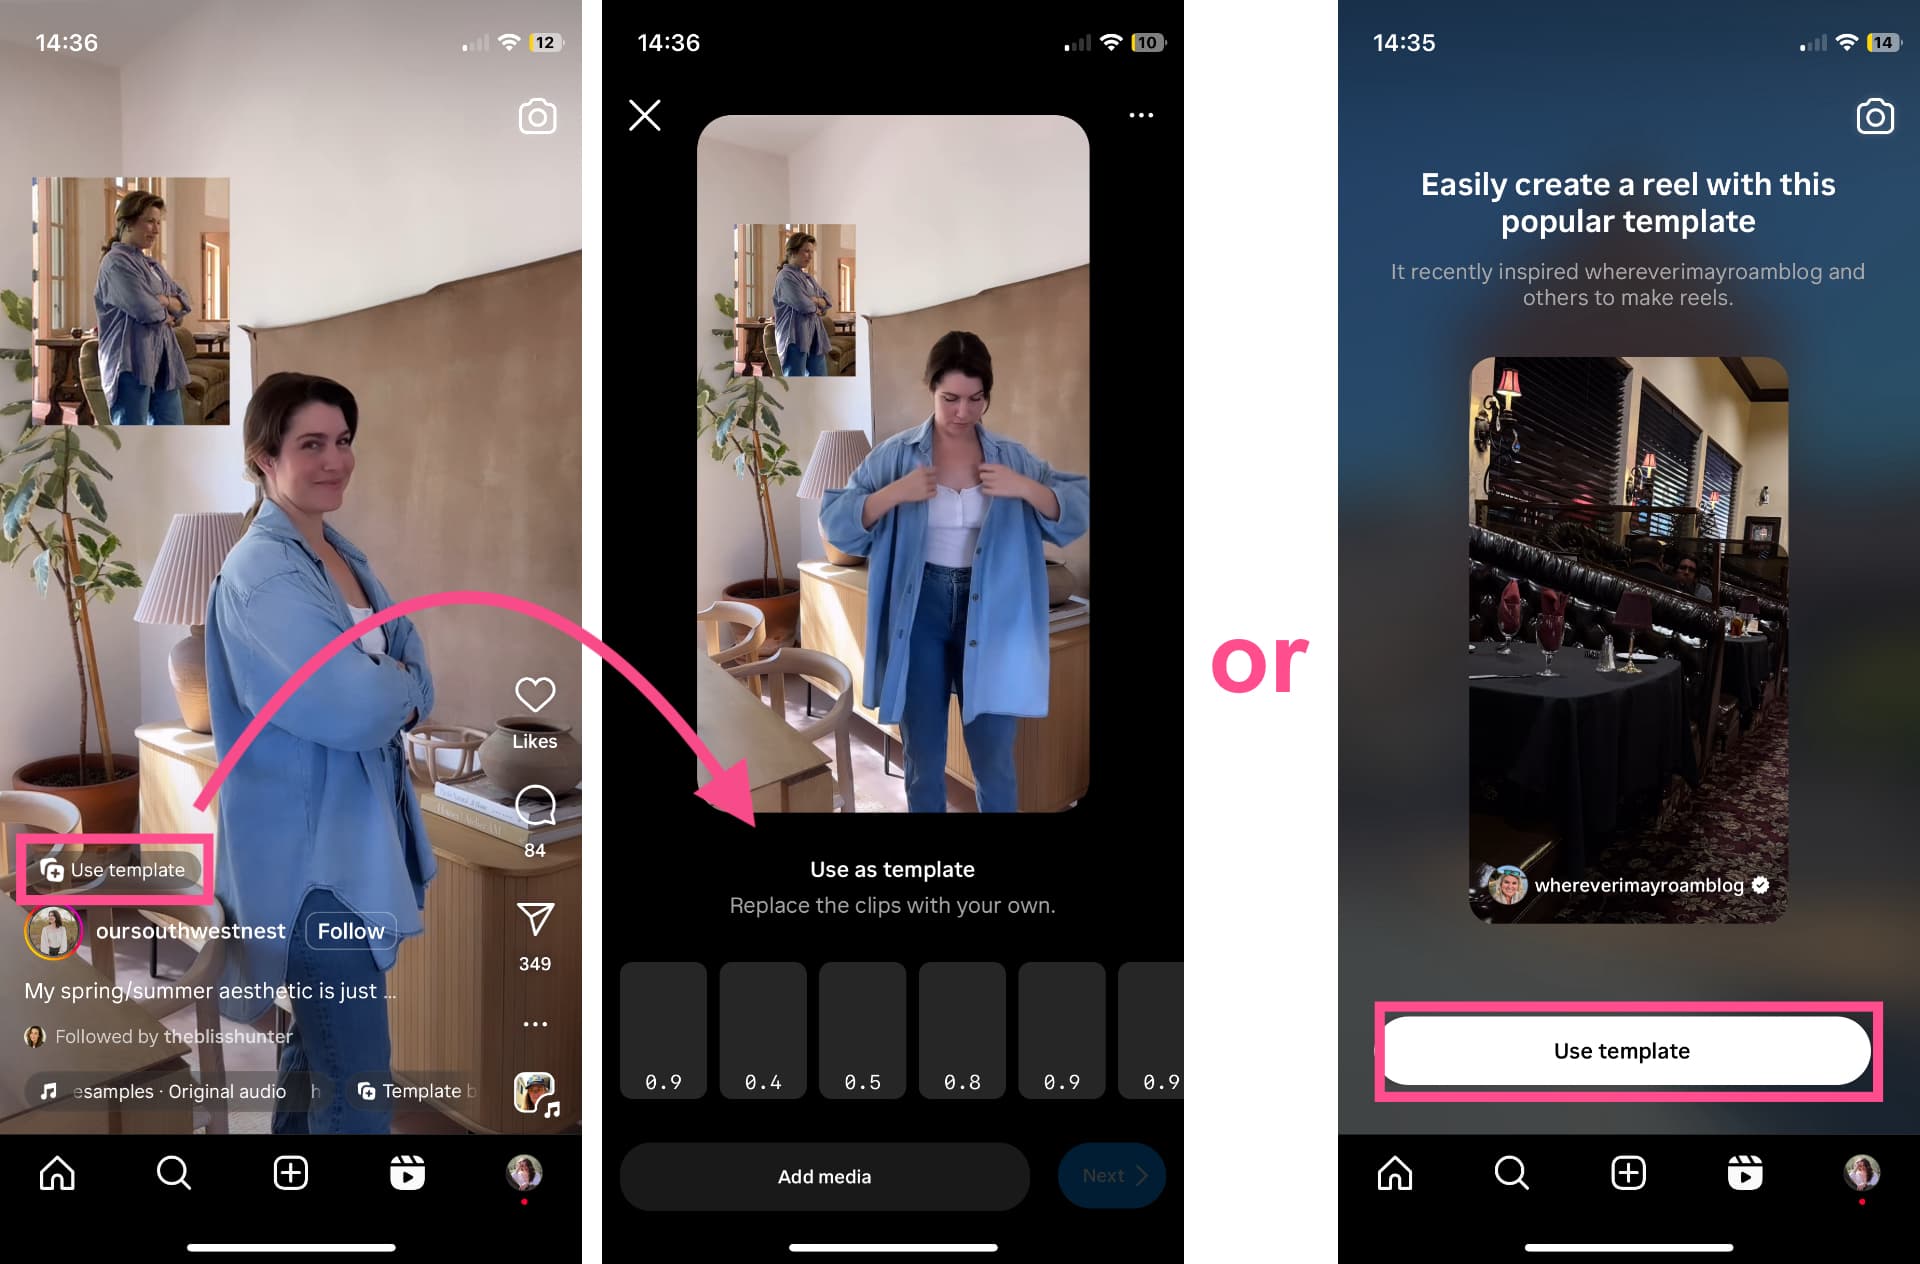
Instagram will also sometimes add more overt template placements in your feed, prompting you to create a Reel from a popular, trending template.
To save a Template to use later, tap on the three dot menu on the right side of the Reel then tap the Save button.

Pro tip: Keep a separate folder in your Saved tab with Reels ideas and templates you want to create later. In content marketing, we call this a swipe file and they’re great for bookmarking inspiration to come back to when you’re brainstorming or hitting a creative block.
How to post a video to your Instagram Feed
What if you don’t want to post a Reel? Is there a way to post a regular video to your Instagram feed?
Kind of.
Instagram sunsetted IGTV back in late 2021 and shortly after, in early 2022, announced that any video under 20 minutes in length will now be shared as Reels. The lone exception is any video published as part of a carousel. If you want to publish a horizontal or square video, you can include it as a slide in an Instagram carousel and it will be published as a regular post instead of a Reel.
That does mean that you can publish videos longer than 20 minutes as a regular Feed video, but only if you post from Instagram for desktop. When posting on desktop, you can publish videos to your Instagram feed of up to 60 minutes.
So if you’re looking to post longer videos to Instagram, this could be the workaround you’re looking for.
How to post a video to your Instagram Story
The last way to post a video on Instagram is by sharing it on your Stories. You can share an original video directly to Stories or share a published Reel or post to Stories from your Feed.
Here’s how to do both.
Share a video as an Instagram Story
Swipe right or tap the plus button on Stories at the top of your Feed to open up a new Instagram Story. From here, you can either record or upload a video from your camera roll.
60 seconds is currently the limit, whether you record or upload. You can add a video longer than 60 seconds from your camera roll, but Instagram will make you trim it which is somewhat difficult within the app. The editing timeline is teeny tiny at the bottom of the screen and there are no timestamps to go by except when you're actually trimming the video. And even then, the numbers are SO small and there isn't much precision control when trimming.
If you want to post a longer video to your Stories, we recommend cutting it up before uploading it to Instagram with an online video editing tool, like Kapwing.
Once your video is uploaded or recorded, you can start editing your Story. Just like a static Story, you can add filters, links, stickers, text, music, and more to your video Stories.
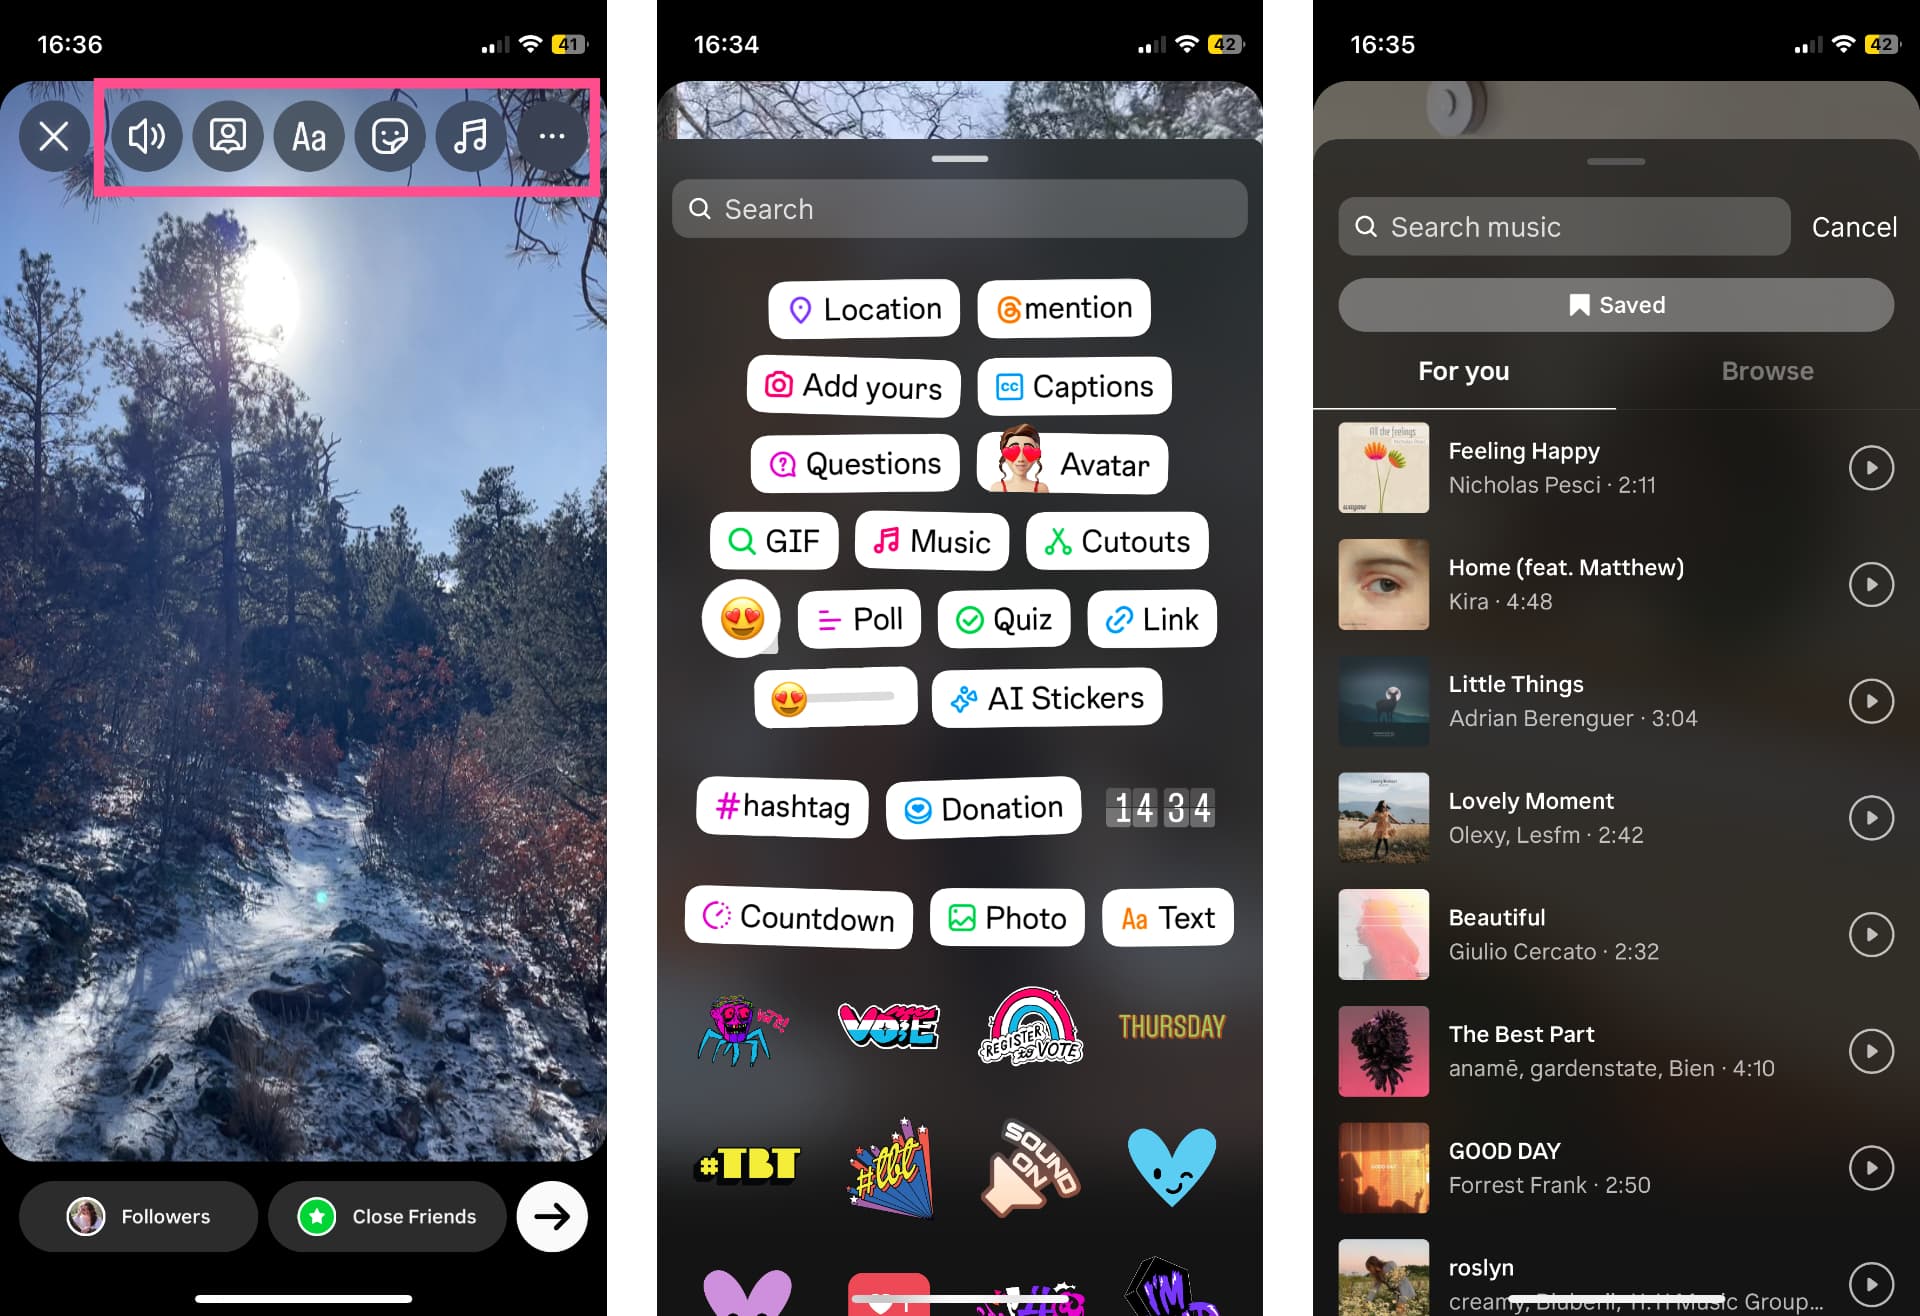
Finally, tap the arrow in the bottom right corner to save your edits and share the video to your Story.
Share a post as an Instagram Story
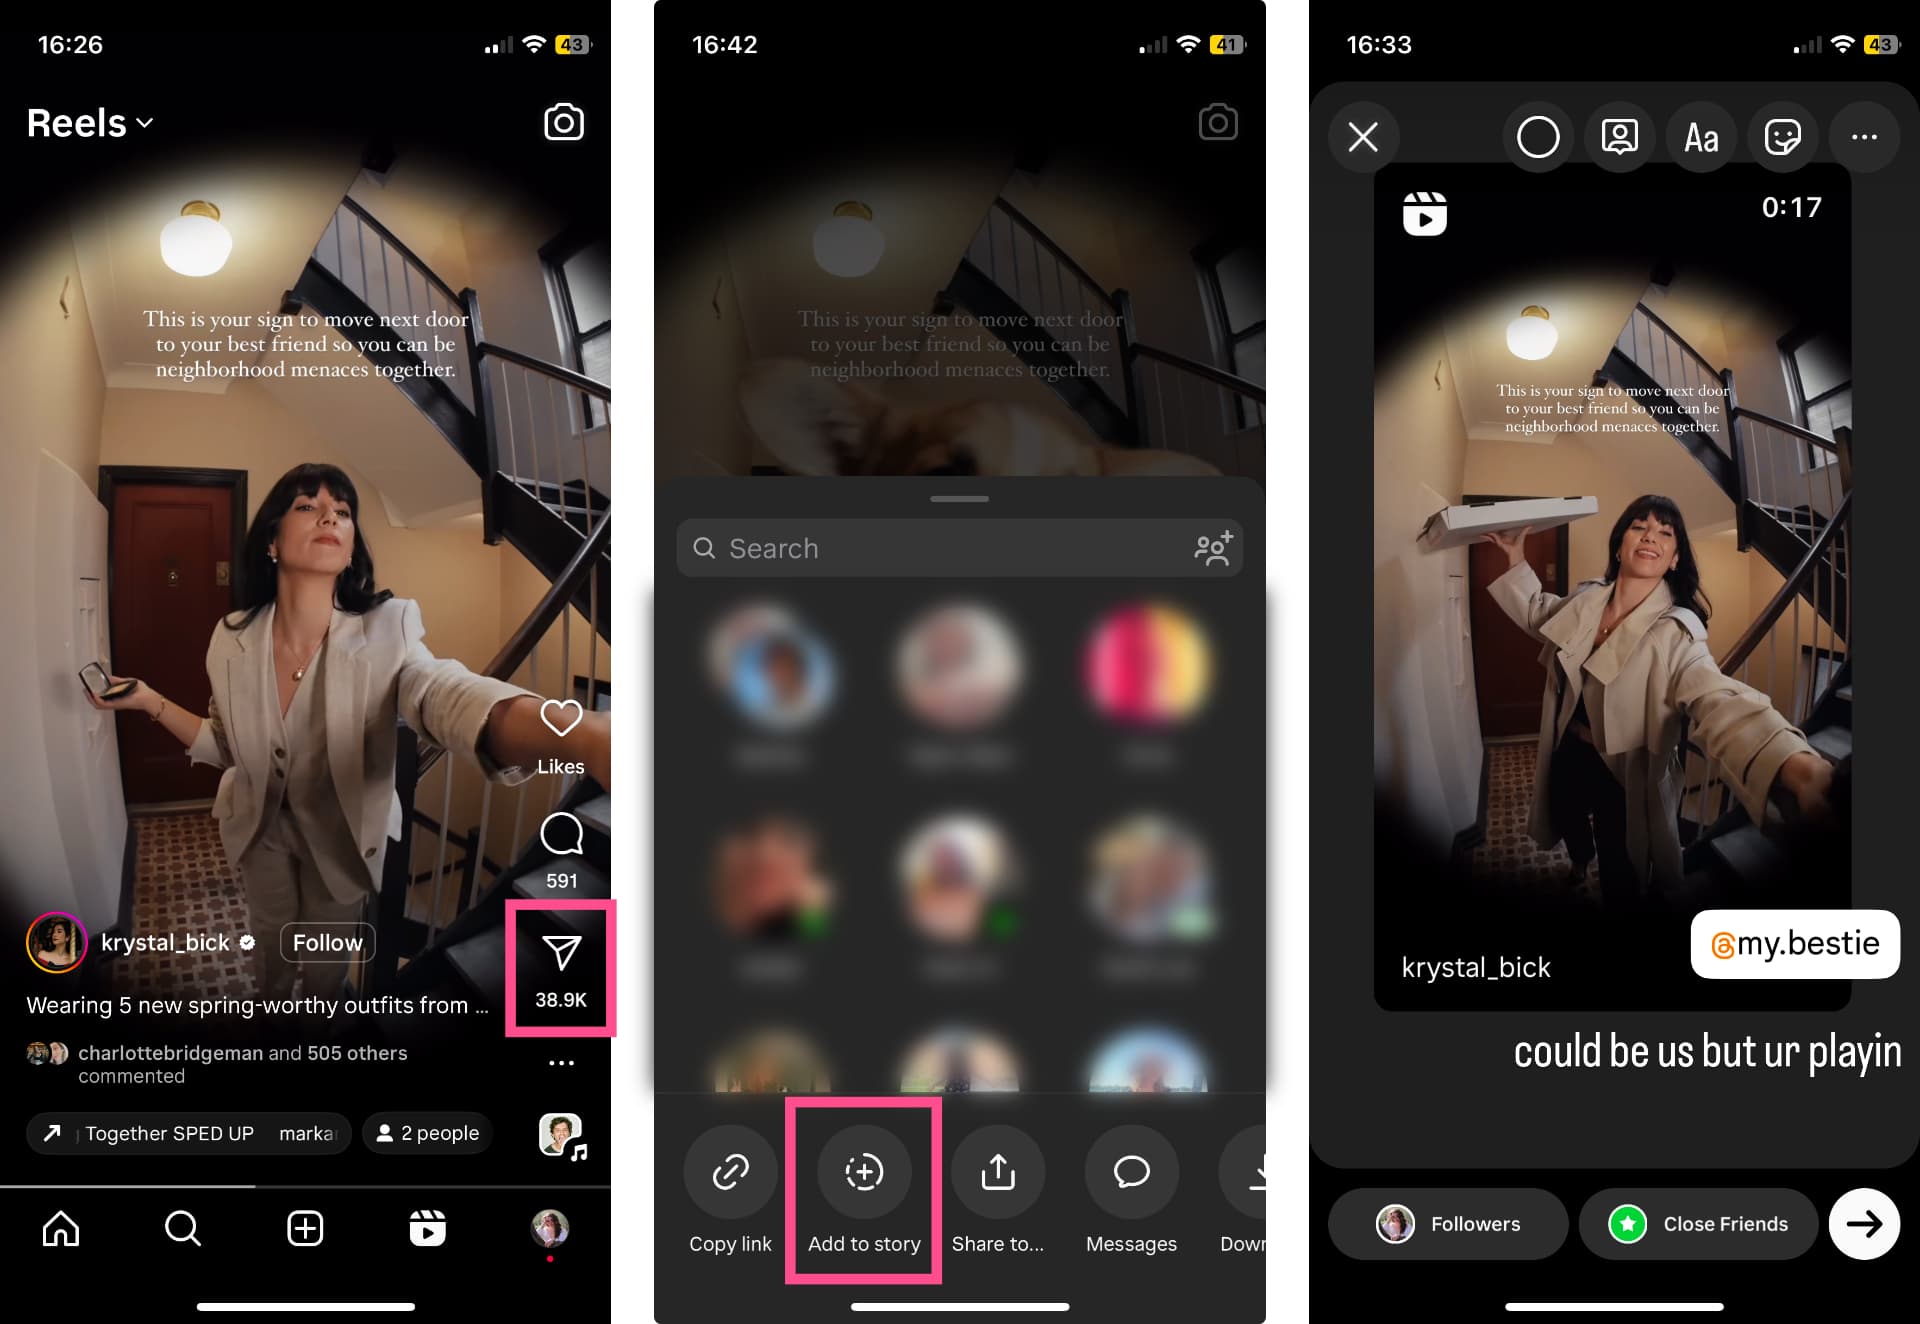
To share a video from your Feed or Reels to Stories, simply tap on the share button on the post. On a Feed post, this will be below the video. On a Reel, it will be in the icon menu on the right side of the screen.
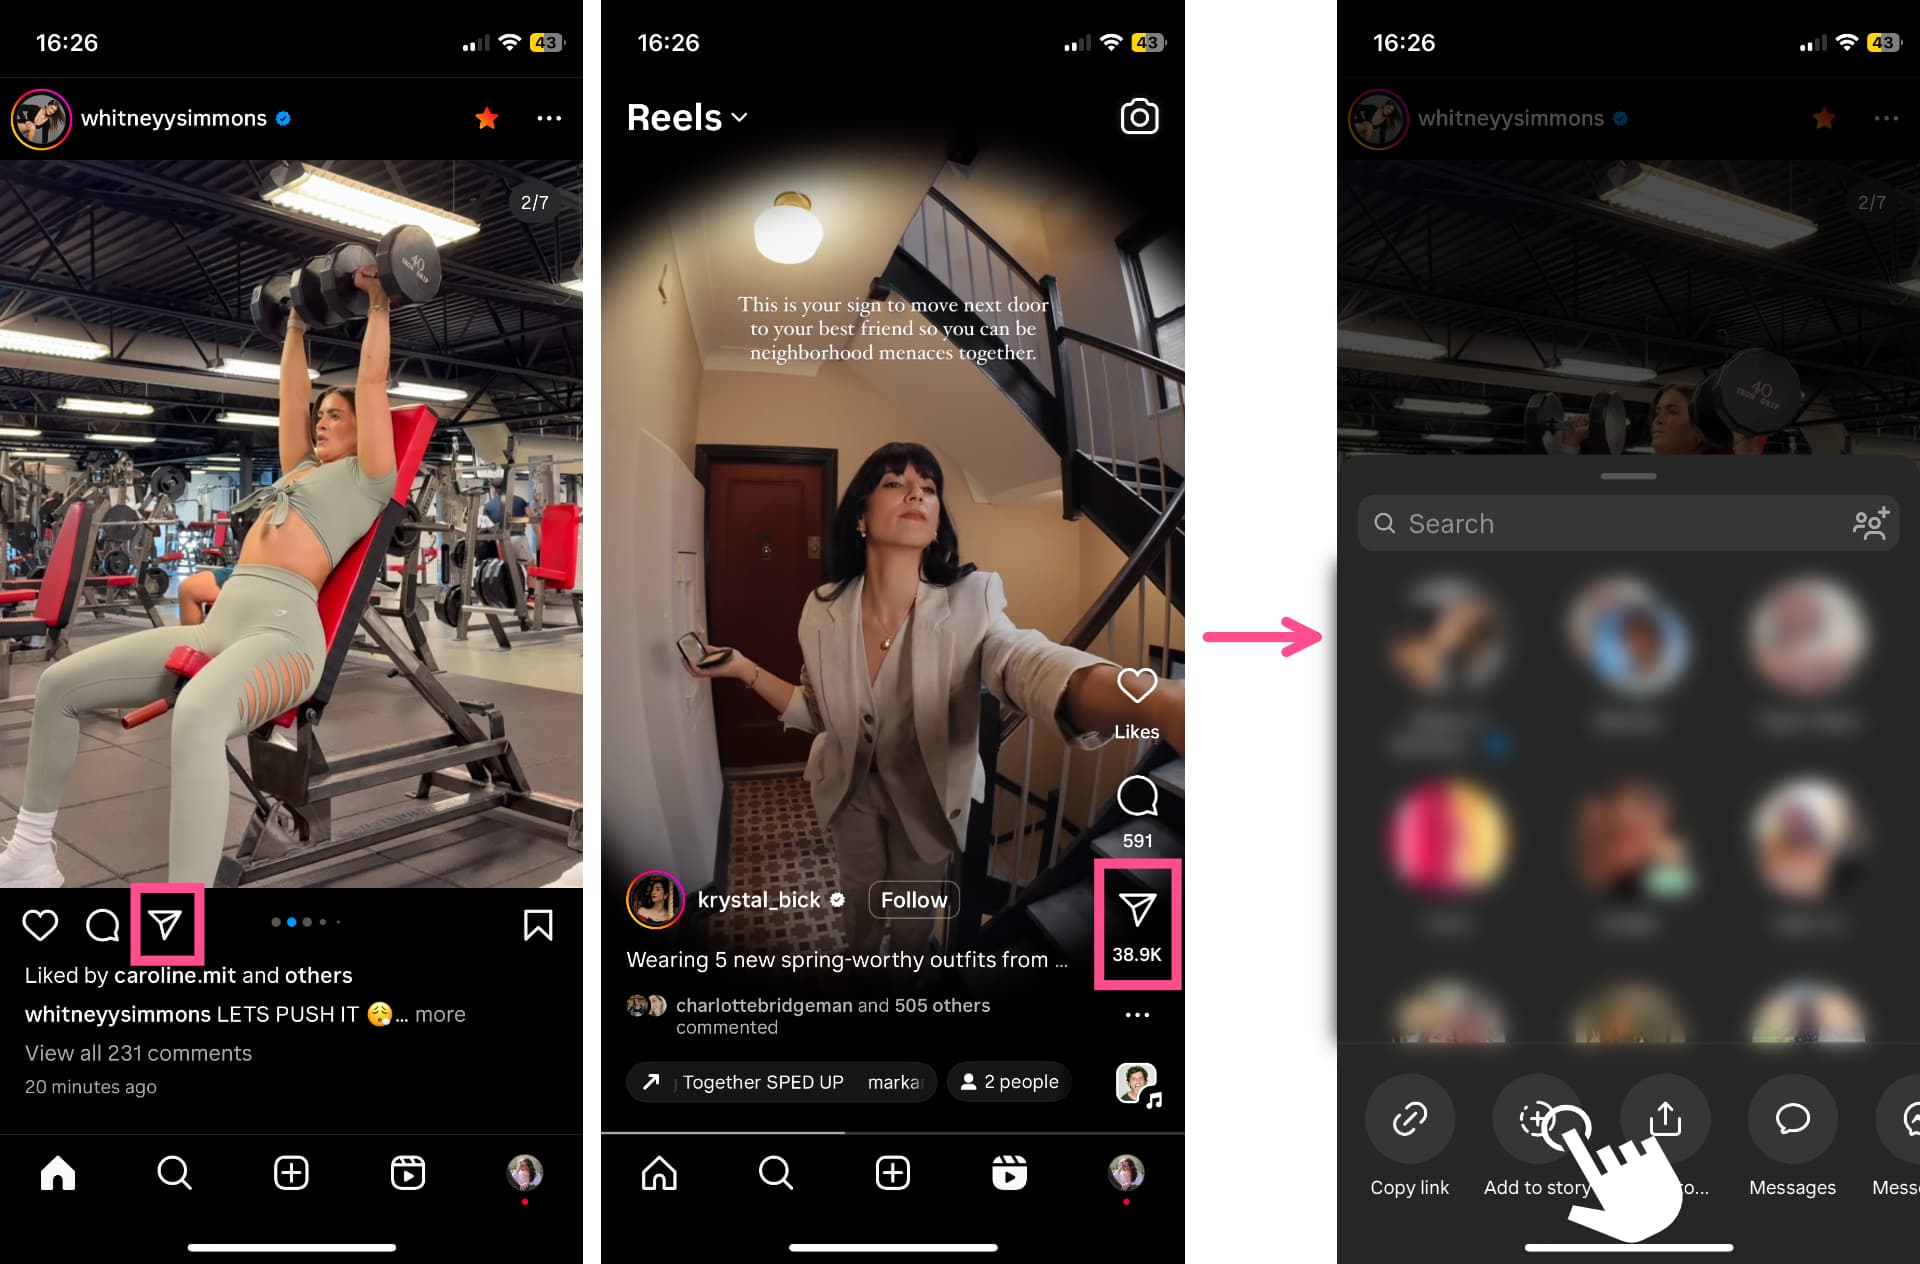
Choose the option to “Add to story.” This will open up a new Story that you can edit just like a regular Story. Once posted, viewers will be able to preview and click through to the original video from your Story.
You can also share videos to Instagram Stories from TikTok and other apps that integrate directly with Instagram.
Note: If the video you’re sharing to your Story is longer than 15 seconds, it will be cut off. For reasons Instagram has not shared with us, the 60-second Story limit only applies to original videos uploaded or recorded, not videos shared from the Feed, Reels, or other apps.
How to save an Instagram Story
IG Stories can only be viewed for 24 hours unless you save them to your Stories Highlights, where they can then be viewed by anyone visiting your profile.
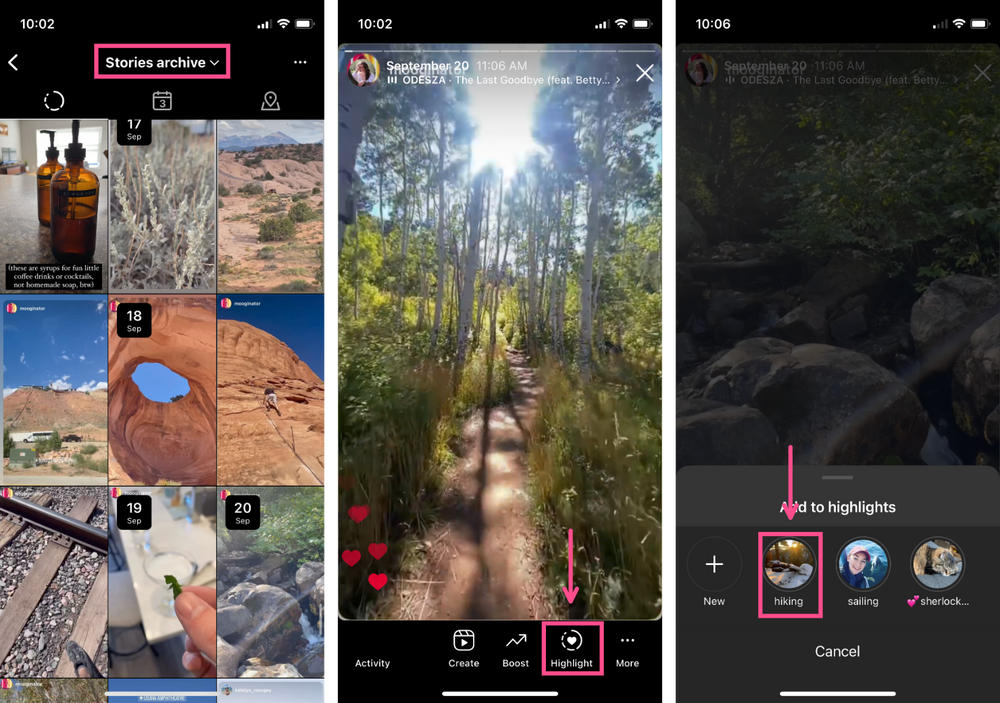
To do so, go to your Stories Archive from the settings menu on your Instagram profile. Scroll through your past Stories or use the calendar view to find the video you’re looking for, then tap the “Highlight” button to save it to a specific Highlight. You can also create a new Highlight if you don’t want to add it to an existing one.
Instagram isn’t just the picture place anymore
No matter how you post a video on Instagram, it’s clear that video content is more popular on the app than ever before. This gives creators and brands some flexibility with where and how they share their content, especially with a potential TikTok ban in the U.S. looming on the horizon.
We don’t think video and Instagram are breaking up anytime soon. Whether you’re looking to try a new platform or shaking things up with your existing Instagram content, we recommend giving these three Instagram video formats a try.


