How to Add Auto-Captions to Instagram Reels
Adding captions to your Instagram Reels is paramount for accessibility and engagement. Here’s a step-by-step guide on how to do it.

Creating accessible video content can help you increase your reach on Instagram Reels, Instagram Stories, and more. Accessible content isn't just for people with disabilities. Data shows that most people actually prefer content with subtitles.
This is true for all video content, but especially for short form social media video, like Reels. Automatic captions have made it easier for people to add captions or subtitles to their Instagram Reels without having to spend hours creating them.
In this article, we’ll share two easy methods for adding auto-captions to your Instagram Reels, both directly in the Instagram app or through a third-party tool like Kapwing's automatic Subtitle Maker.
Create content faster with Kapwing's online video editor →
How to add captions to Instagram Reels in the app
You can add auto captions to your Instagram Reels directly in the Instagram app to help your followers easily follow along with your videos.
Here's how to add Instagram's auto generated captions feature to your Reels:
- Step 1: Open your Instagram app and create a new post.
- Step 2: Select "Reel" from the available formats.
- Step 3: Upload your video from your camera roll.
- Step 4: Click “Next” at the top of your screen to start editing.
- Step 5: Open the Stickers menu and select the Captions sticker.
- Step 6: Customize your captions font, style, and placement.
- Step 7: Publish your Instagram Reel.
Let's break down the process step by step below.
Step 1. Create a new post
Open your Instagram app
Next to your handle, click on the plus icon on the top right hand corner to open the “Create” popup window.

Select "Reel" from the available format options.

Step 2. Upload your video from your camera roll.
Choose the video you want to use for your Instagram Reel from your camera roll.
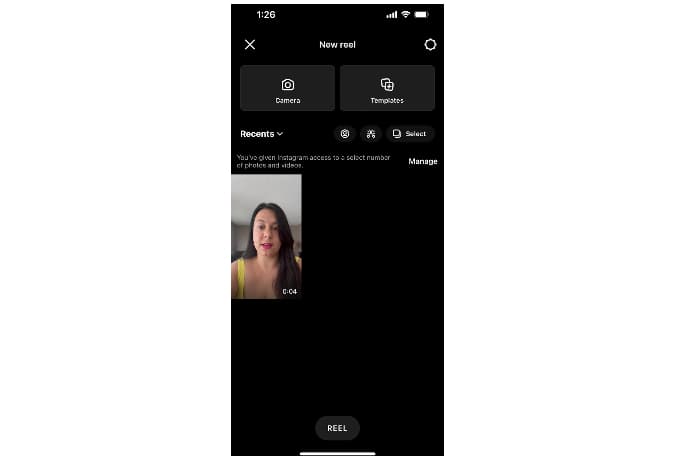
Then, click “Next” on the top of your screen after uploading your Reel.
Step 3. Add captions to your Reel
From the Reels editor, tap the sticker icon, the fourth, square icon on the top right hand-side of your screen.
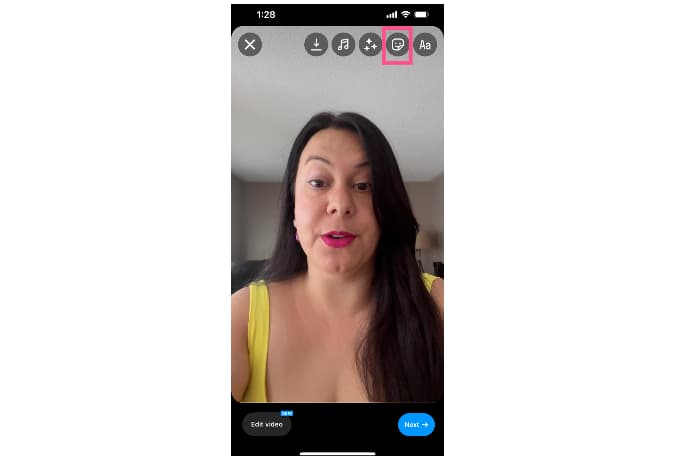
Inside the sticker menu, you’ll find the Captions sticker. If you don’t see it right away, you can search for it using the search bar.
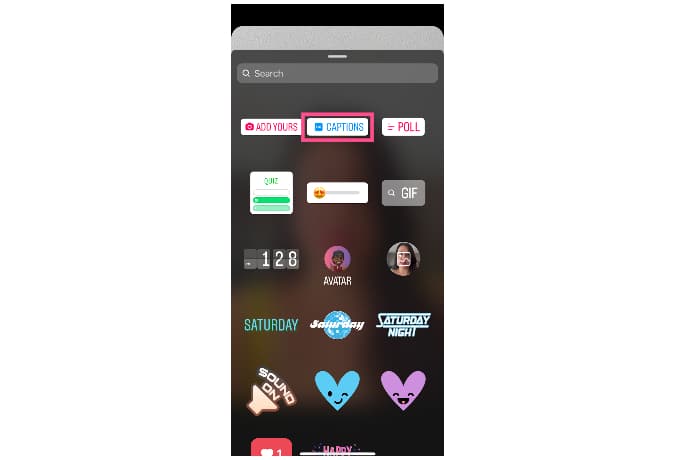
Select it.
Instagram's captioning feature will automatically transcribe your video and add captions for you. Fortunately, these aren't the auto captions of the past. Instagram's built in captioning feature allows lets you edit captions and styling right there in the app.
Step 4. Customize your captions
Select the font style you prefer for your captions from the four options at the bottom right corner of the screen: classic, typewriter, scroll, or fade.
By default, your captions will appear on the middle of the screen.
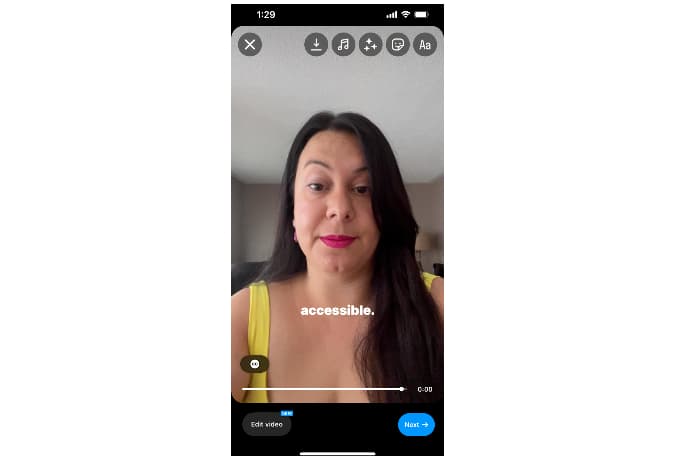
Feel free to move them to an area that creates a better user experience by dragging the text with your fingers. Please note that where you place the captions is the permanent caption placement for the whole video. You won't be able to move it around to different areas as your clips change.
Step 5. Share your Instagram Reel
Click “Next” to write an Instagram caption for your video (different from closed captions), tag people, add your location, and so on.
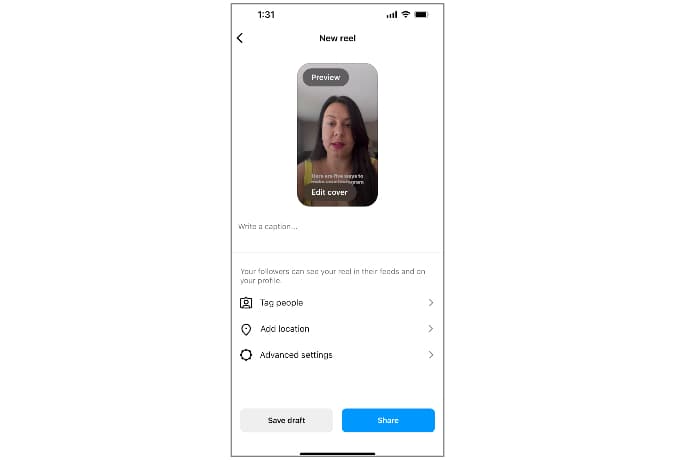
Finally, click “Share” to publish your Instagram Reel.
Pro tip: This captions feature can be used for captioning Instagram videos of every type, including Feed videos and Instagram Stories.
Another way to add auto captions to Reels
While adding captions to Instagram using the native built-in feature on the Instagram app might be easy, it's not always the most practical solution for your Reel. Fortunately, there are other tools you can use to embed captions and make your Reels accessible and engaging with auto-captions.
Why use a video editing tool to add captions to Reels
Using a third-party editor like Kapwing will allow you to add more functionality with easy edits and customized caption styles. You can even translate your video captions into other languages.
Using Kapwing’s subtitle software allows you to create accessible, readable captions while giving you more control over the captions’ placement, style, and accuracy.
And if you’re making Reels for a brand account with multiple stakeholders, you can share edit access with team members.
Let’s break down a few of these different benefits:
Style and placement
On Instagram, you only have four style options: classic, typewriter, scroll in/out, or fade in/out. These style options come with a preset font and text animation, which can’t be changed or customized.
You can also only choose one location for your captions.
If your Reel doesn't include different scenes or areas of focus, this might not seem like a big deal. However, most videos don't only include one static shot in the same spot for the duration of the video. There's typically multiple clips with various areas of focus for the video. Not being able to change where the captions are located for optimal viewing can be a major disadvantage to using Instagram Reels’ native editor to add subtitles to instagram.
With a tool like Kapwing, you have total control over the visual style of your captions. You can change the size, font, color, animation, and even how many words appear on the screen at a time.
Plus, you can move your captions around and preview how they will look within the Reels interface to make sure they’re visible at all times.
Accuracy
A third-party tool can also help you with the accuracy of your captions, which is extremely important in terms of accessibility.
Sometimes, auto-captions tools like Instagram misinterpret a word. This can happen if someone has an accent, if they’re talking quickly or excitedly, if there’s background noise, or if it’s an uncommon word, like a brand or product name.
With a third-party tool, you'll be able to read over your auto-captions to ensure that the written words exactly match the words communicated. And if it gets the occasional word wrong, you can edit the transcript as quickly and easily as editing a text document.
Ease of use
Adding captions to your Instagram videos using a third-party tool can be easier to edit, especially if you’re using an editor you can access on your desktop. Editing captions on instagram on your phone can be a poor user-experience. Being able to use a larger screen for editing can allow you to edit faster and with ease.
It’s also easier to share if you're working with a team.
The native Reels editing experience can make the approval and editing process more tricky and time-consuming. There are often multiple people you need to get approval or at least feedback from before publishing, but Instagram drafts live on your device, not your account.
By using a third-party tool that allows multiple people to view, comment on, and edit the same project, you can make sure your captioned content is approved ready to go before uploading it to Instagram.
How to use a Kapwing to caption Instagram Reels
Enough about why you should be using an editing tool to add captions to your Instagram Reels. Let’s get into the how of it all. For this tutorial, we’ll be showing you how to add automatic video captions using Kapwing, a browser-based video editor.
Kapwing has a subtitling tool called Magic Subtitles that’s perfect for adding captions to your Instagram Reels or even Instagram Stories. Here’s a step-by-step tutorial:
Step 1. Upload your video
Head over to Kapwing’s Add Subtitles to Video tool. Click the “Choose a video” button.
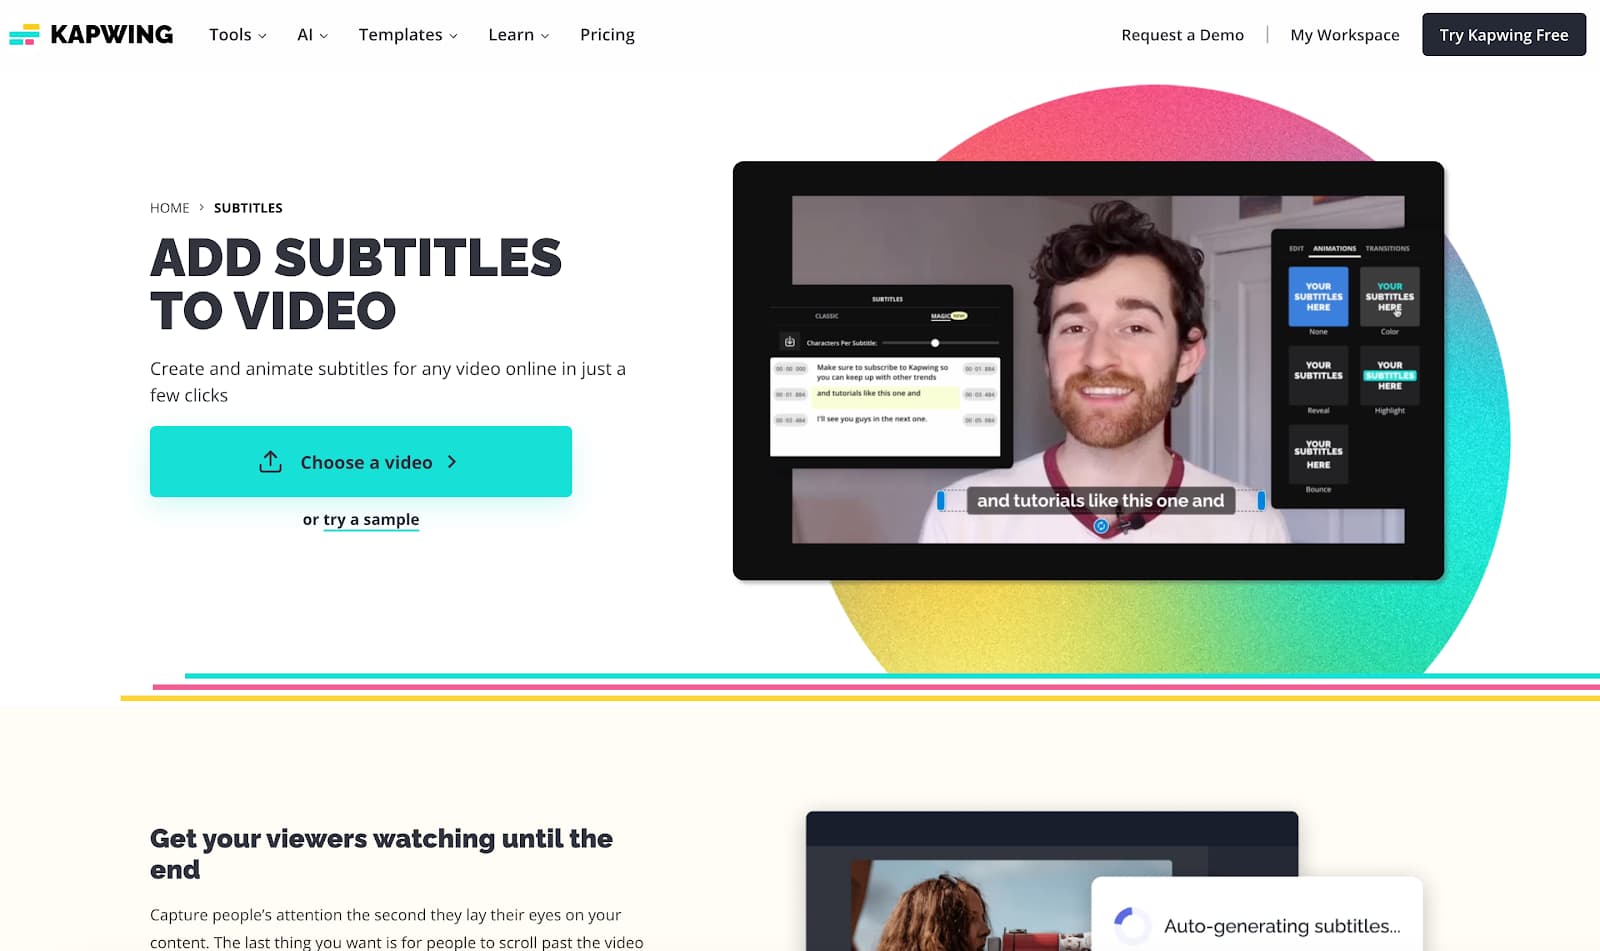
Once you’re inside the editor, click Choose a Video to upload a video you want to add auto captions to. If you have your file browser open already, you can also drag and drop your video onto the editor.
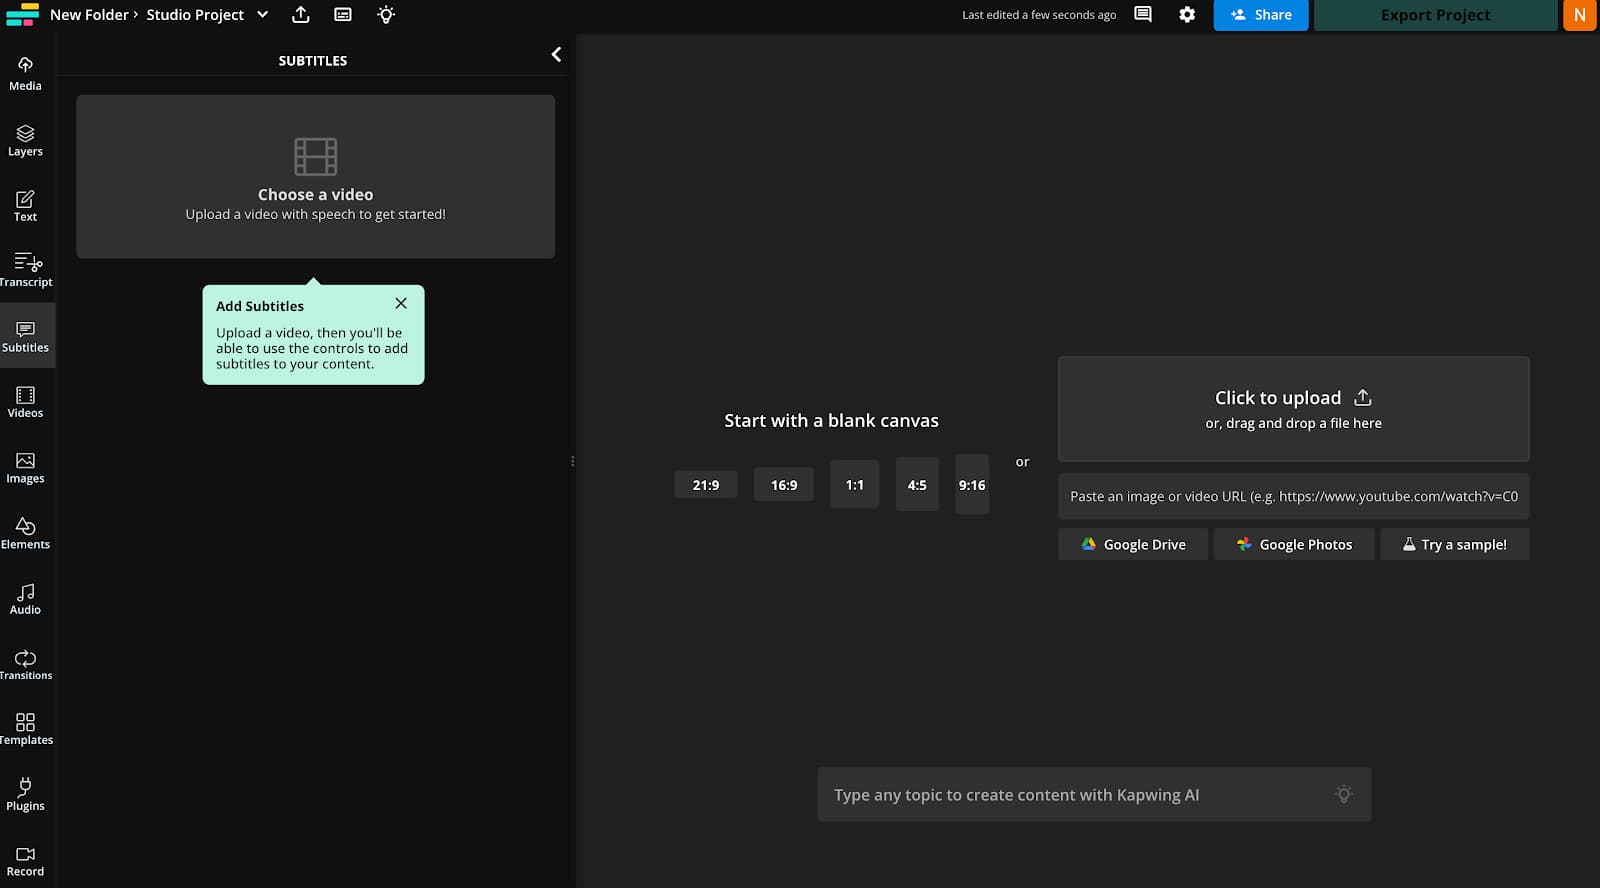
Alternatively, you can choose to import a video from a link or from Google Drive or Google Photos.
Step 2. Generate auto subtitles
After your video file is uploaded, it'll appear in the editor preview window. You should also see a new layer in the timeline with the new video and audio together.
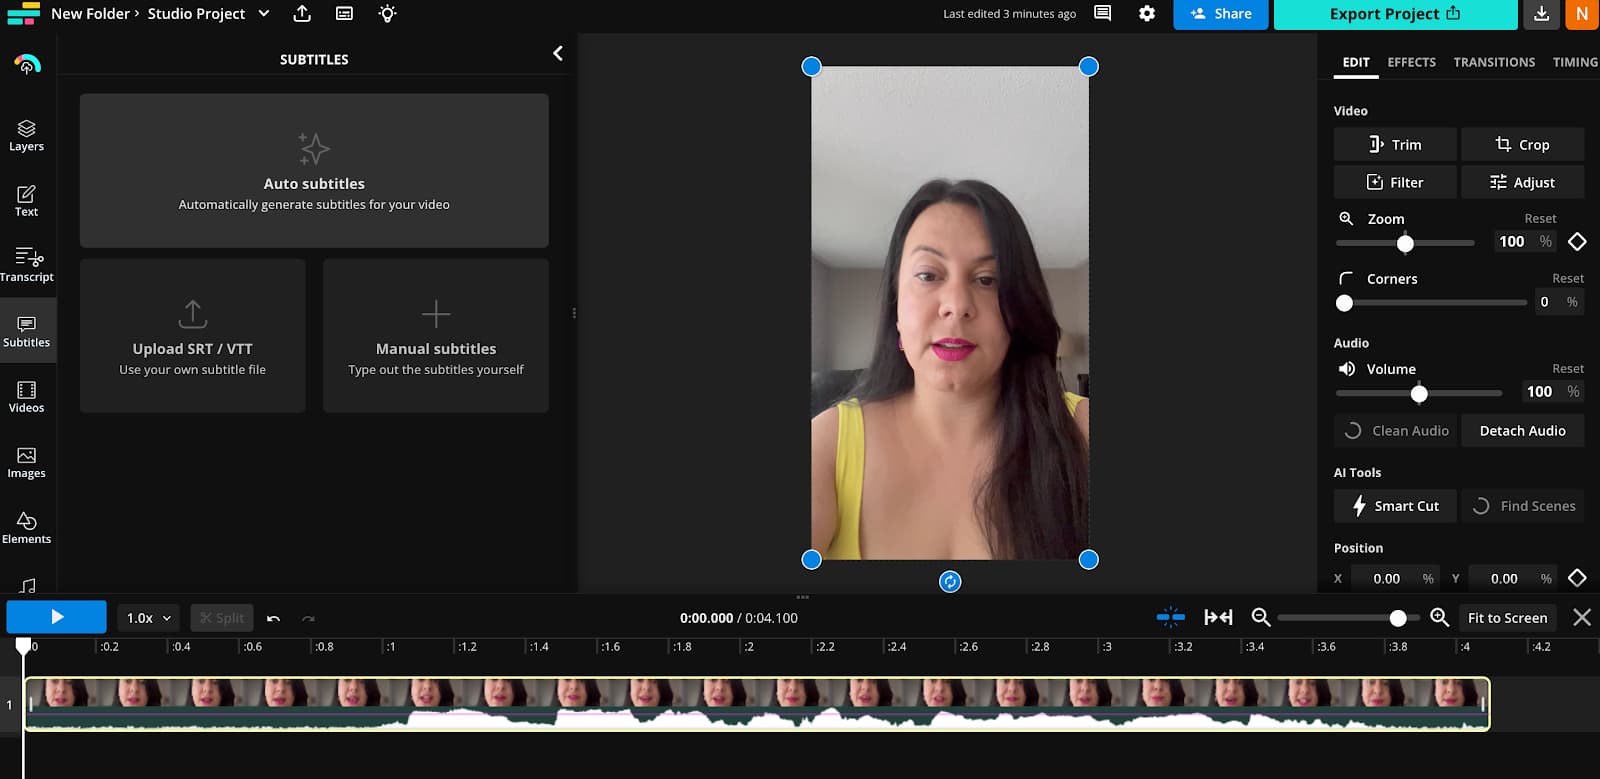
Click on the Subtitles tab in the left sidebar. There are three options for adding subtitles to your video: Auto subtitles, Upload SRT/VTT, or Manual Subtitles.
Select “Auto subtitles.”
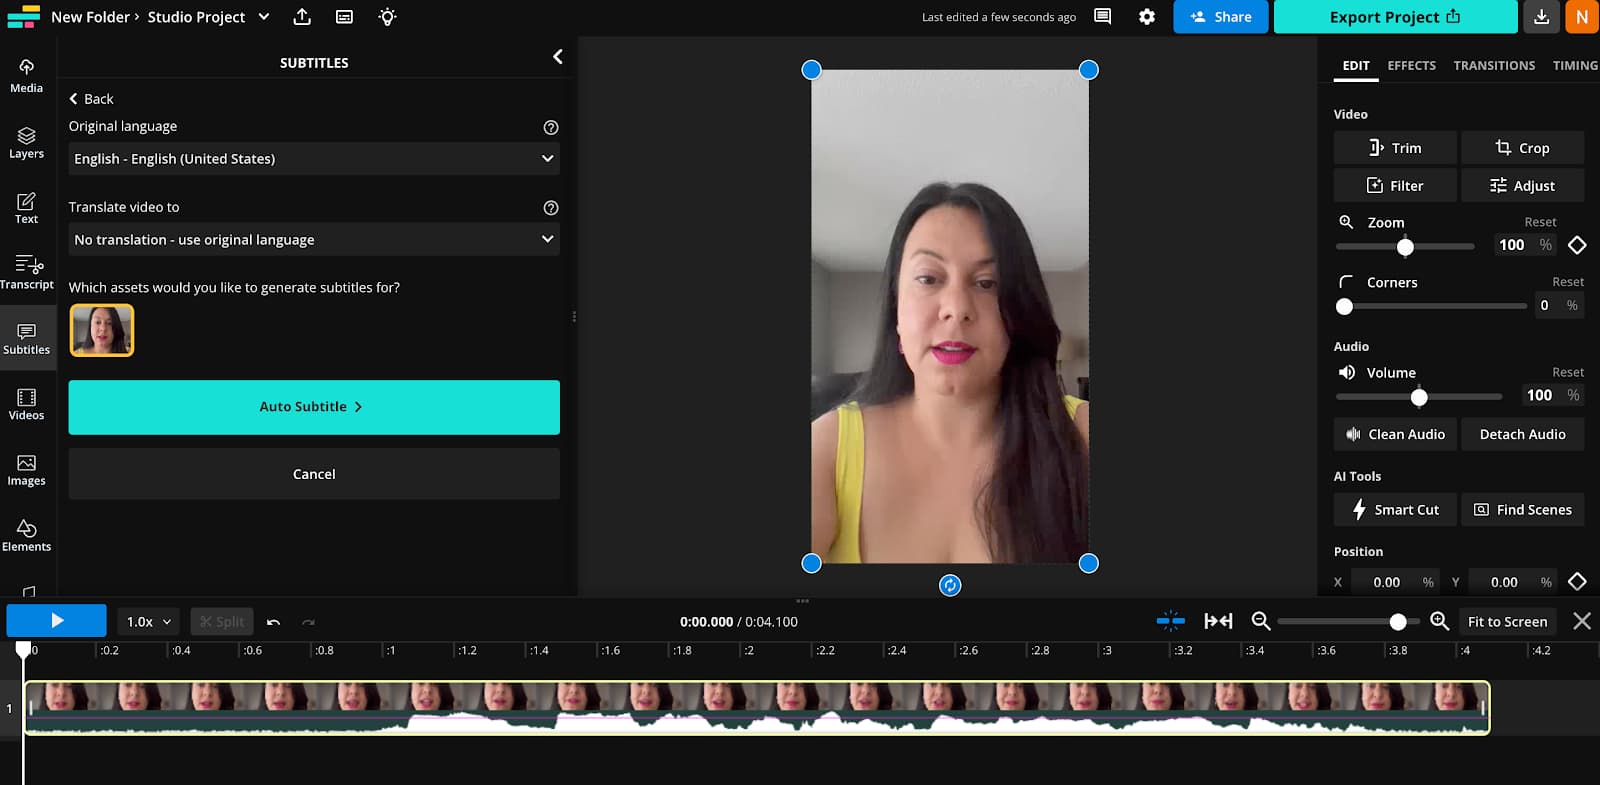
After clicking "Auto subtitles," you'll have the option to translate your video. If you'd like to keep it in your current language, you don't need to make any changes. Click the button that reads "Auto subtitle" to automatically generate captions for your Reel.
Step 3. Customize your captions
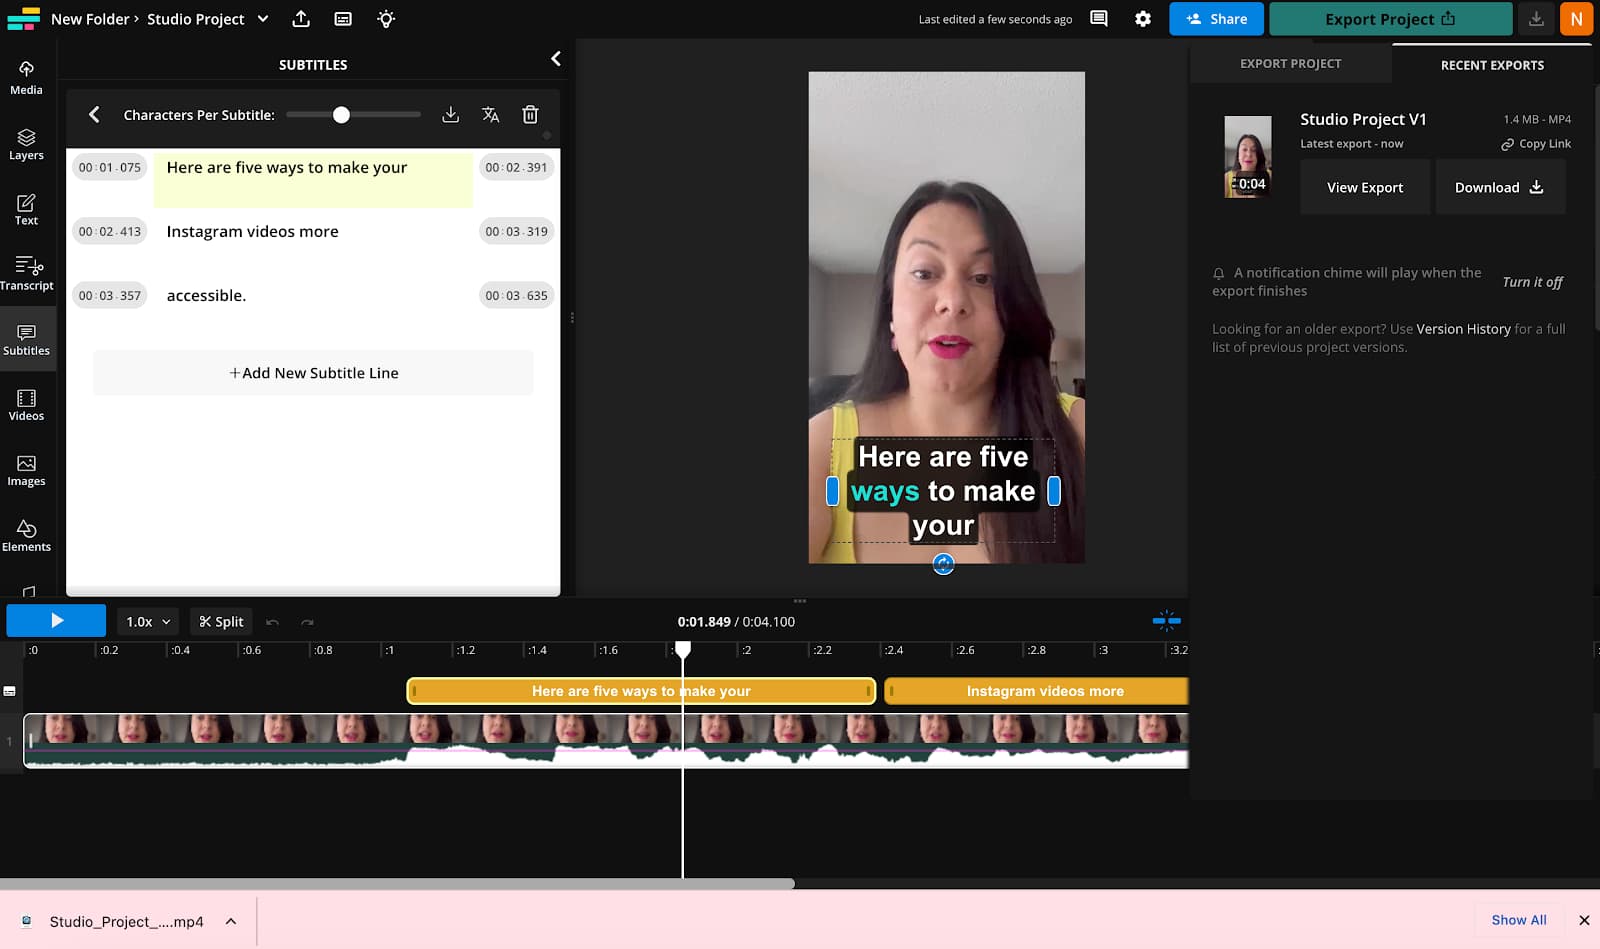
After a few moments, the subtitles for your video will appear.
You can scroll through the transcript on the left to edit your captions for any misinterpreted words if necessary.
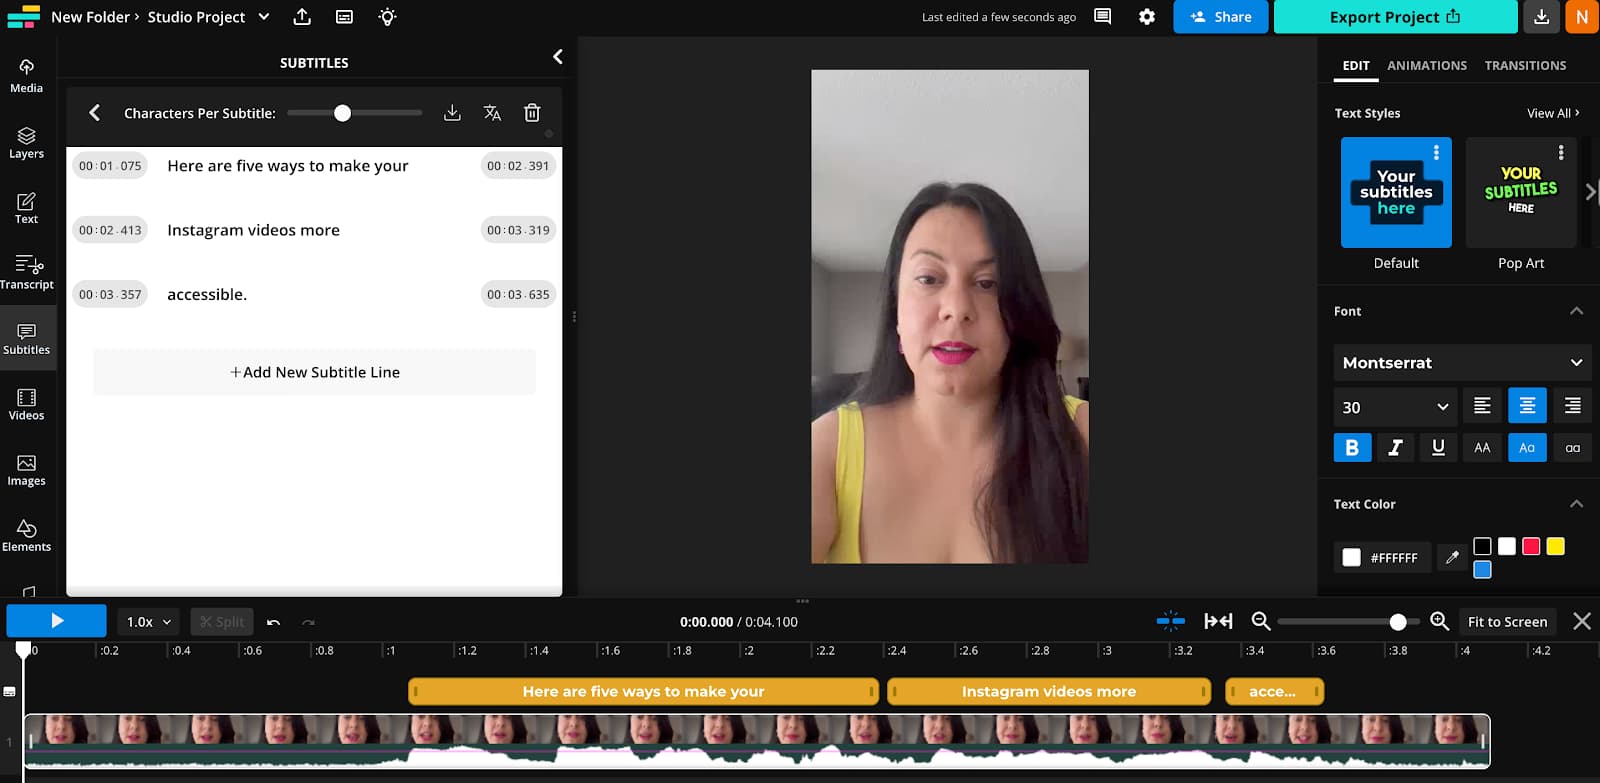
Plus, you'll now be able to modify the font size, type, alignment, color, and more on the right-hand side. Create your own custom configuration or choose from one of the presets, like Pop Art (aka, Alex Hormozi style captions), Typewriter, etc.
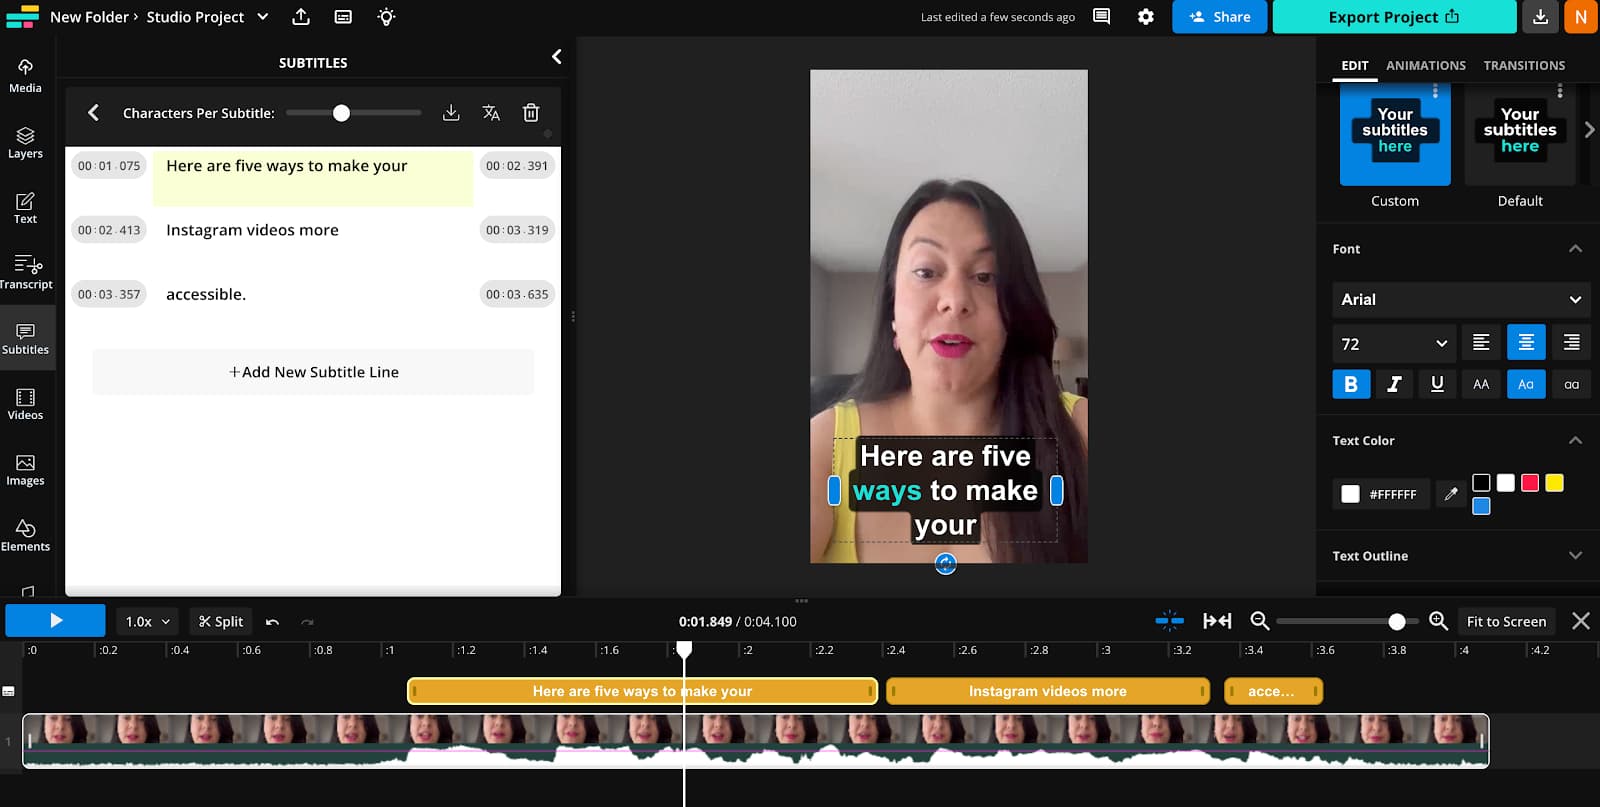
To see how your captions look, click the playback button. Kapwing’s Magic Subtitles uses AI transcription technology to get the timing of your captions just right and make sure they sync with the audio and video layers.
Step 4. Export and download
Once you’re happy with the edits you've made to your Instagram Reel, click the "Export Project" button in the top right corner.
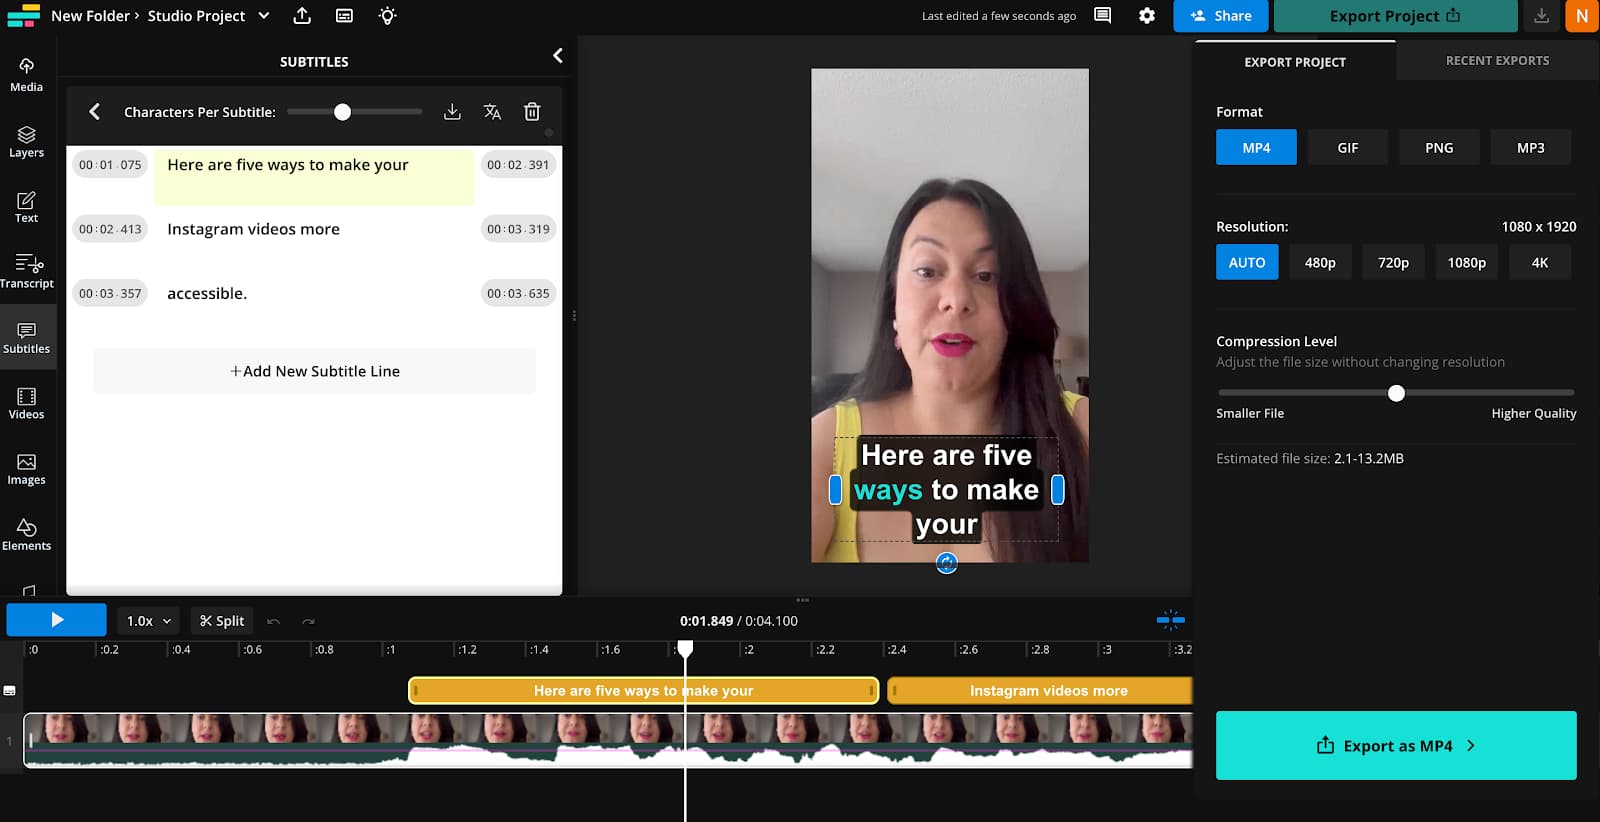
Choose your format (MP4) and resolution settings. You can always lower the resolution or compress the file if it's too large. Then, click "Export as MP4" and download your video file.
And that’s it!
If you're constantly thinking about Instagram Reels ideas to help you get more viewers and go viral, remember that tactics like adding captions can also be effective for boosting views, comments, and likes on your content. The more accessible your content is, the more people you can reach on Instagram.
So, if you plan to add subtitles to your Instagram Reel video, consider using Kapwing's video editor to create more content faster.
And if you're interested in learning some more tips about how to create accessible Instagram content, check out our article on how to add alt text on Instagram.
Reels Auto-Captions FAQs:
Can you add captions automatically on Instagram?
Yes, you can add captions automatically on Instagram. The main downside to using Instagram for adding captions is that you have limited style customization options and it can be difficult to edit the transcript for accuracy. Creating captions with a third-party tool allows you to customize and edit captions more easily to create a better user-experience on Instagram.
How do you put captions on a Reel?
You can put captions on a Reel in only a few clicks by selecting the Captions sticker icon under the Stickers section of your Instagram app while creating your Reel. You'll be able to drag your captions anywhere on the screen so people can read along to your video.
Why can't I put captions on my Reel?
There are various reasons why you might not be able to put captions on your Reel. For example, you might've included banned hashtags, exceed character limits, there's a technical issue on Instagram such as a bug, the caption isn't clear, or some other similar reason.
Why don't I have the caption option on Instagram?
There are two main reasons why you might not have the caption option on Instagram. The Instagram captioning feature should be available to most Instagram users, so if you can't access it, you may need to download the latest version of Instagram. If you’ve updated your app but still don't have the caption option available, it's possible the caption feature just hasn't launched in your country yet, although this shouldn't be the case for many users.
How do you add text to individual clips on Reels?
You can add text to individual clips on Reels by clicking the "Aa" icon at the top right corner of your Instagram Reel within the app. This is ideal for adding a few words to stand out. However, if you're looking to add captions to your Instagram Reel, you're better off going to the Stickers icon and selecting the Captions sticker.


