LinkedIn Video Size Guide: Aspect Ratios, Resolution, Length, and Best Practices
Make sure your LinkedIn videos stand out
LinkedIn video posts are a powerful way to boost engagement and ensure that key information is retained. In feeds starting to move as fast as Instagram and TikTok, videos stand out, encourage more interaction, and make it easier to explain complex ideas.
Since LinkedIn is built for business professionals, high-quality, well-optimized content is more important than on other social channels. A polished video not only enhances your credibility but also increases the likelihood of your content being shared and reaching a wider audience.
To achieve the best results, it’s important to understand factors like aspect ratios, file formats, resolution, and best practices for captions and thumbnails. Optimizing these elements ensures your videos look professional, load quickly, and display correctly on all devices.
In this article, we’ll walk through everything you need to know to create LinkedIn video posts that stand out, perform well, and effectively communicate your message.
Table of Contents
- LinkedIn Video Size Guide
- Best Practices for Posting Videos on LinkedIn
- How to Create a Professional Video For LinkedIn
LinkedIn Video Size Guide
Video uploads on LinkedIn must meet specific requirements related to file size, length, and format. While the platform supports various aspect ratios, certain ratios perform better and are more likely to capture attention.
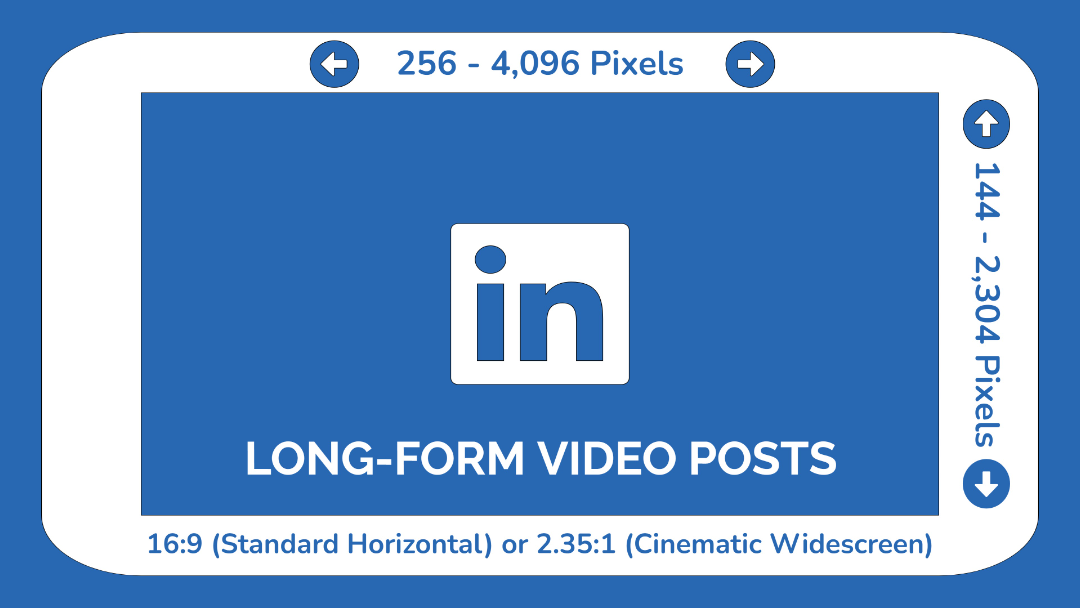
Long-Form Video Posts
Long-form videos are ideal for detailed updates, in-depth tutorials, and product showcases. Use the following specifications for the best results:
- Aspect Ratios: 16:9 (standard horizontal) or 2.35:1 (cinematic widescreen)
- Resolution: Minimum 256 x 144 pixels, Maximum 4096 x 2304 pixels
- File Size: 75 KB to 5 GB
- Video Length: 3 seconds to 10 minutes
- File Format: MP4 or MOV (recommended, with other formats also supported)
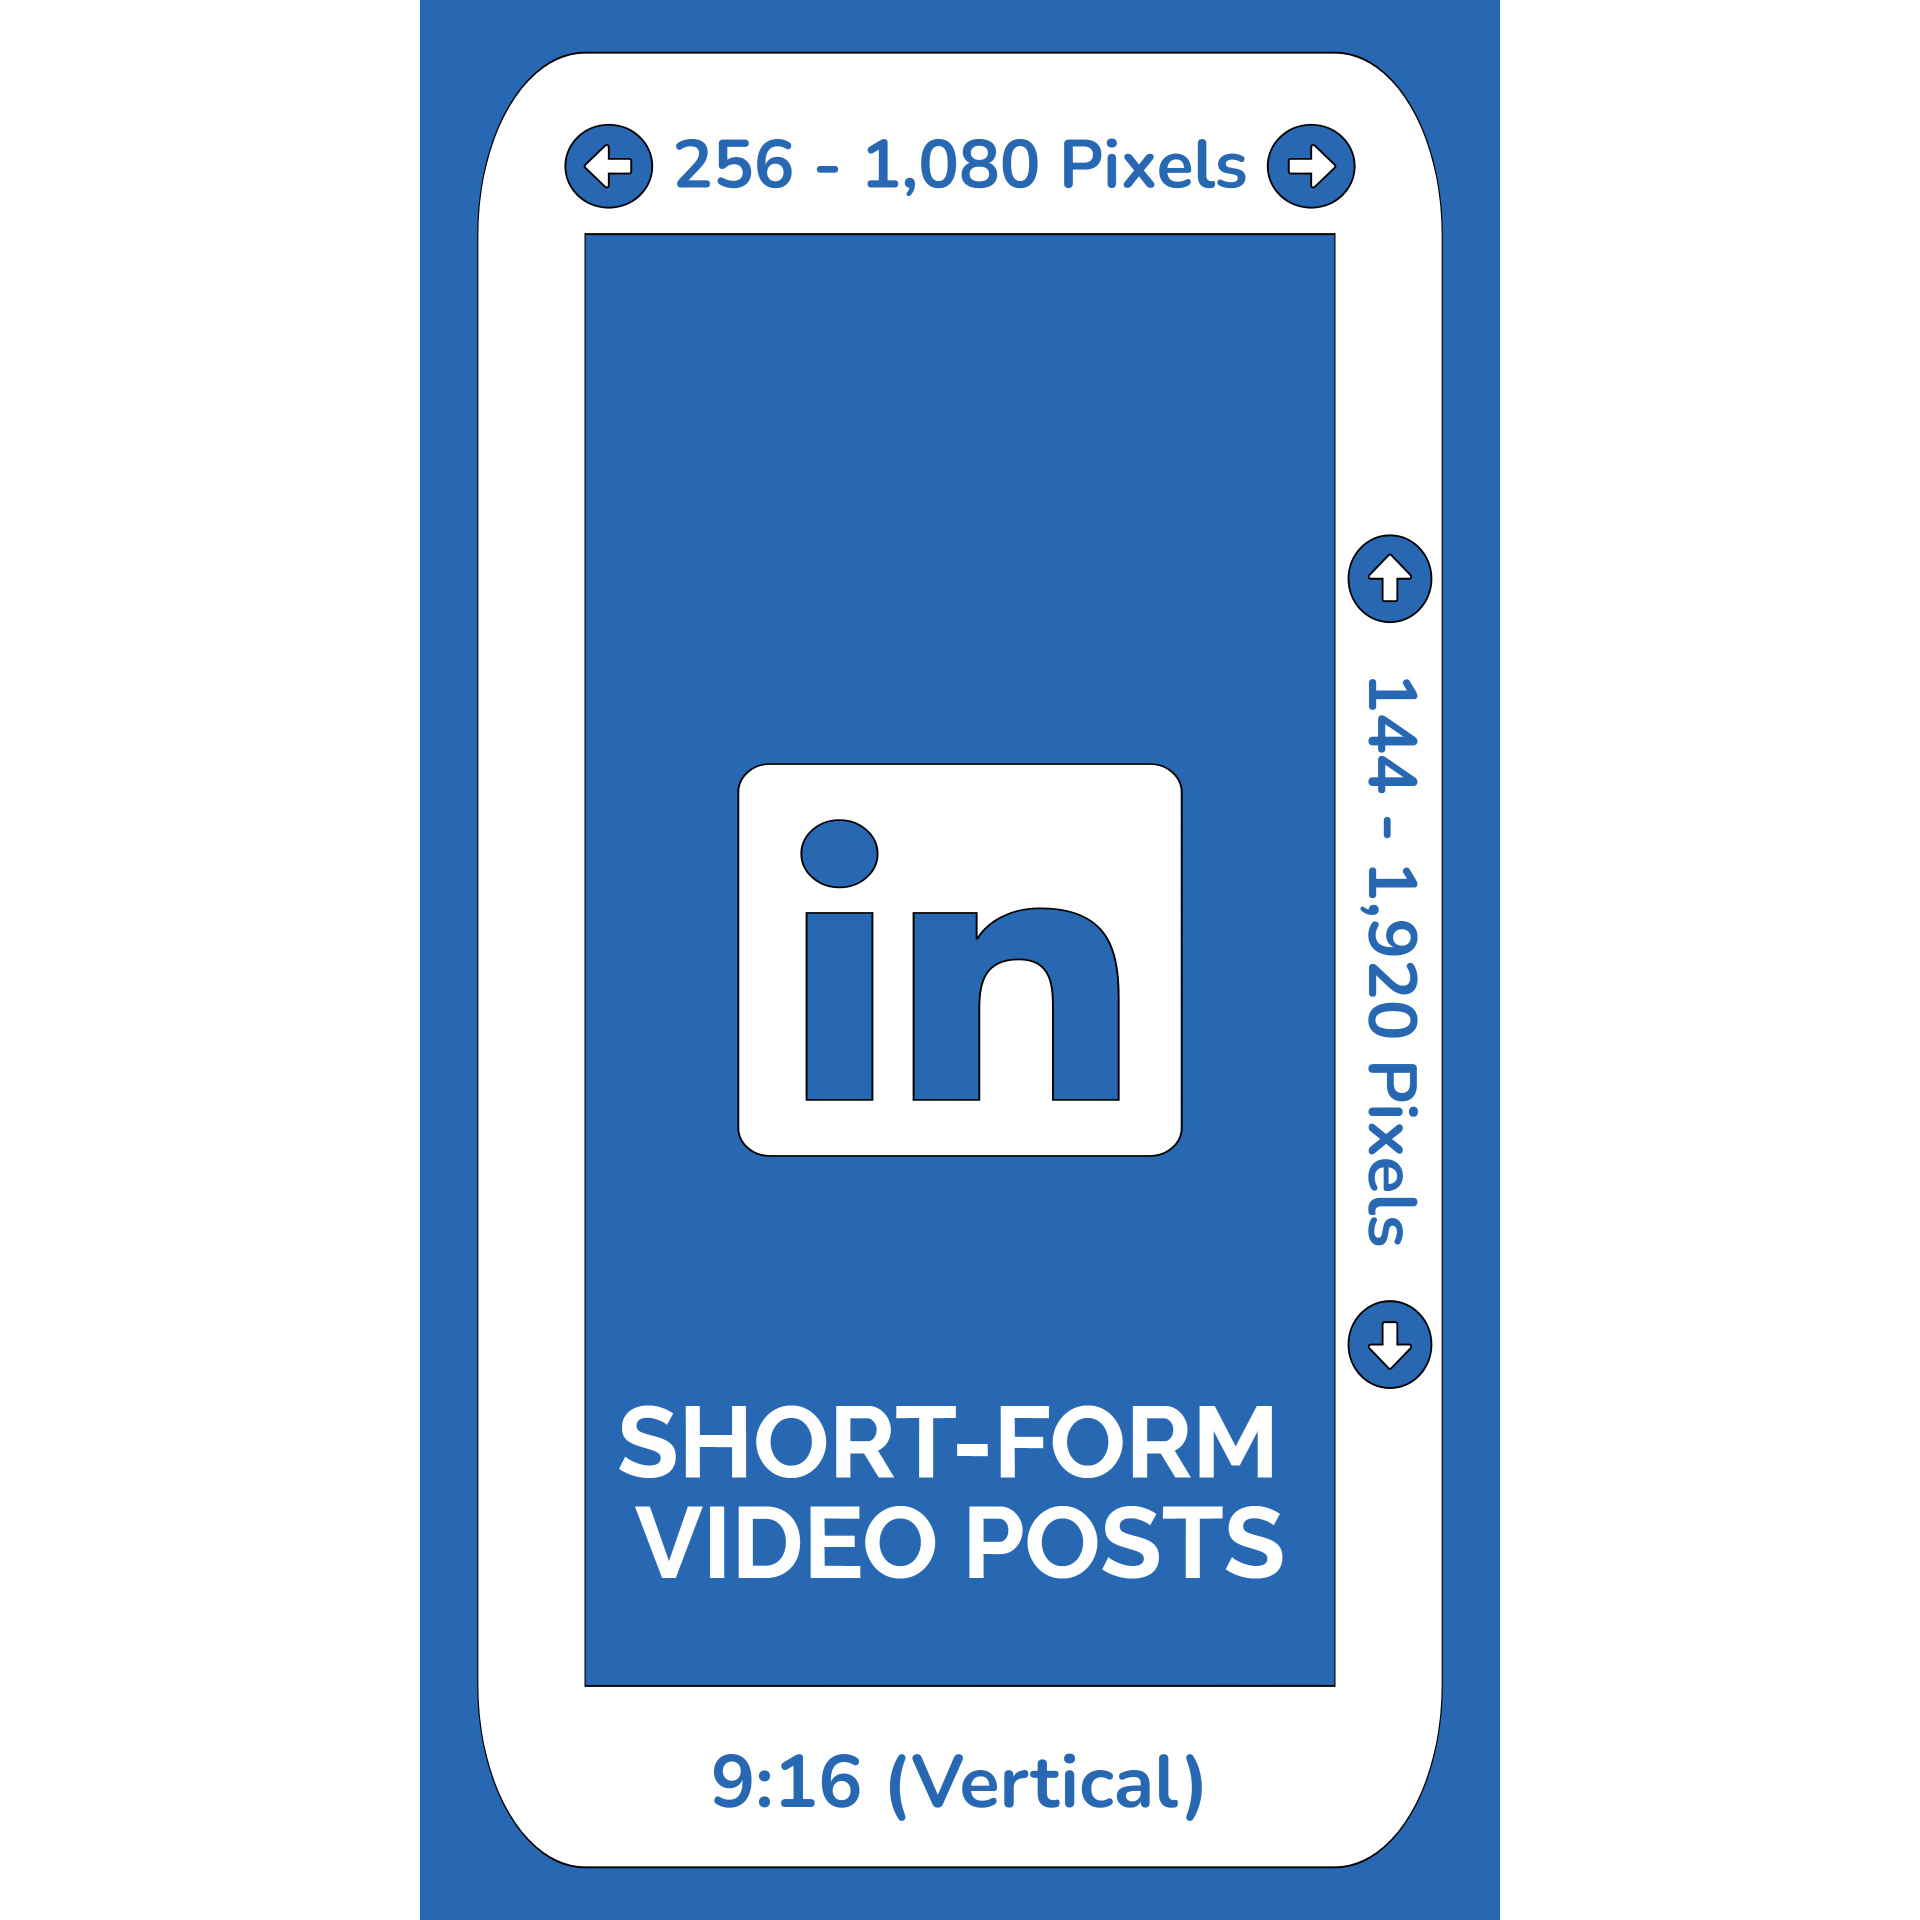
Short-Form Video Posts (Vertical Videos)
Short-form vertical videos are great for building brand awareness, generating buzz around a product, or giving an inside look at your company. Use these specifications to ensure your videos are optimized for LinkedIn:
- Aspect Ratio: 9:16 (vertical)
- Resolution: Minimum 256 x 144 pixels, Maximum 1080 x 1920 pixels
- File Size: 75 KB to 5 GB
- Video Length: 30 to 90 seconds for best engagement
- File Format: MP4 or MOV
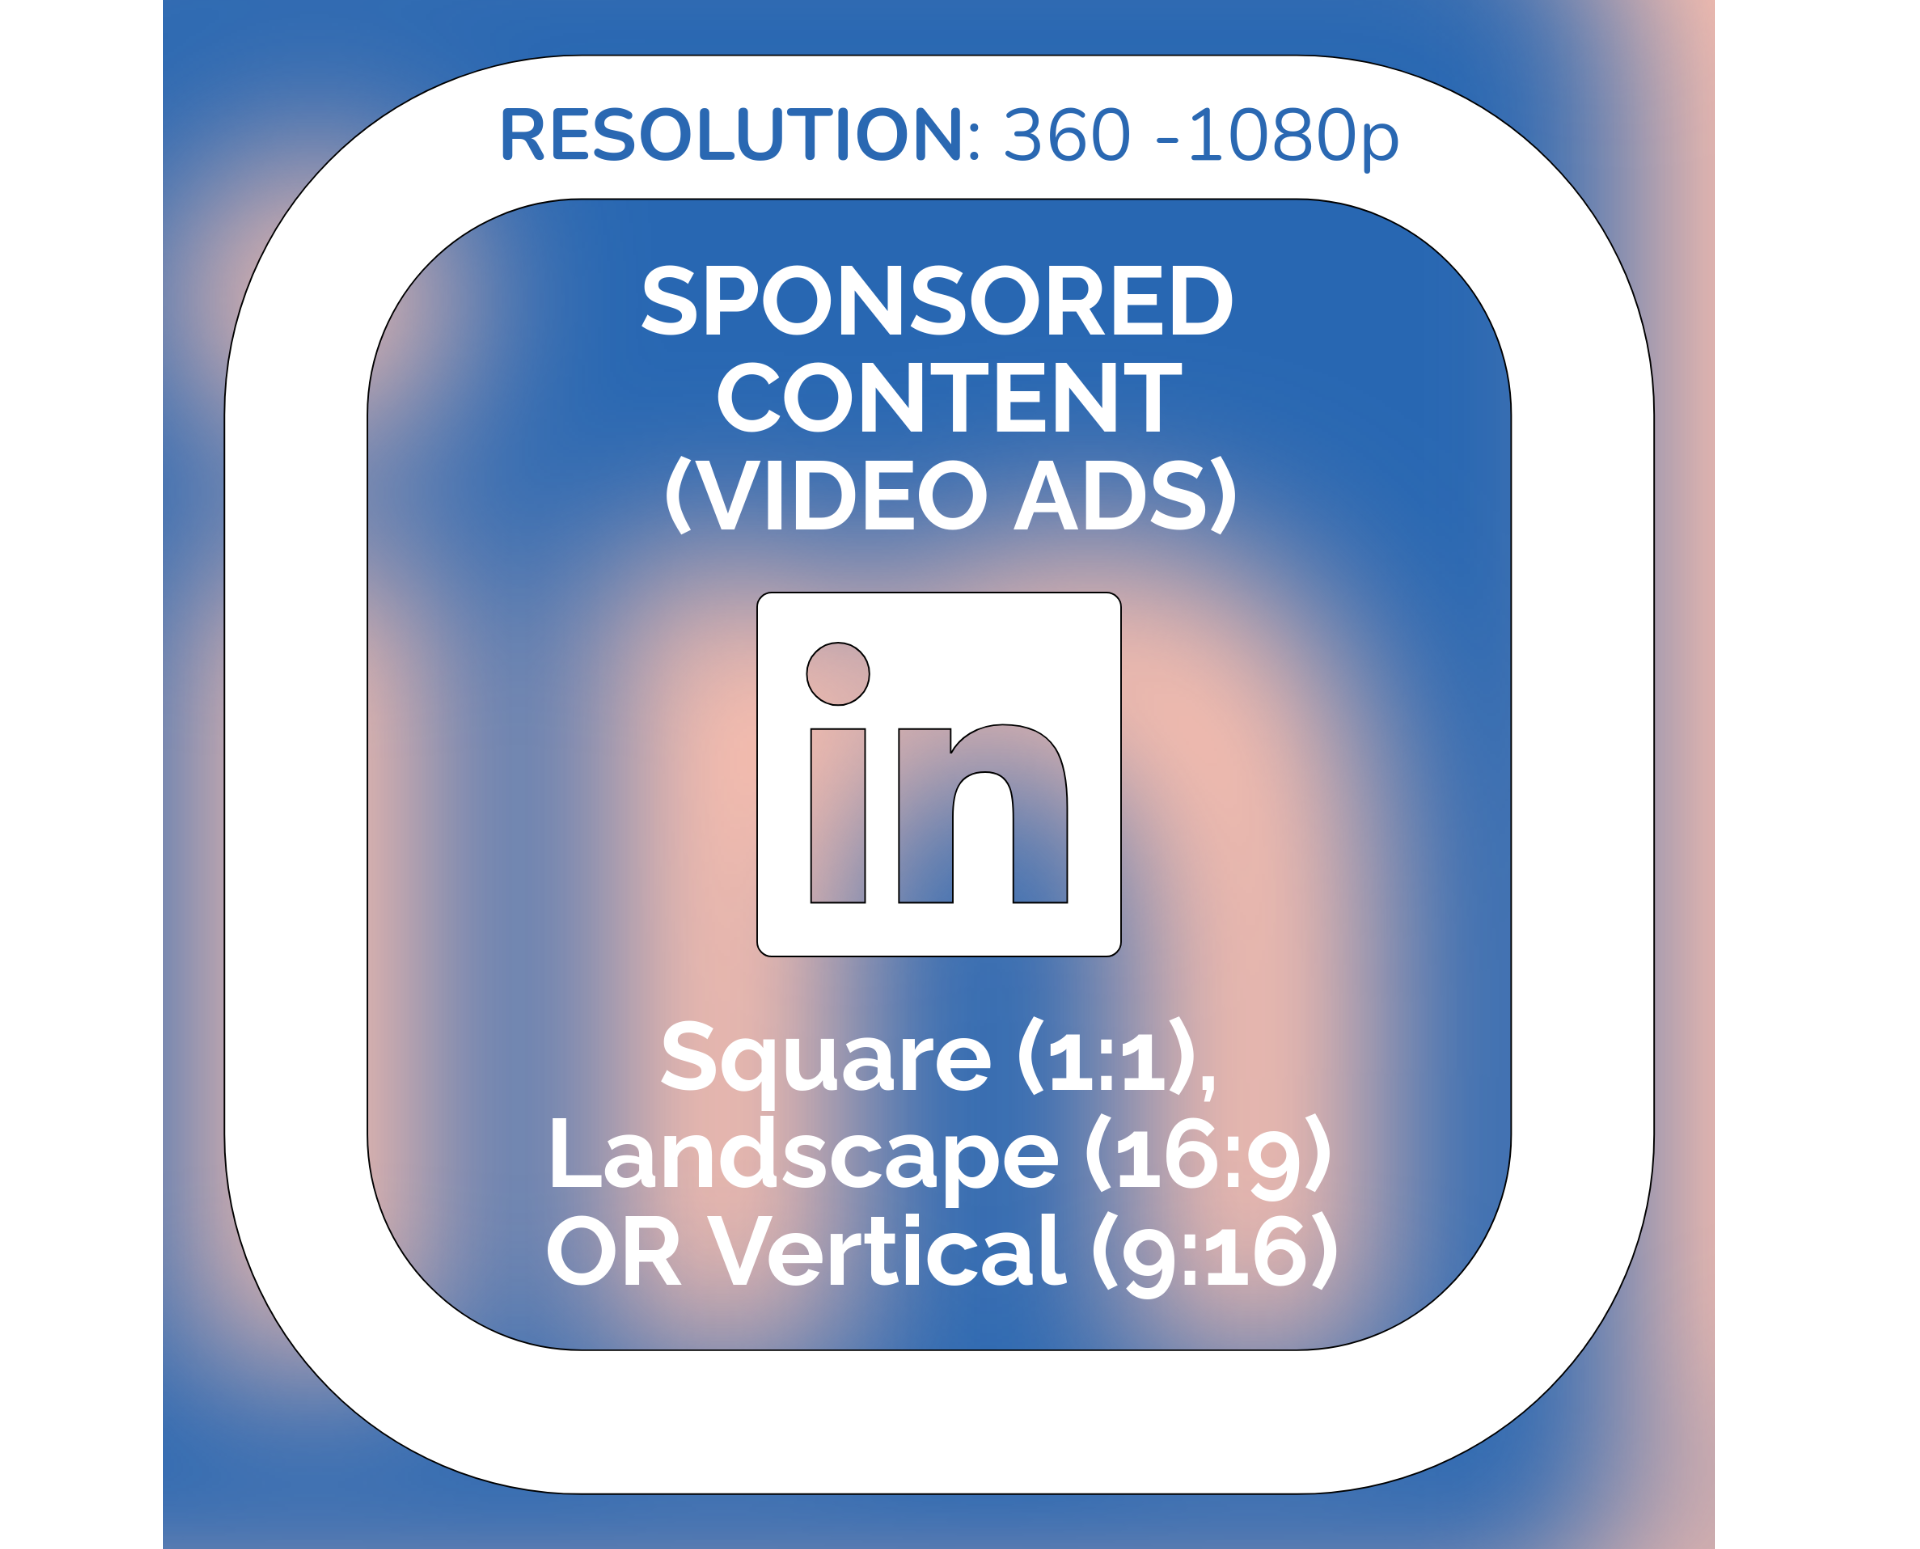
Sponsored Content (Video Ads)
LinkedIn video ads appear in different locations, including the post feed, video feed, or a combination of both. The best aspect ratio and length depend on the ad's content and target audience.
For highly targeted ads, a long-form approach works best, presenting factual information concisely. For broader audiences, shorter videos are more effective. Capture attention quickly with a strong hook in the first 8 seconds and include a clear call-to-action, such as clicking a link or visiting a specific page.
To upload a video ad on LinkedIn, follow these guidelines:
- Aspect Ratios: Landscape (16:9), Square (1:1), Vertical (9:16)
- Resolution: Minimum 360p, Maximum 1080p
- File Size: Up to 200 MB
- Video Length: 3 seconds to 30 minutes
- File Format: MP4
Pro Tip: Videos shorter than 30 seconds will automatically loop until they reach 30 seconds in total duration.
Best Practices for Posting Videos on LinkedIn
To maximize engagement on LinkedIn, follow these key strategies when posting videos:
1. Choose the Right Aspect Ratio
LinkedIn supports a wide range of aspect ratios and resolutions, but selecting the correct one can significantly impact engagement. Before creating a video, define your goal and target audience.
For in-depth product demos, releases, or tutorials, a horizontal (16:9) aspect ratio works best. However, keep in mind that mobile users account for 60% of LinkedIn traffic, and horizontal videos are less optimized for mobile viewing.
For short-form videos such as behind-the-scenes content, quick promotions, or brief updates, use a vertical (9:16) aspect ratio for better display on mobile devices.
Optimizing your videos for mobile improves the viewing experience and aligns with LinkedIn’s vertical video feature. While horizontal videos may be tempting, only 13% of mobile users rotate their phones to watch them, so it's best to format content for the majority who don’t.
2. Add Professional Video Captions
LinkedIn offers automatic captions, but the tool lacks customization options for font, color, and outlines.
To enhance accessibility and professionalism, consider generating automatic captions using a free online captioning tool and uploading an SRT file to integrate closed captions into your video.
3. Keep it Concise
Viewer retention continues to decline in 2025, so your content should be concise and relevant to respect your audience’s time. To boost engagement and create a more authentic connection, include a clear call to action such as:
"Click the link in the description now to see how our tools can help you."
Our in-depth article studying the best time to post on LinkedIn may also come in handy.
How to Create a Professional Video For LinkedIn
LinkedIn’s built-in video tools are limited, offering only a few basic editing options:
- Video trimming: Cut content from the beginning or end of your video.
- Add a headline: Overlay a text headline in a few different styles.
- Add closed captions: Enable automatic captioning or upload an SRT file on desktop.
Given these limitations, here’s how to use a free online video editor to resize your videos, add professional subtitles, and create a video from scratch using LinkedIn templates.
Resizing LinkedIn Videos
Kapwing allows you to quickly resize any video using 15+ size presets or custom dimensions.
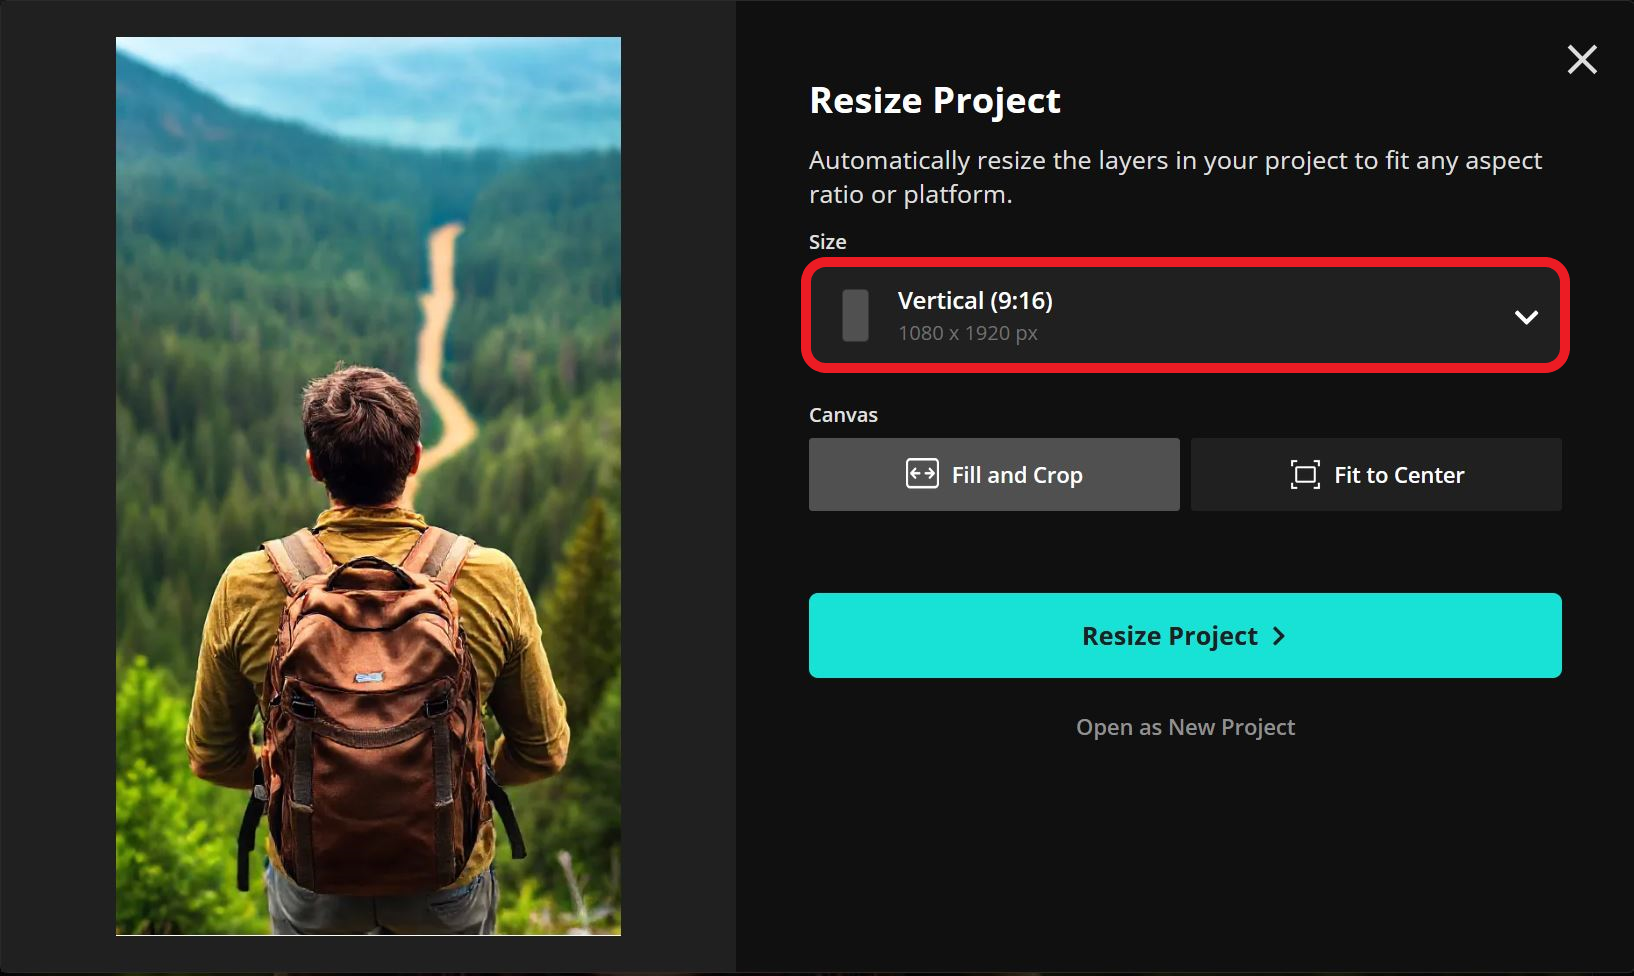
To start, upload your video to the editor. Then, select the background of your project and find the Resize Project tool on the right-hand side.
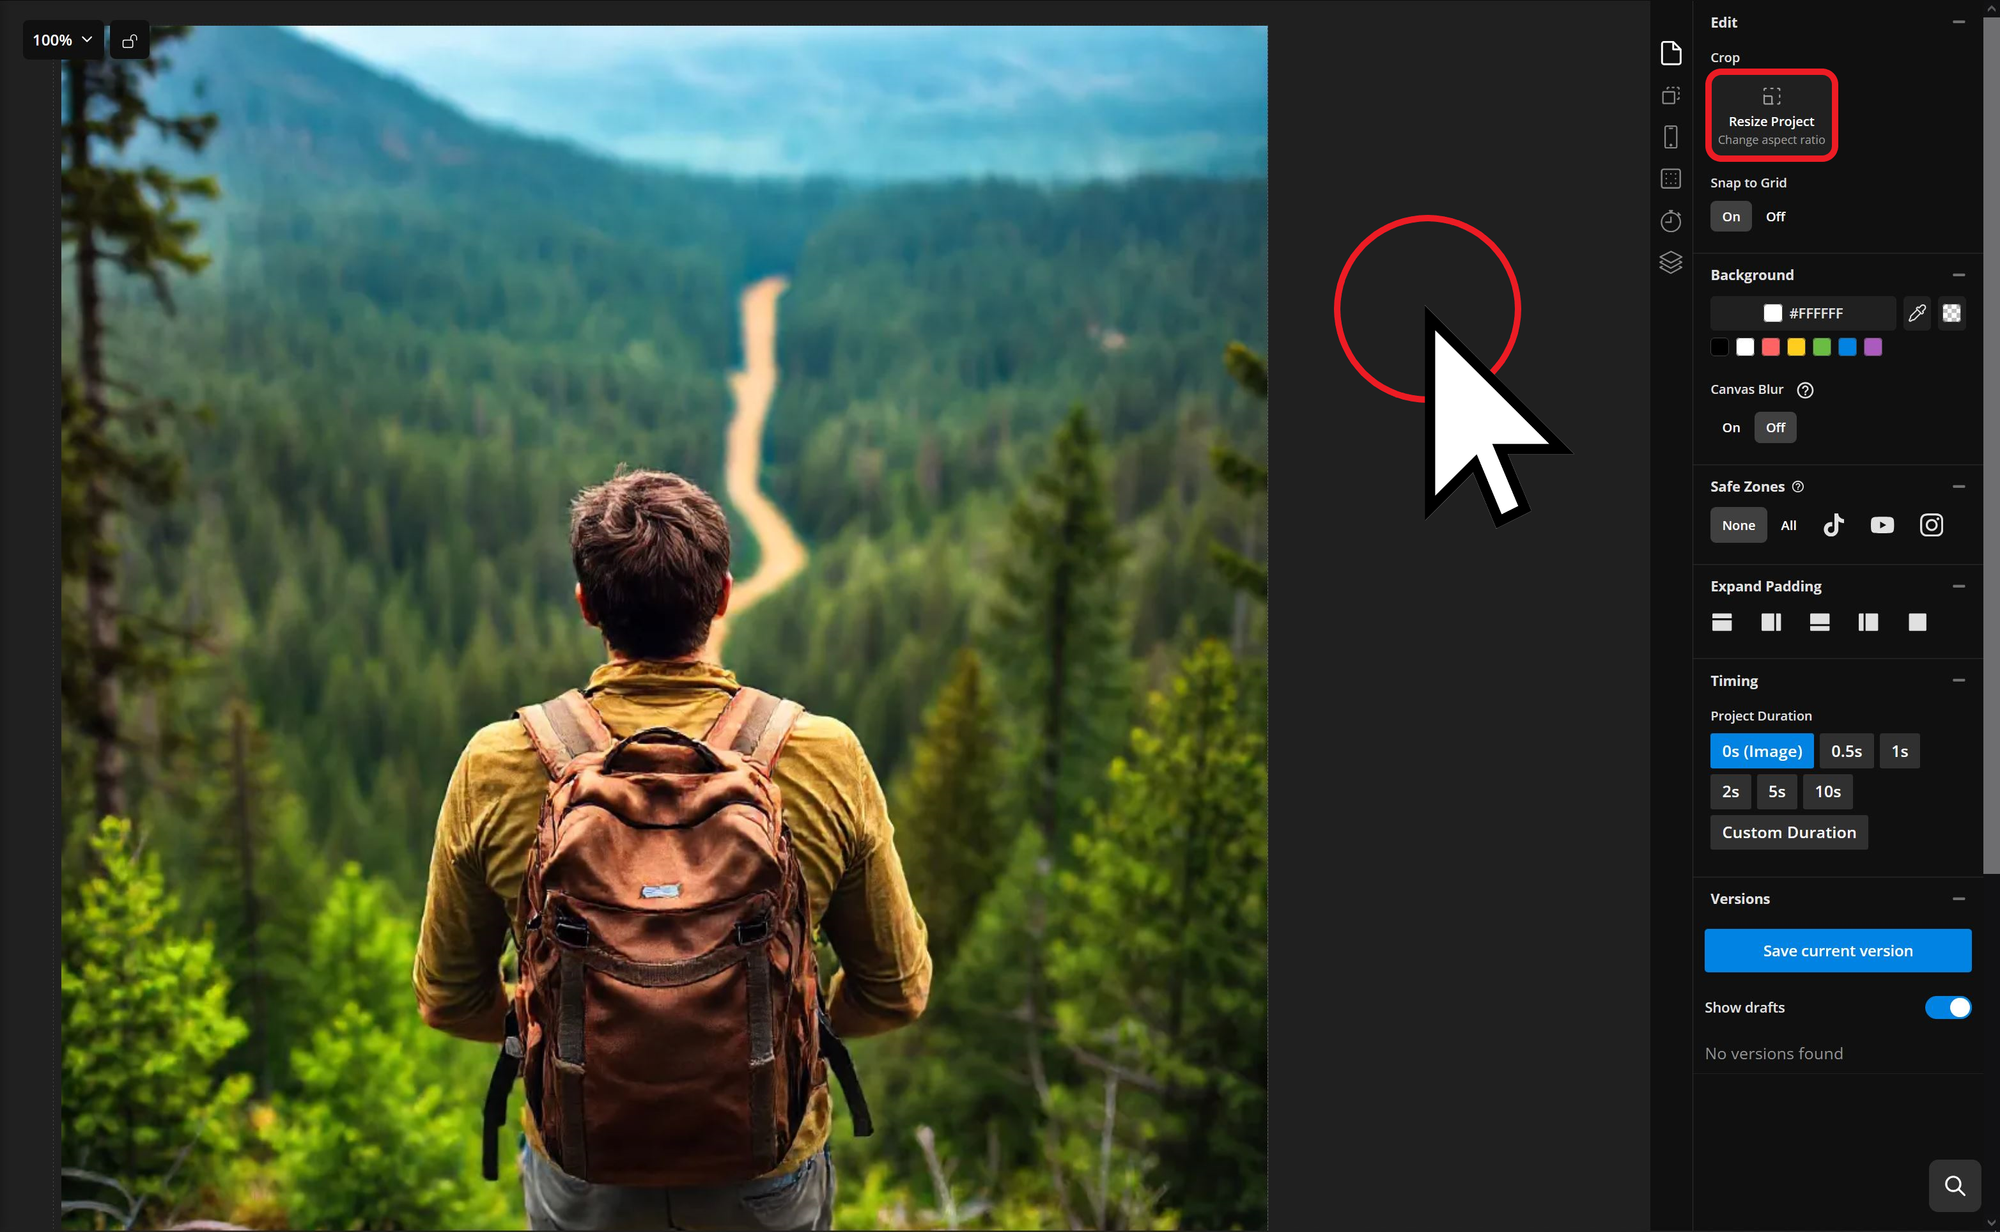
Then, from the preset options or enter custom dimensions in the dropdown menu labeled "size".
Resizing is useful not only for optimizing video content but also for creating perfectly sized LinkedIn banner images, profile pictures, and other social media assets. While you don’t need to memorize every social media aspect ratio, here are some key ones to keep in mind:
- Horizontal videos – 16:9
- Vertical videos – 9:16
- Vertical images – 4:5
- Profile images – 1:1
- Banner images – 3:1
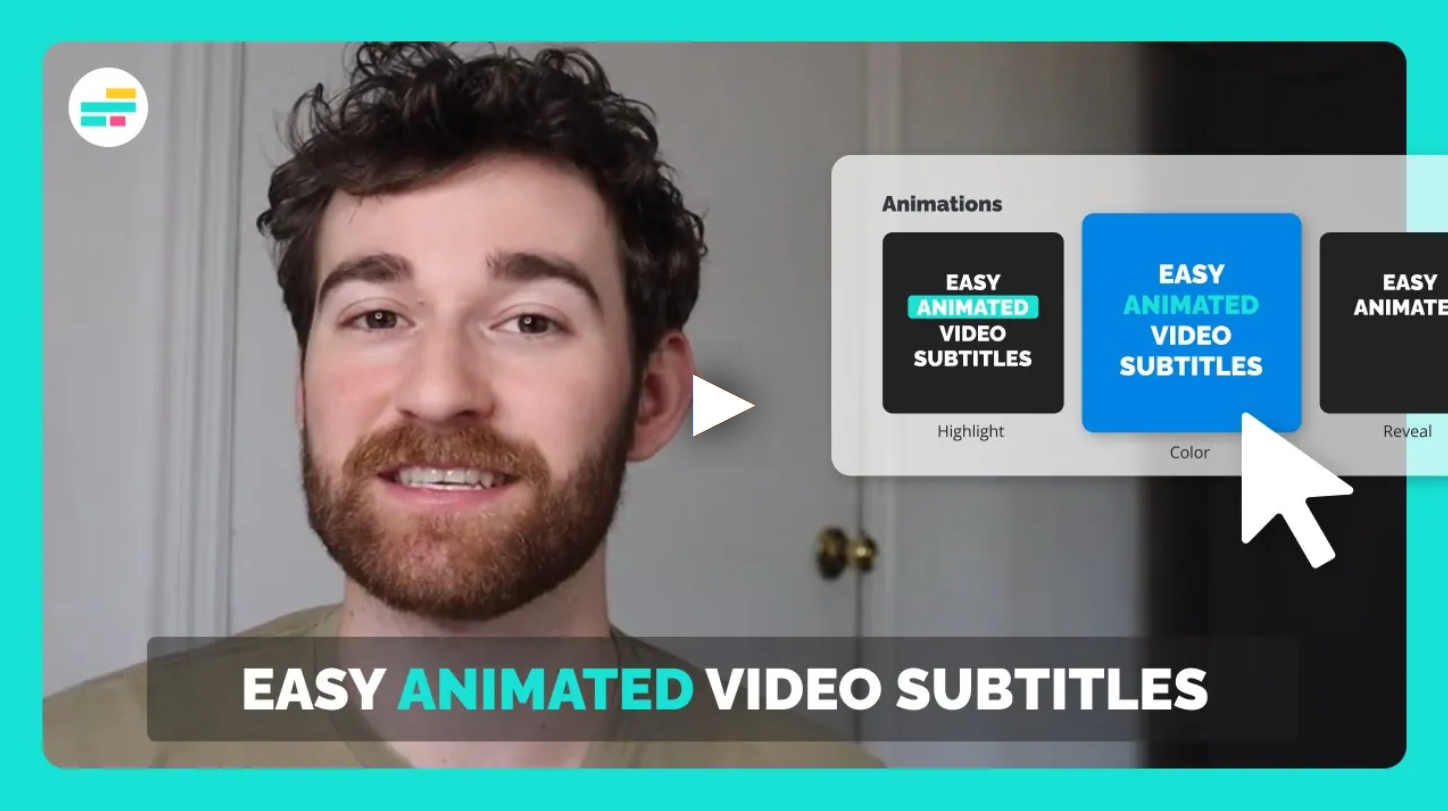
Adding Automatic Subtitles and Creating an SRT File
With LinkedIn's limited captioning options, adding closed or open captions to your video can improve accessibility and engagement. The difference between these two is:
- Closed captions: Can be enabled or disabled by the viewer. LinkedIn allows users to attach an SRT file to automatically embed closed captions when uploading a video on the desktop platform.
- Open captions: Permanently displayed on the video and cannot be toggled on or off. These allow greater customization, including text, color, and effects options.
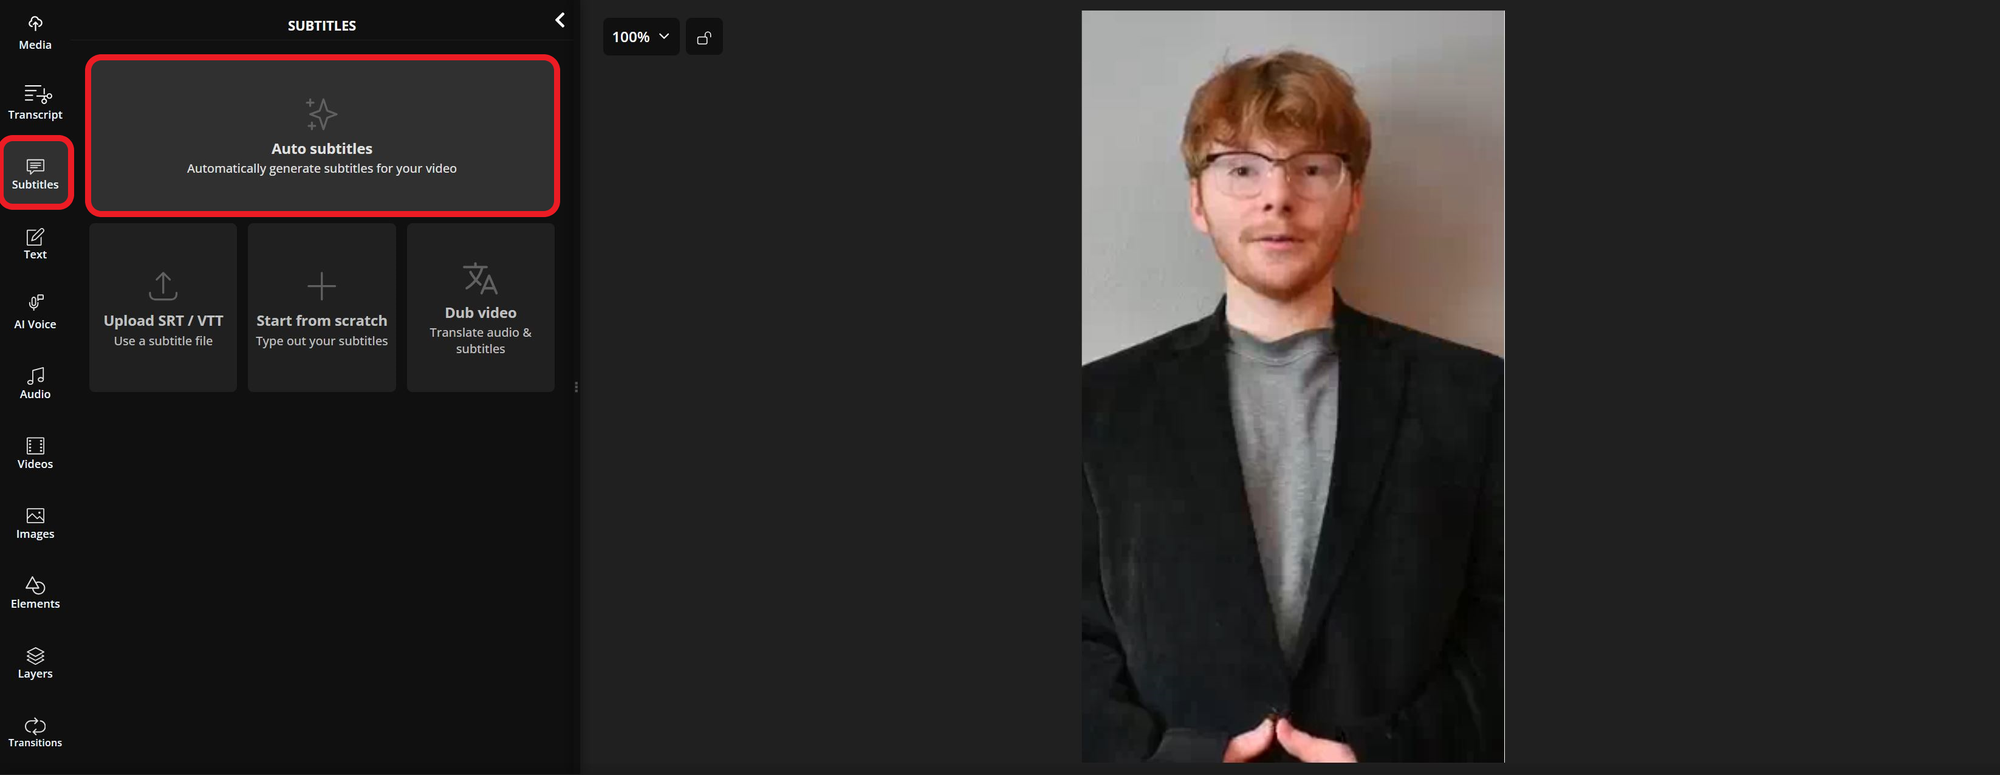
To add automatic captions to your next video, upload it to the Automatic Subtitle Generator. Open the Subtitles tool in the left-hand sidebar and select Auto Subtitles to generate captions.
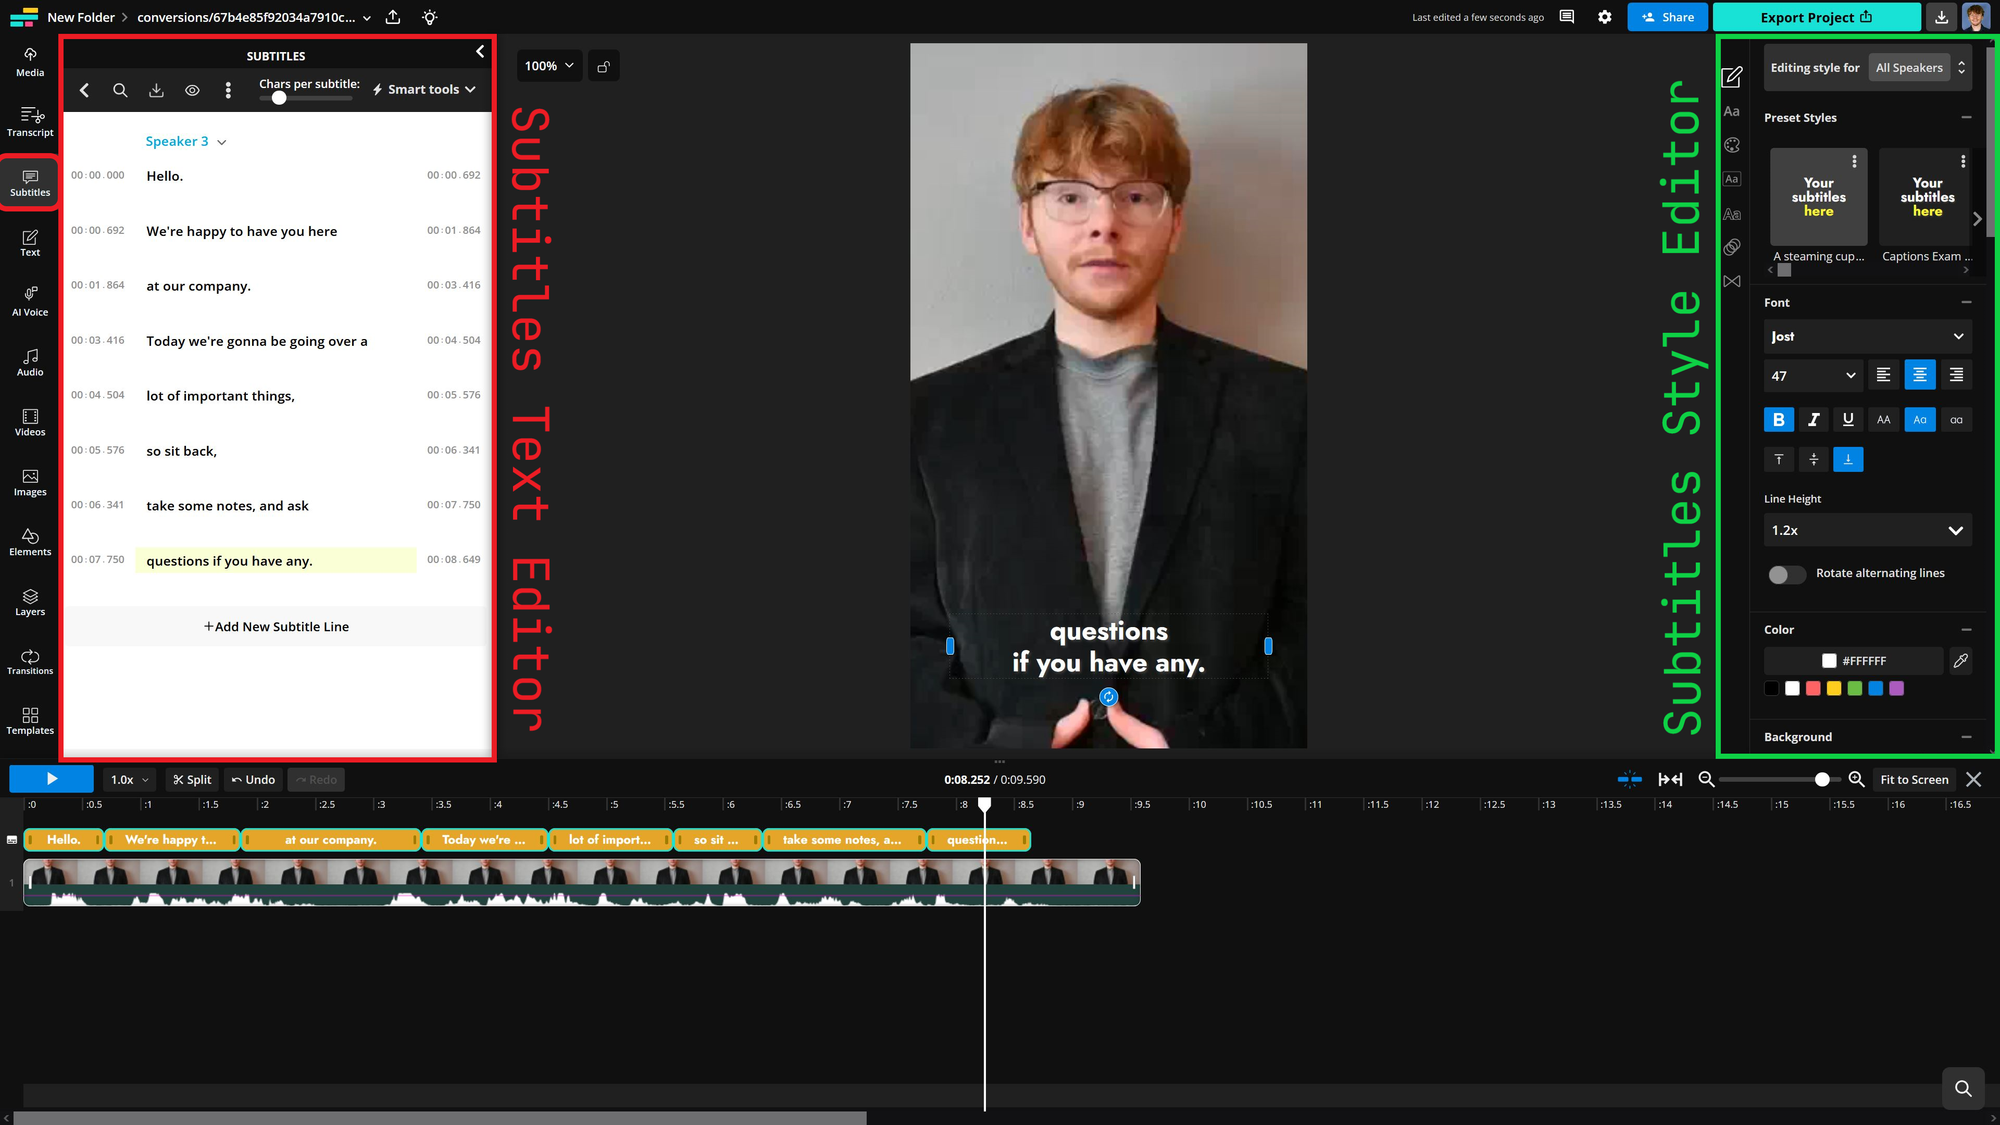
Kapwing’s auto-captioning tool will detect different speakers and separate captions accordingly.
Once generated, captions will be automatically added to your video and aligned with the spoken content in the timeline.
To edit captions, use the subtitle editor in the left-hand panel or select them directly in the timeline. To customize the style, use the editing tools on the right-hand side to adjust the font, color, outline, transitions, and other effects.
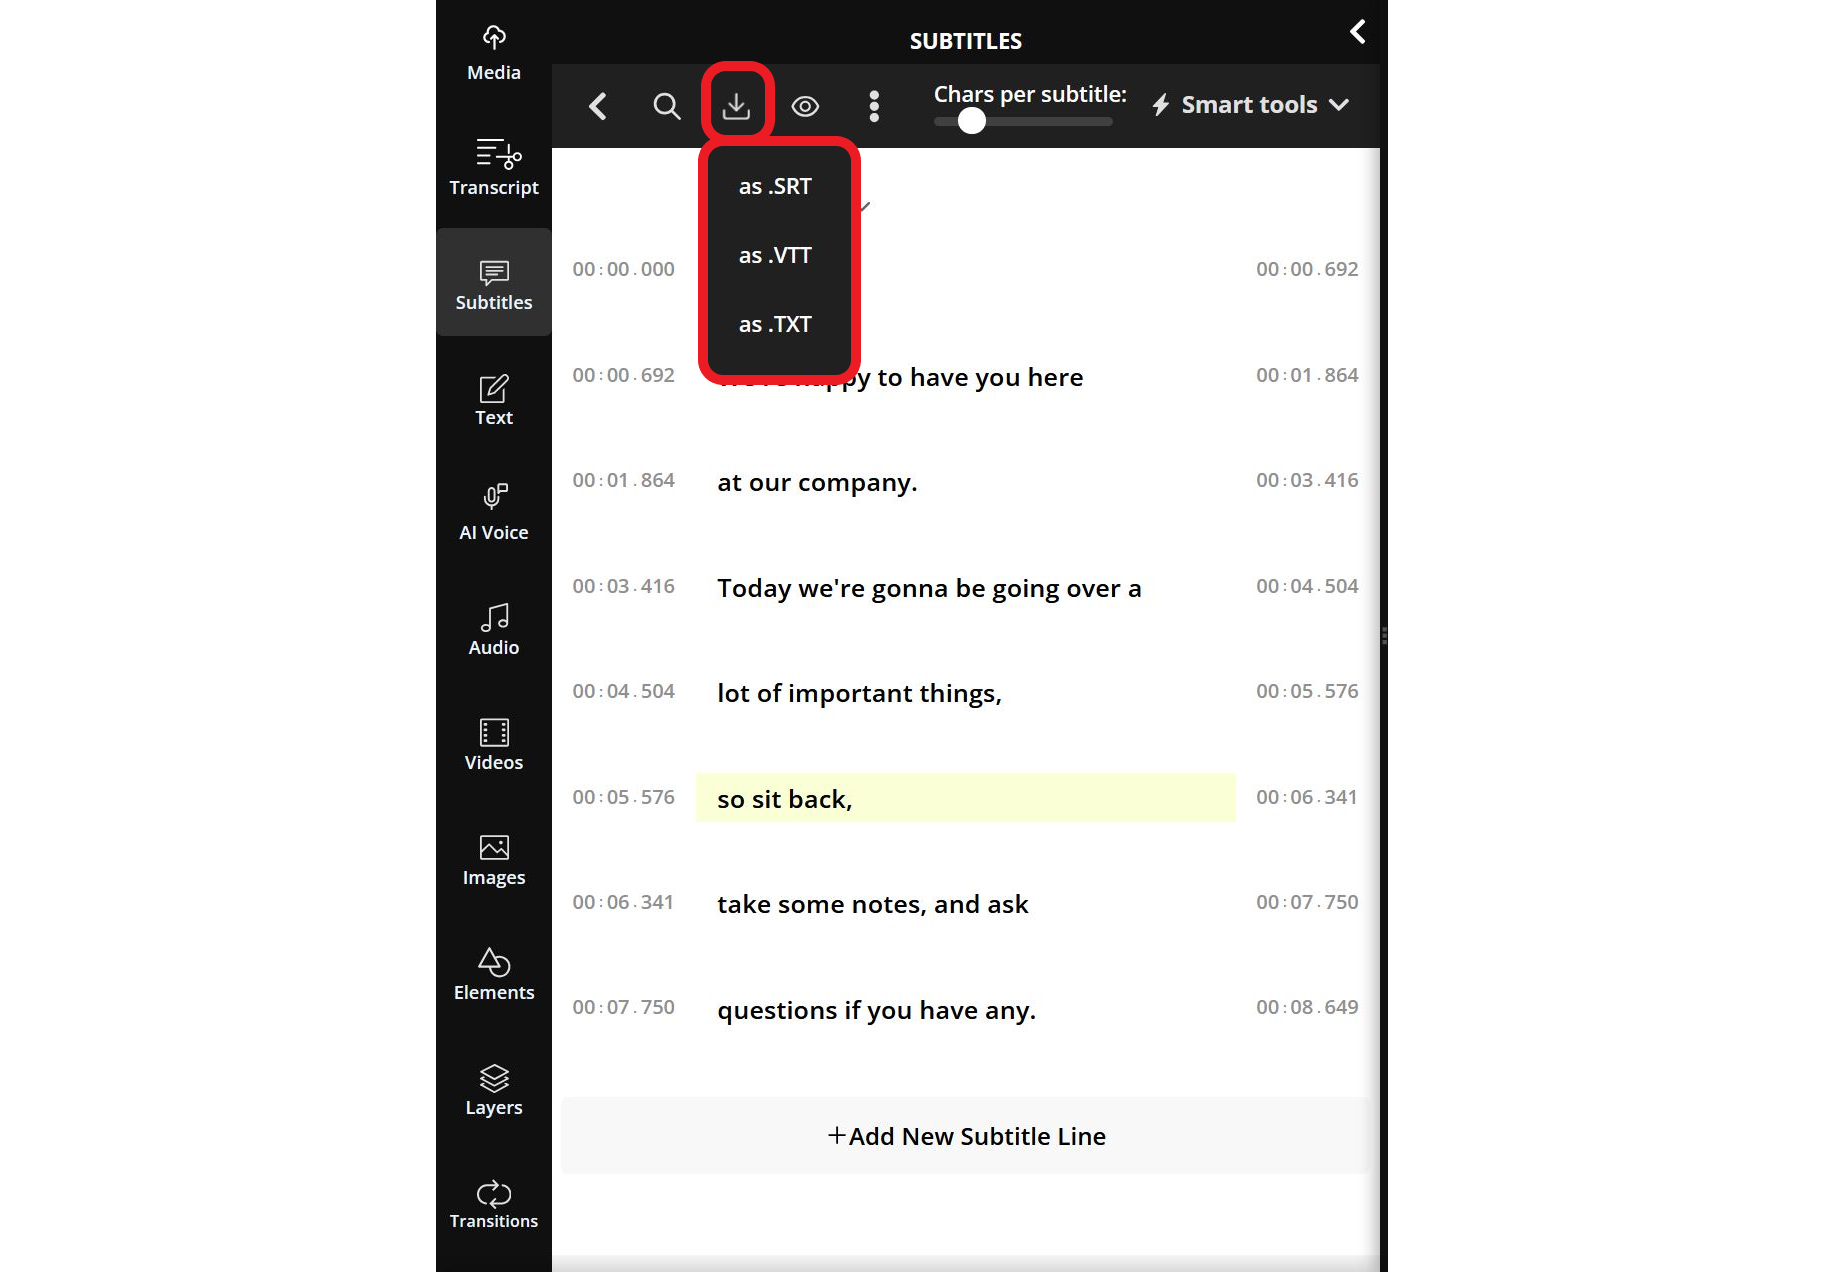
If you don’t want captions permanently overlaid on your video, creating an SRT file is the best option. This ensures accurate captions with precise timing, avoiding reliance on LinkedIn’s auto-captioning. To download an SRT file using Kapwing, open the Subtitles menu, click the download icon, and select SRT file format (or VTT/TXT if needed).
Creating a LinkedIn Video From a Professional Template
While product releases and major company updates require extensive resources, smaller projects like short-form updates and promotions can be created easily using free templates. The Kapwing template library offers hundreds of professional templates for any use case, whether you’re creating a new social media profile, building a quick product advertisement, or capitalizing on a trending meme to gain attention for your brand.
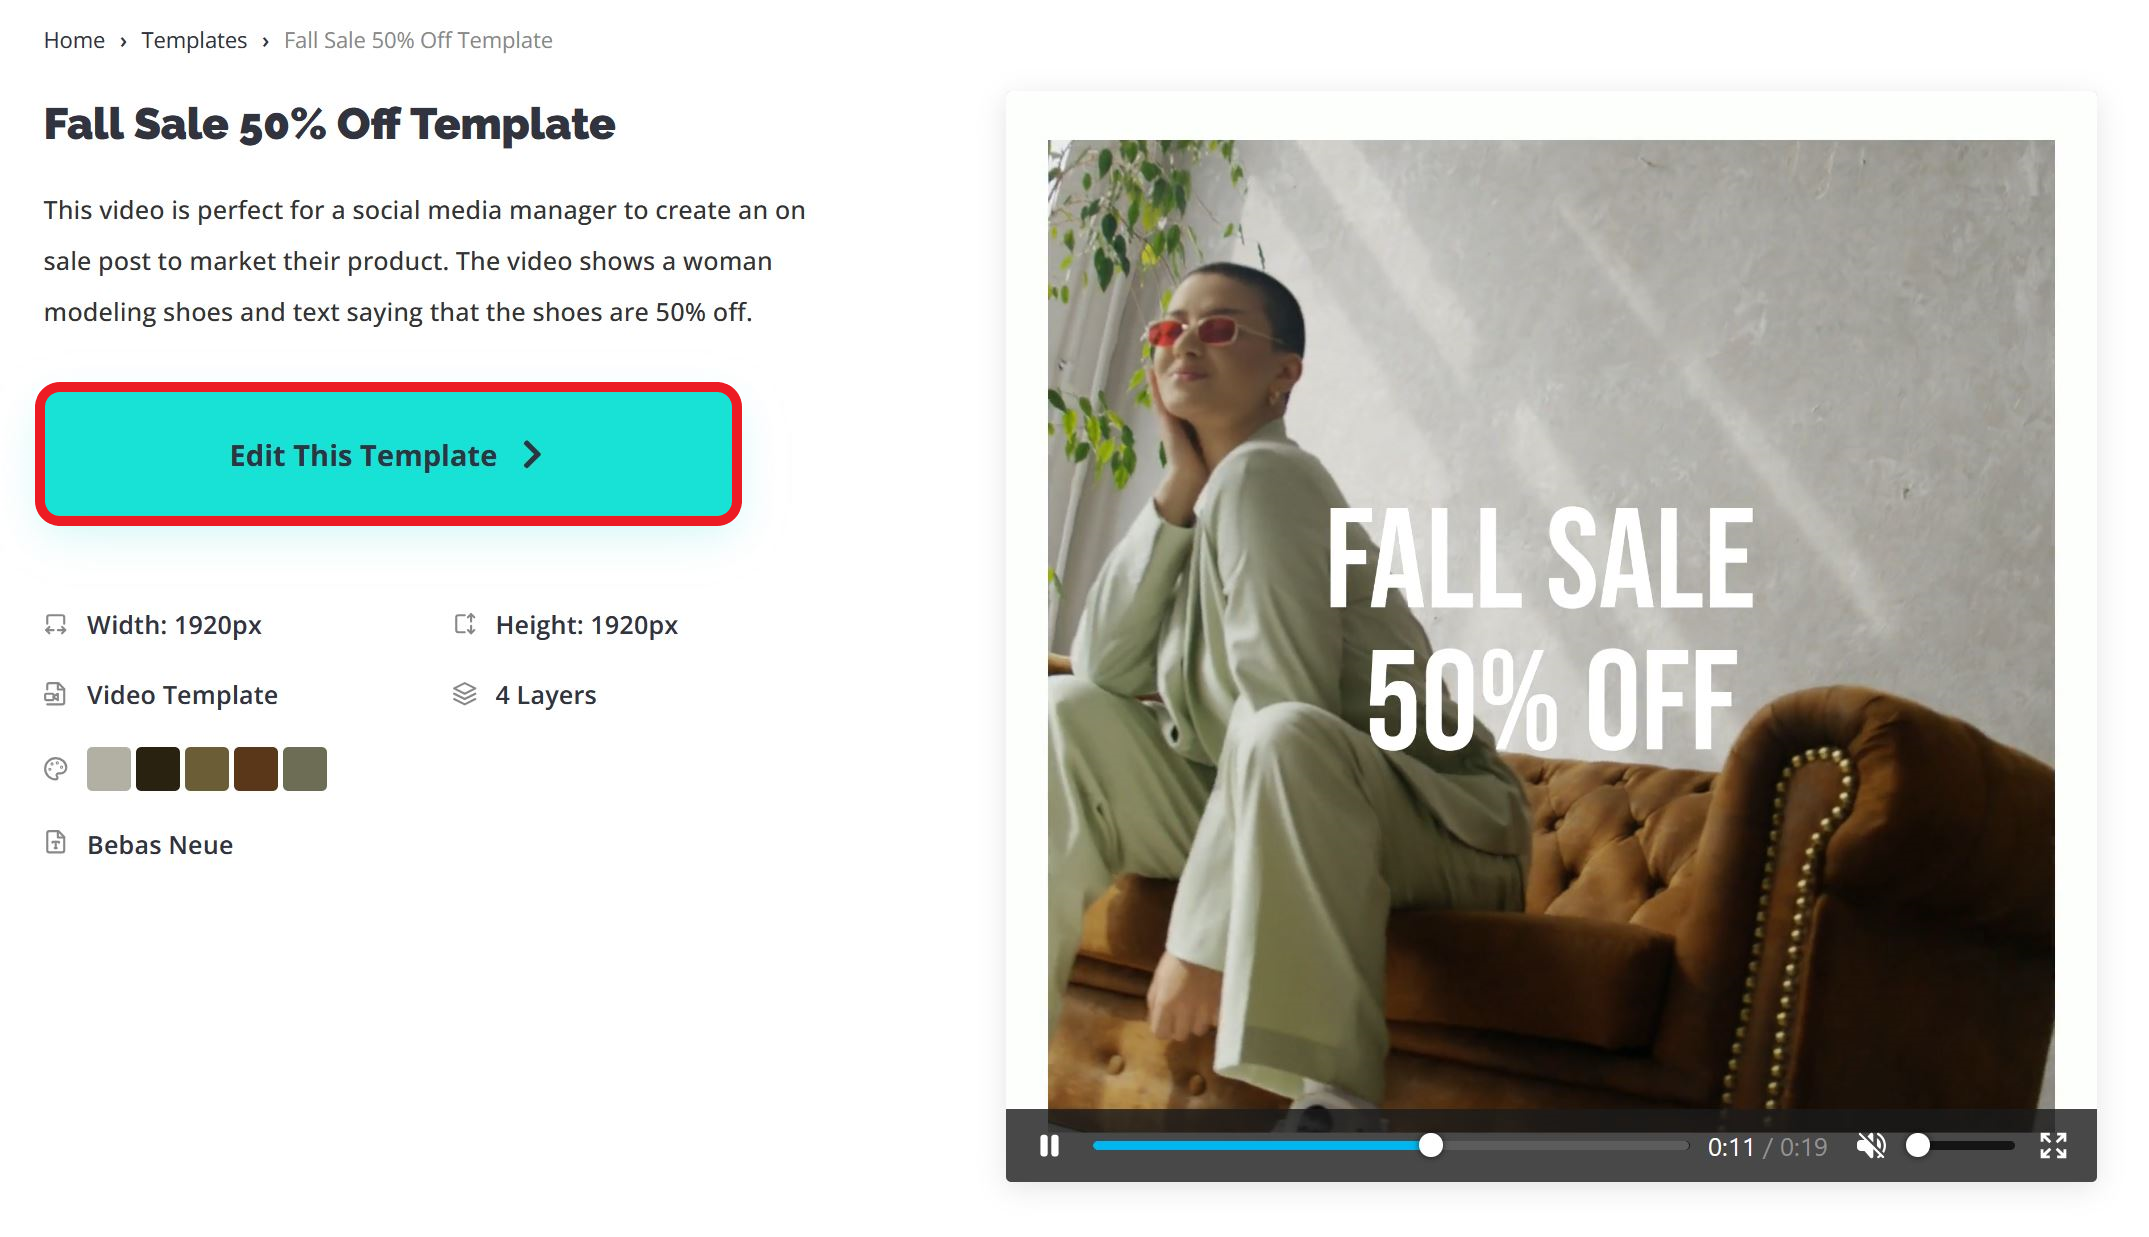
To use a template in your next project, browse the template library and select one that fits your needs. Click Edit This Template to open it in the editor.
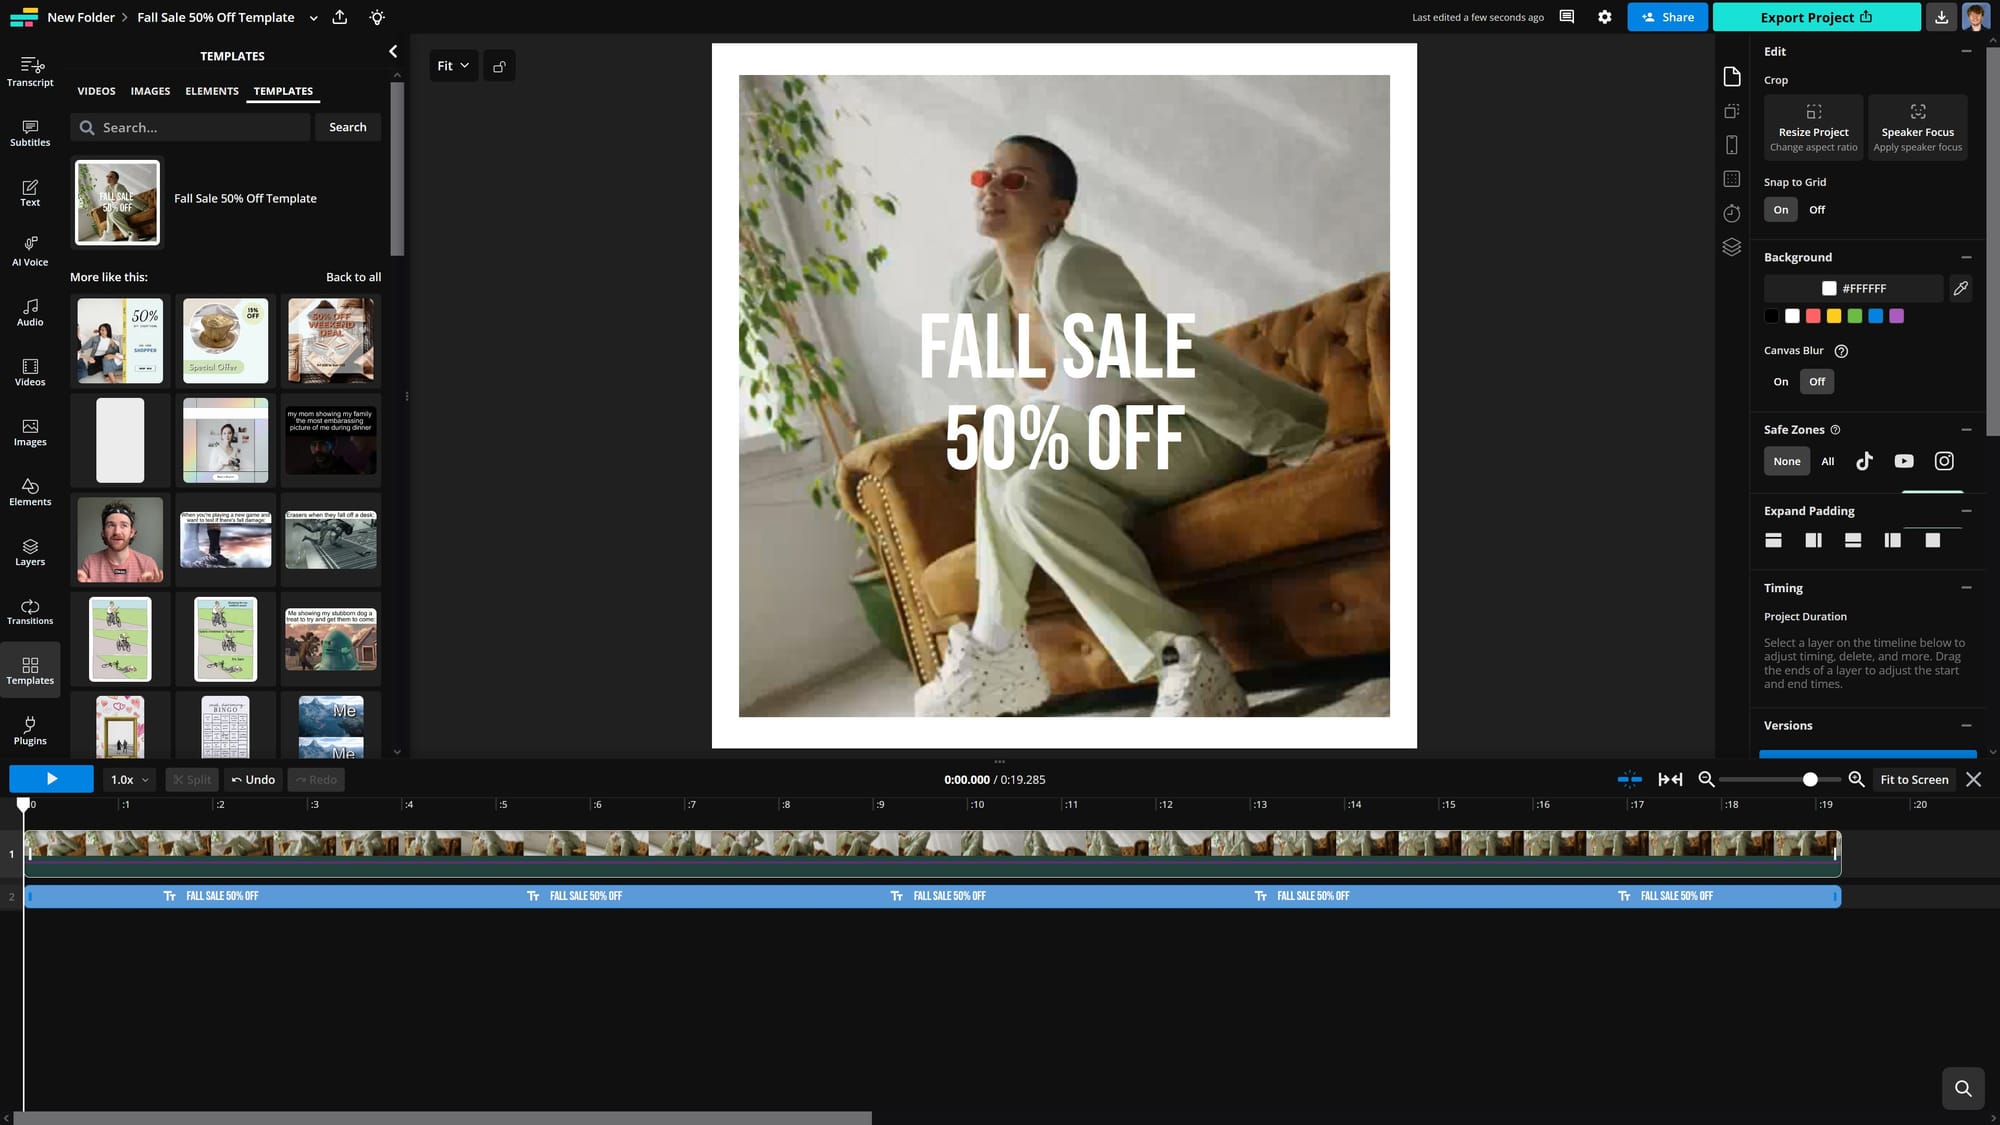
This will automatically open the template in the editor, allowing you to begin customizing it to fit your brand. Select any elements to edit by simply clicking on them.
To import more media like graphics, a company logo, or additional images/videos, open the Media menu in the sidebar. To swap out your template, use the Templates menu in the sidebar to browse similar options without having to return to the template library.
Using these strategies, you can create professional LinkedIn videos that reflect your brand or personal style while maximizing engagement.


