Substack Video Guide: Monetization, How to Post, and Aspect Ratios
82% of the top 250 highest-revenue creators use audio and video

As social media platforms compete for user attention, Substack has carved out a unique space as an independent publishing platform, offering an algorithm-free experience for writers and creators. While traditionally known for its newsletter model, Substack continues to evolve, most recently introducing video tools for mobile creators in 2025.
Substack stands out with its peer-to-peer subscription model, allowing users to pay creators directly for access to their content. Unlike ad-based platforms, Substack prioritizes direct monetization, giving creators the majority of their subscription revenue instead of taking a large cut.
This approach not only promotes high-quality content but also encourages creators to actively grow their audience and subscriber base. Whether you're building a niche community, launching a media business, or using Substack as a content hub, the platform provides a straightforward way to earn money — especially with its new video tools.
In this article, we’ll walk through how to post videos on Substack, covering technical details like recommended aspect ratios for media uploads, as well as strategies for monetization and maximizing your earnings.
"82% of the top 250 highest-revenue creators use audio and video" — Substack
Table of Contents
- How to Make Money on Substack
- How to Post Videos on Substack (Mobile)
- Substack Desktop Video Tools
- Substack Aspect Ratios and Video Size Guide
- How to Delete Video Posts on Substack
- Adding Video Captions and Creating an SRT File
How to Make Money on Substack
Monetizing content on Substack is different from traditional social media platforms. Rather than earning money through ad revenue or engagement-based payouts, all monetization happens through paid subscriptions. Creators can establish a paywall on their profile, offering exclusive content to subscribers who opt into a paid plan. There are no standalone monetization options for individual posts or videos — everything is tied to the creator’s overall subscription model.
While Substack has traditionally been known for written content, the platform has expanded its focus on video, recognizing its role in boosting engagement. Video and audio content can be integrated into posts just like text, and creators who use multimedia often see faster audience growth and higher revenue.
Substack reports that creators who include video or audio in their posts earn revenue 2.5 times faster than those who rely solely on text. Although video itself does not have a separate monetization structure, its ability to enhance engagement makes it a powerful tool for attracting and retaining paying subscribers.
In the future, Substack is introducing a preview feature that lets free subscribers watch teasers before deciding to pay while also enhancing its editing tools and analytics to help creators boost engagement and earnings.
Creating Your First Substack Publication
To start making money on Substack, you’ll need to start by creating a publication. Open the Settings menu, scroll down to the Publications section, and select Create a Publication.

Substack will guide you through a quick setup process, including selecting your profile interests and importing any existing subscriber email lists. Once your publication is set up, you'll be prompted to enable payments by connecting your account to Stripe, Substack’s payment processor.

After linking your bank account, go to the Payments page in your Substack settings to configure your monetization options. You can set three types of subscription pricing:
- Monthly Subscription – Subscribers pay month-to-month for access to your content.
- Annual Subscription – Subscribers pay for a full year upfront, often at a discounted rate to encourage long-term support.
- Founding Subscription – A higher-priced option for subscribers who want to provide extra support. Founding members receive the same content as regular paid subscribers but contribute at a premium rate.
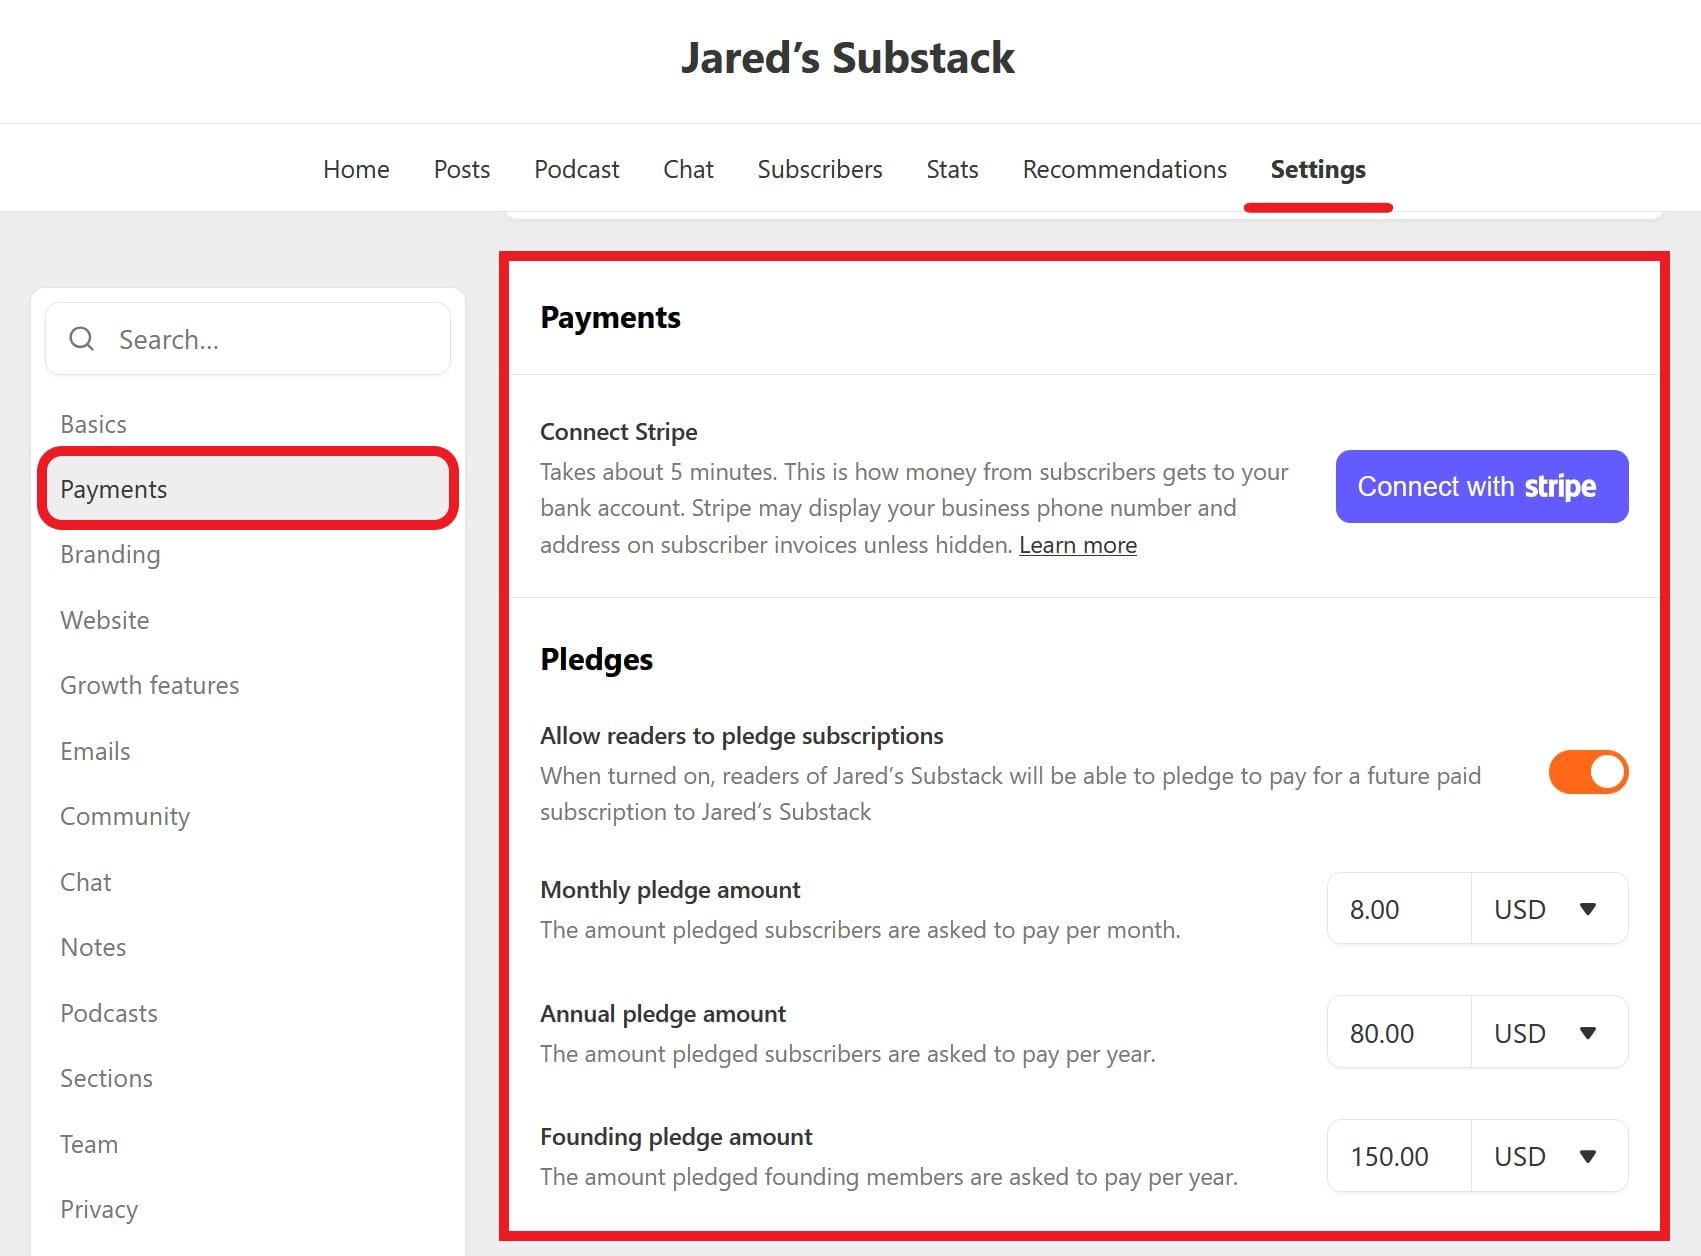
Substack requires a minimum subscription price of $5 per month and allows a maximum of $99,999,999 per month (though it will be very difficult to find subscribers at that price point). For most creators, keeping the subscription cost closer to the $5 range increases the likelihood of building a strong paying audience. Most Substack publications charge between $5 and $10.
How to Post Videos on Substack (Mobile)
Posting videos on Substack is straightforward, especially with the platform’s updated mobile tools. To start, tap the “+” icon to create a new post. From here, you have two options for video content:
- Tap the film strip icon to create a video note.
- Select Video from the post menu to create a video post.

You might be wondering: What’s the difference between a post and a note? Here’s what I found:
- Notes: These function like short-form social media posts. They are media-heavy, appear in the main feed, and are visible to all your followers (not just paid subscribers). However, notes do not appear under the “Posts” tab on your profile.
- Posts: These are long-form content pieces meant for in-depth discussions. They are visible in the main feed, appear under the “Posts” tab, and are sent directly to subscribers. Posts are ideal for monetized content.
Notes vs Posts on Substack

Creating a video note (left) is as simple as uploading a video and adding text. The format will feel familiar to users of text-thread platforms, but unlike traditional social media, Substack doesn’t enforce a strict character limit. This gives you the flexibility to add as much context to your video as needed.
Creating a video post (right) offers more customization options, making it ideal for professional publications. These posts require a title, video upload, and description, which serves as the main body of the post. Substack also includes a formatting toolbar, allowing you to add media, insert links, create lists or quotes, and undo actions for a more polished presentation.
After posting, your content will appear differently depending on whether it’s a note or a post. Notes embed videos directly into the post, allowing followers to view them instantly. Posts, however, feature videos within a clickable thumbnail box that displays the title and preview image, requiring users to click through to watch.

So, when should you use a post instead of a note?
Posts are best for well-developed, professional content, especially if you plan to monetize your Substack. They are ideal for sharing high-value, original insights—whether it’s an in-depth industry analysis, a personal story, or an educational breakdown. Since the title plays a key role in engagement, it's worth investing time in crafting one that drives clicks and captures reader interest.
Notes are best for casual, day-to-day content and make up most of what you’ll see in the Substack feed. They function similarly to posts on platforms like X (Twitter) or Bluesky but don’t need to be as detailed as full posts. While professionalism still matters — especially if you're monetizing — notes are better suited for quick updates, brief insights, or profile news. Substack doesn’t enforce a character limit for posts or notes, but they recommend keeping notes shorter. A good example might be a short video introduction for your subscribers.
Substack Desktop Video Tools
Creating a video post on Substack's desktop platform follows the same process as on mobile, requiring a video, title, and description. However, the desktop version provides more advanced writing tools, making it better suited for crafting in-depth posts, while the mobile app is better for quick video notes.

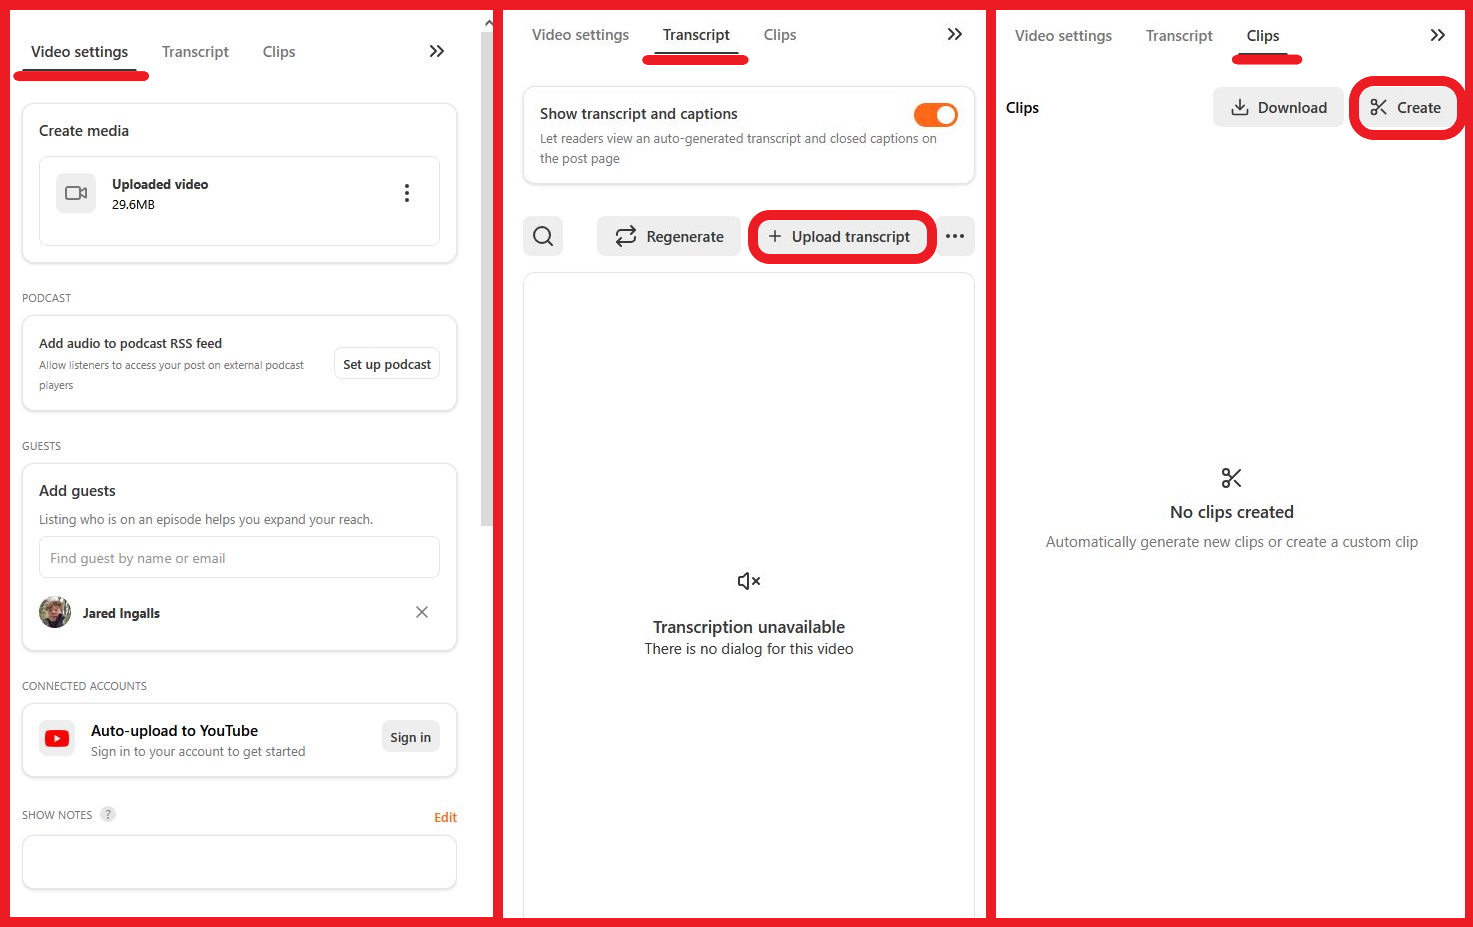
Beyond its expanded editor, the desktop platform offers advanced video editing features like transcript generation and automatic clip creation.
The clip generator lets you create short previews of your video, making it easier to share free content that attracts paid subscribers. The transcript generator is useful on its own but becomes even more powerful with the ability to upload existing subtitle files in SRT, VTT, or TXT format. Using an SRT file is especially beneficial for creators who want highly accurate subtitles with precise timing.
Substack Aspect Ratios and Video Size Guide
Since video is highly effective at increasing engagement on Substack, it's important to use the right media formats for the platform. Substack's official video guidelines include:
- 1080p or 1440p resolution for the fastest processing
- Video bitrate of 8Mbps or lower
- Frame rate between 5 and 120 fps
- Maximum file size of 20GB
Beyond these technical specifications, choosing the right aspect ratio is key to optimizing your content. While personal preference plays a role, these general guidelines will help ensure a better viewing experience:
- 9:16 (Vertical) for video notes
- 16:9 (Horizontal) for video posts
Pro Tip: Video notes do not have added borders, while video posts do. As a result, vertical videos uploaded as posts may appear slightly cropped or unevenly displayed. We recommend using a Video Resizer to ensure all content has the optimum aspect ratio.
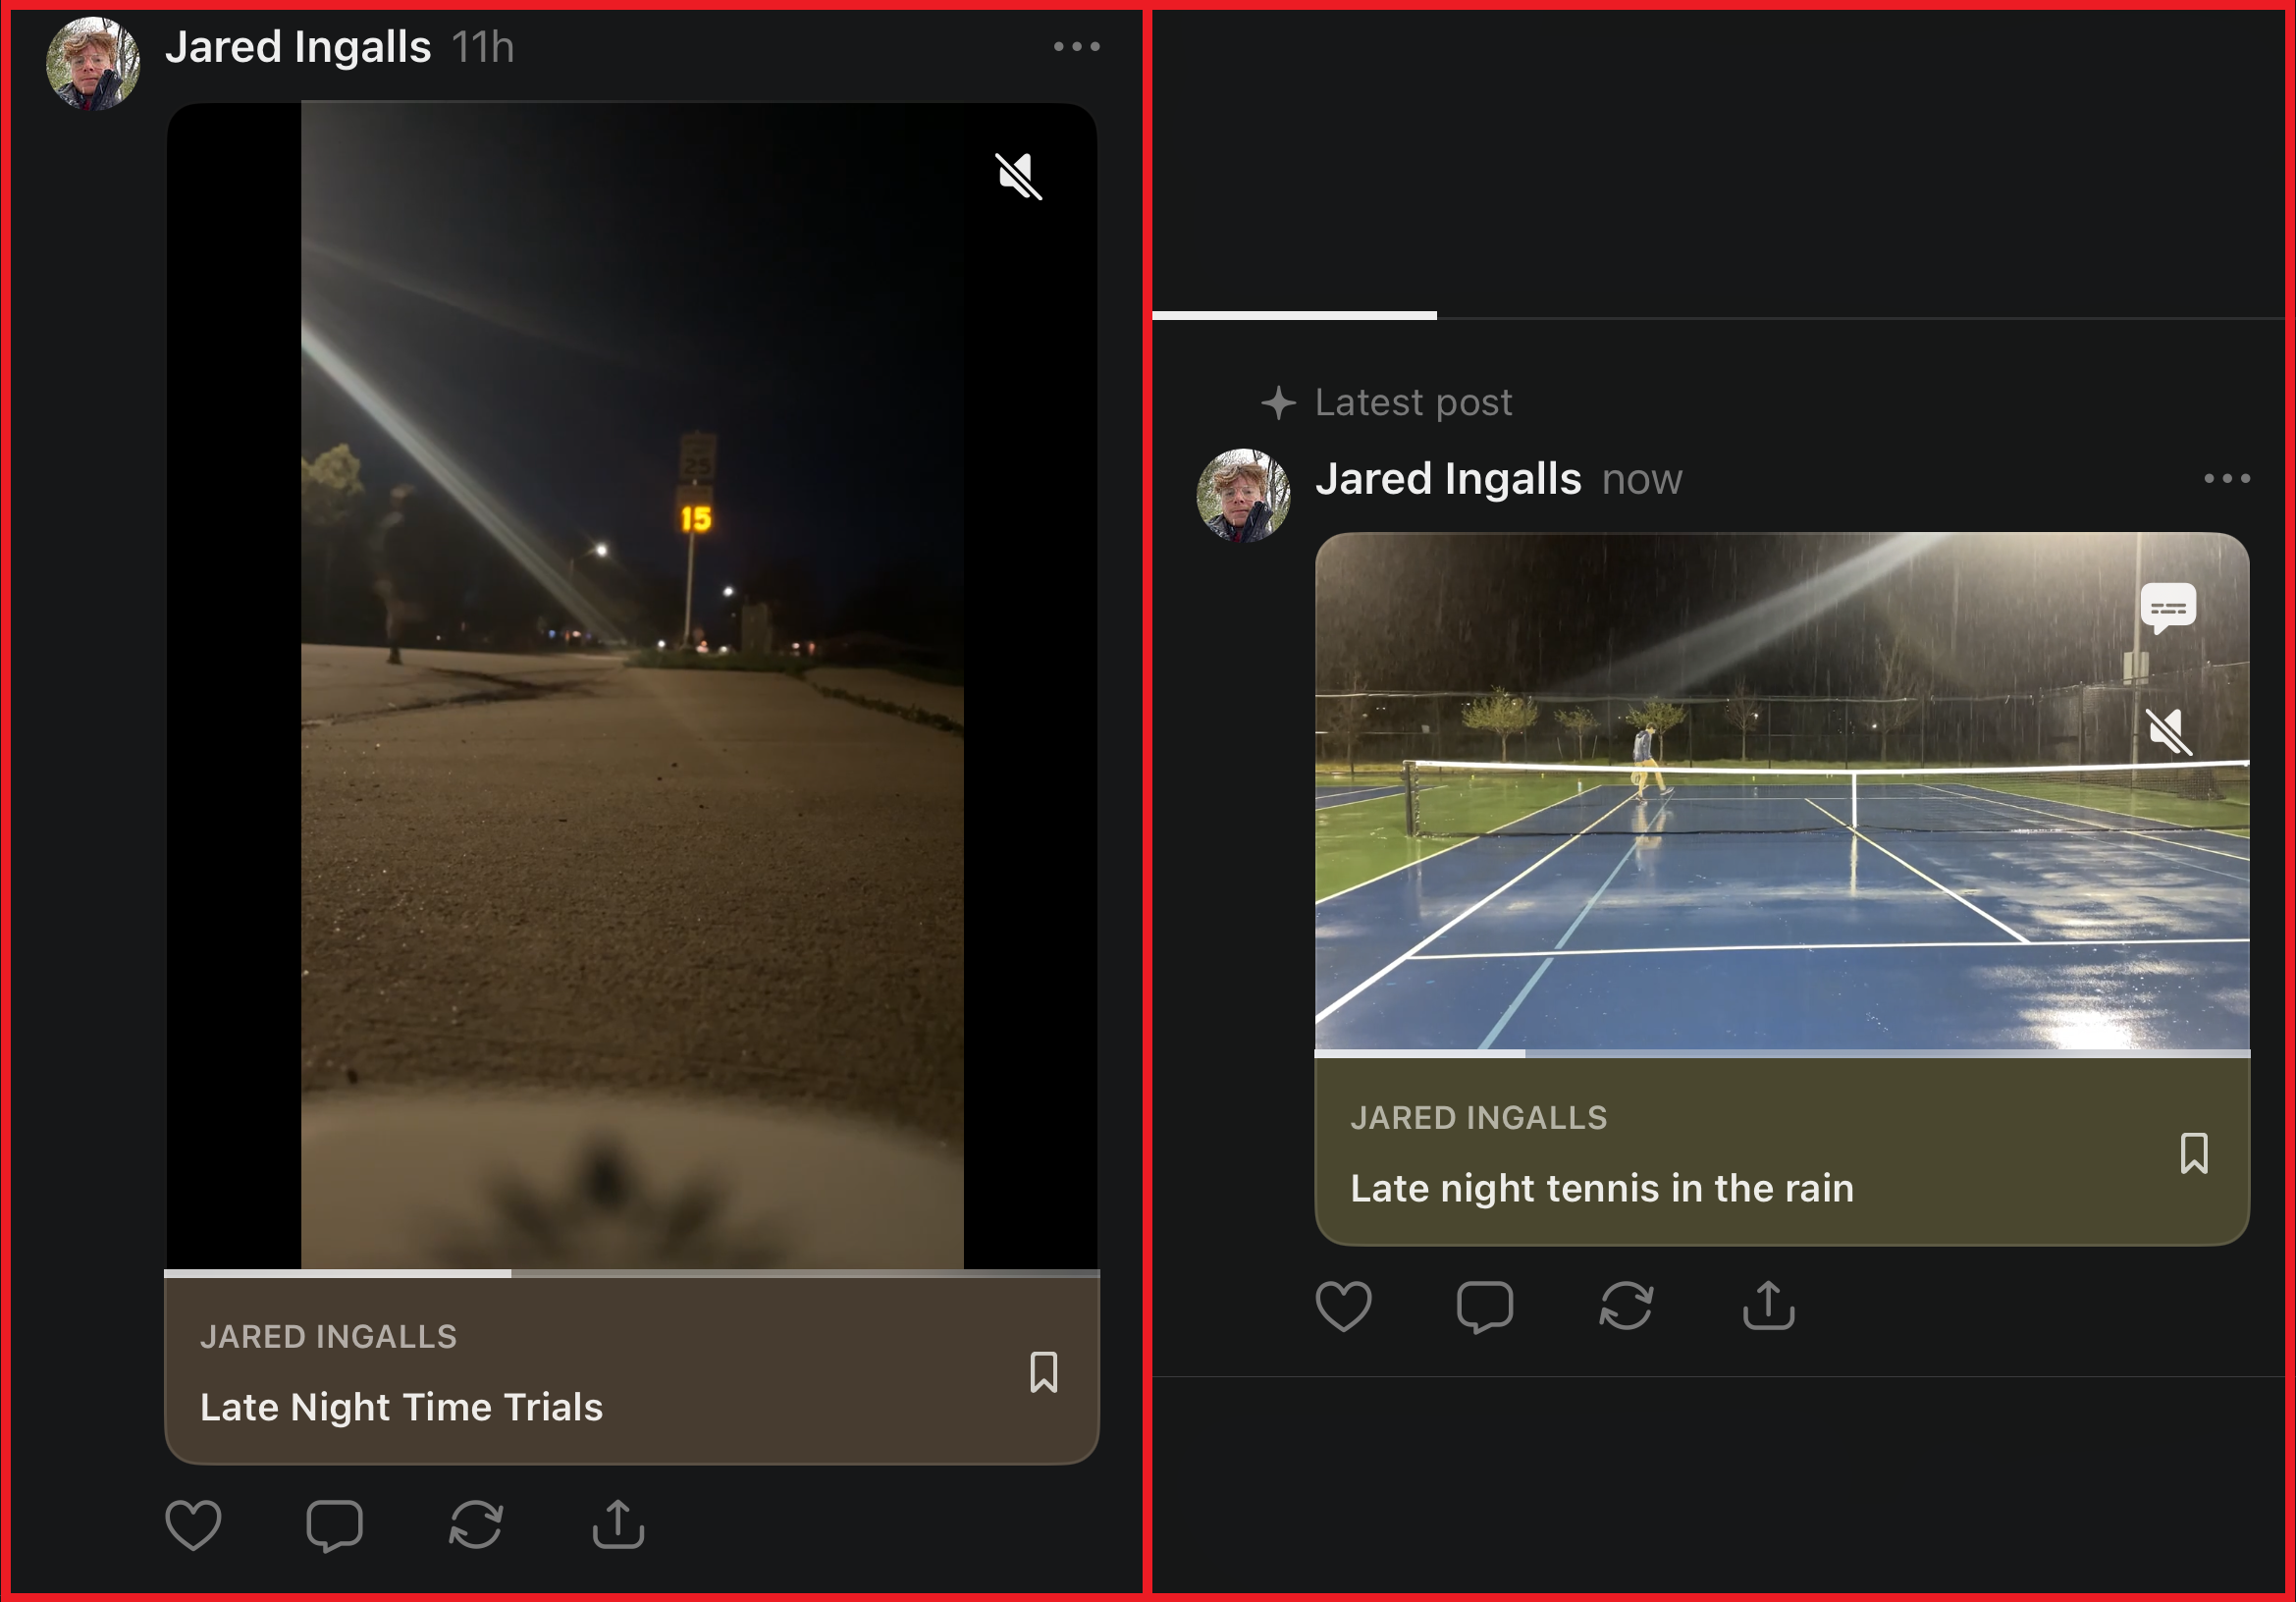
The graphic above compares a 9:16 vertical video post to a 16:9 horizontal video post in the feed. As shown, vertical video posts display with large black bars on the sides, negatively affecting their overall appearance.
Adding Video Captions and Creating an SRT File
For video posts, captions make your content more accessible to existing subscribers and improve engagement, helping you reach a wider audience. Substack offers automatic transcription and subtitles, but it doesn’t allow customization of their appearance. This means all creators using the feature produce subtitles with a dull, uniform look.

To avoid this, consider using an automatic subtitle generator to add subtitles with better customization options, making your content more unique and recognizable.
Here’s how to use Kapwing’s captioning tool to do just that.
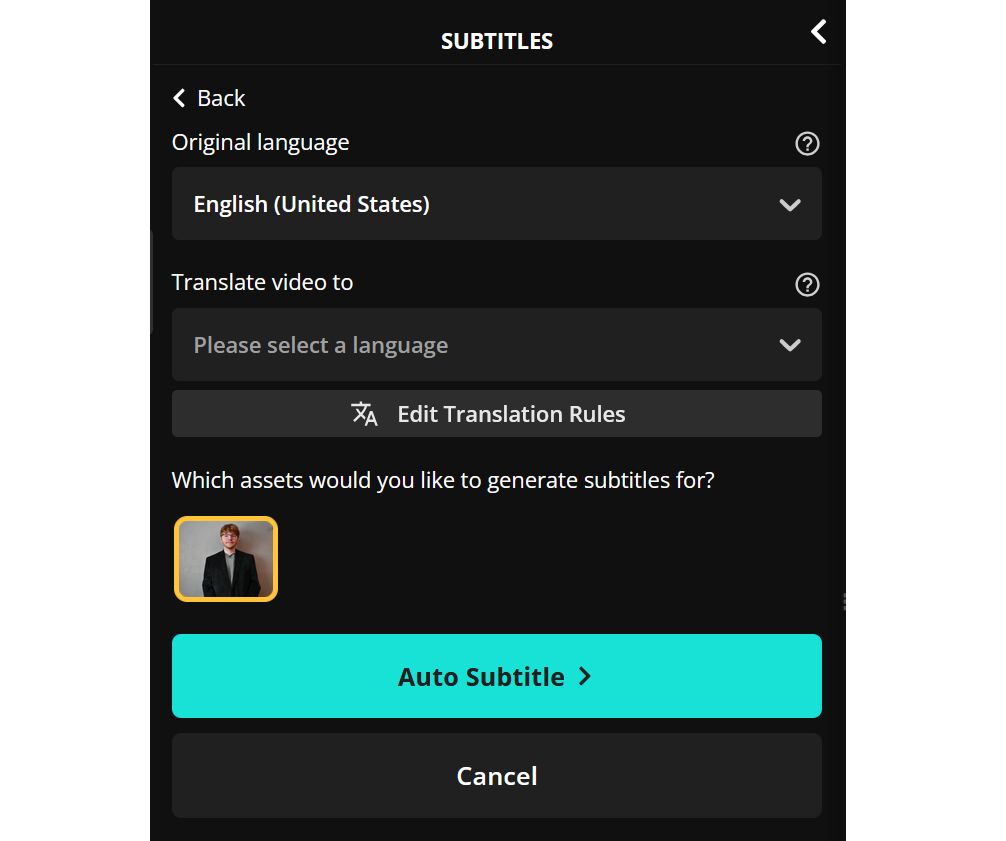
Upload your video to the editor and select the Subtitles tool from the sidebar. Then, click Auto Subtitles to start generating.
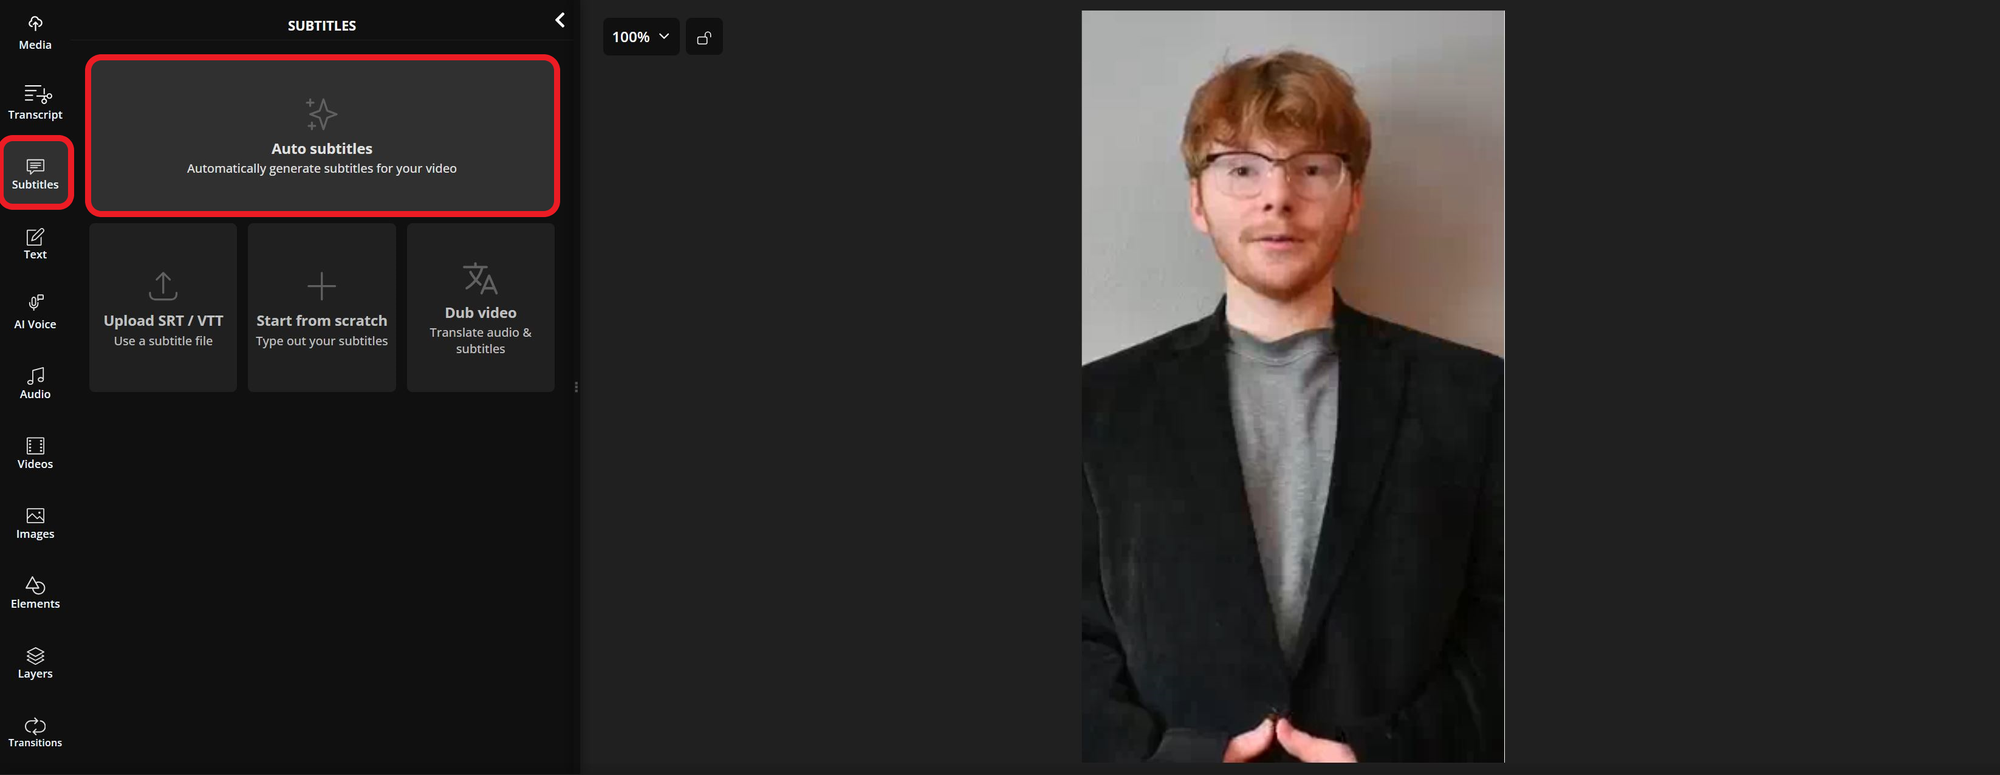
Adjust your generated subtitles before selecting the Auto Subtitle button again to finalize your captions.
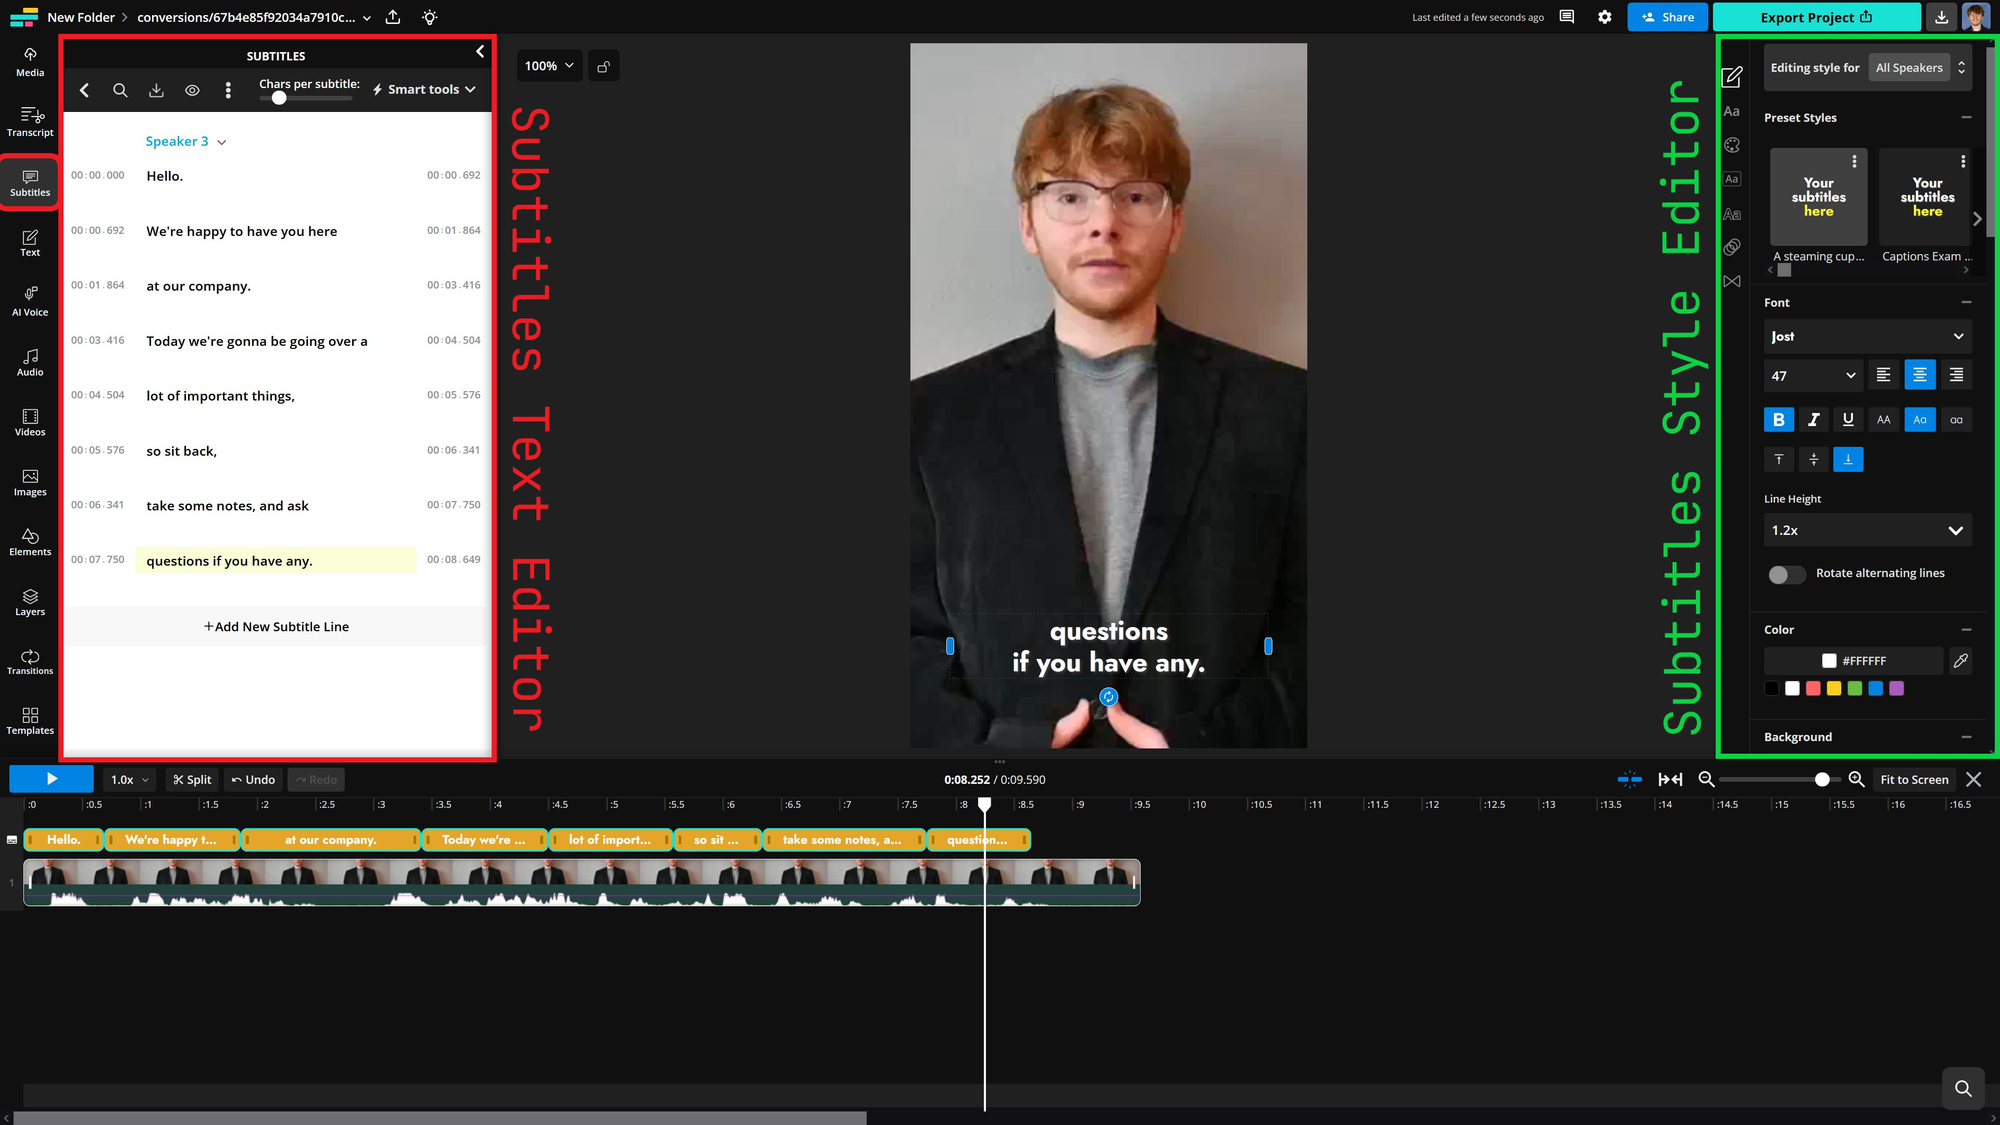
Once generated, your subtitles will be listed in a text menu on the left and automatically aligned with your video in the timeline.
To edit the look and feel of the captions, use the editing tools on the right to adjust the size, font, color, and video effects.
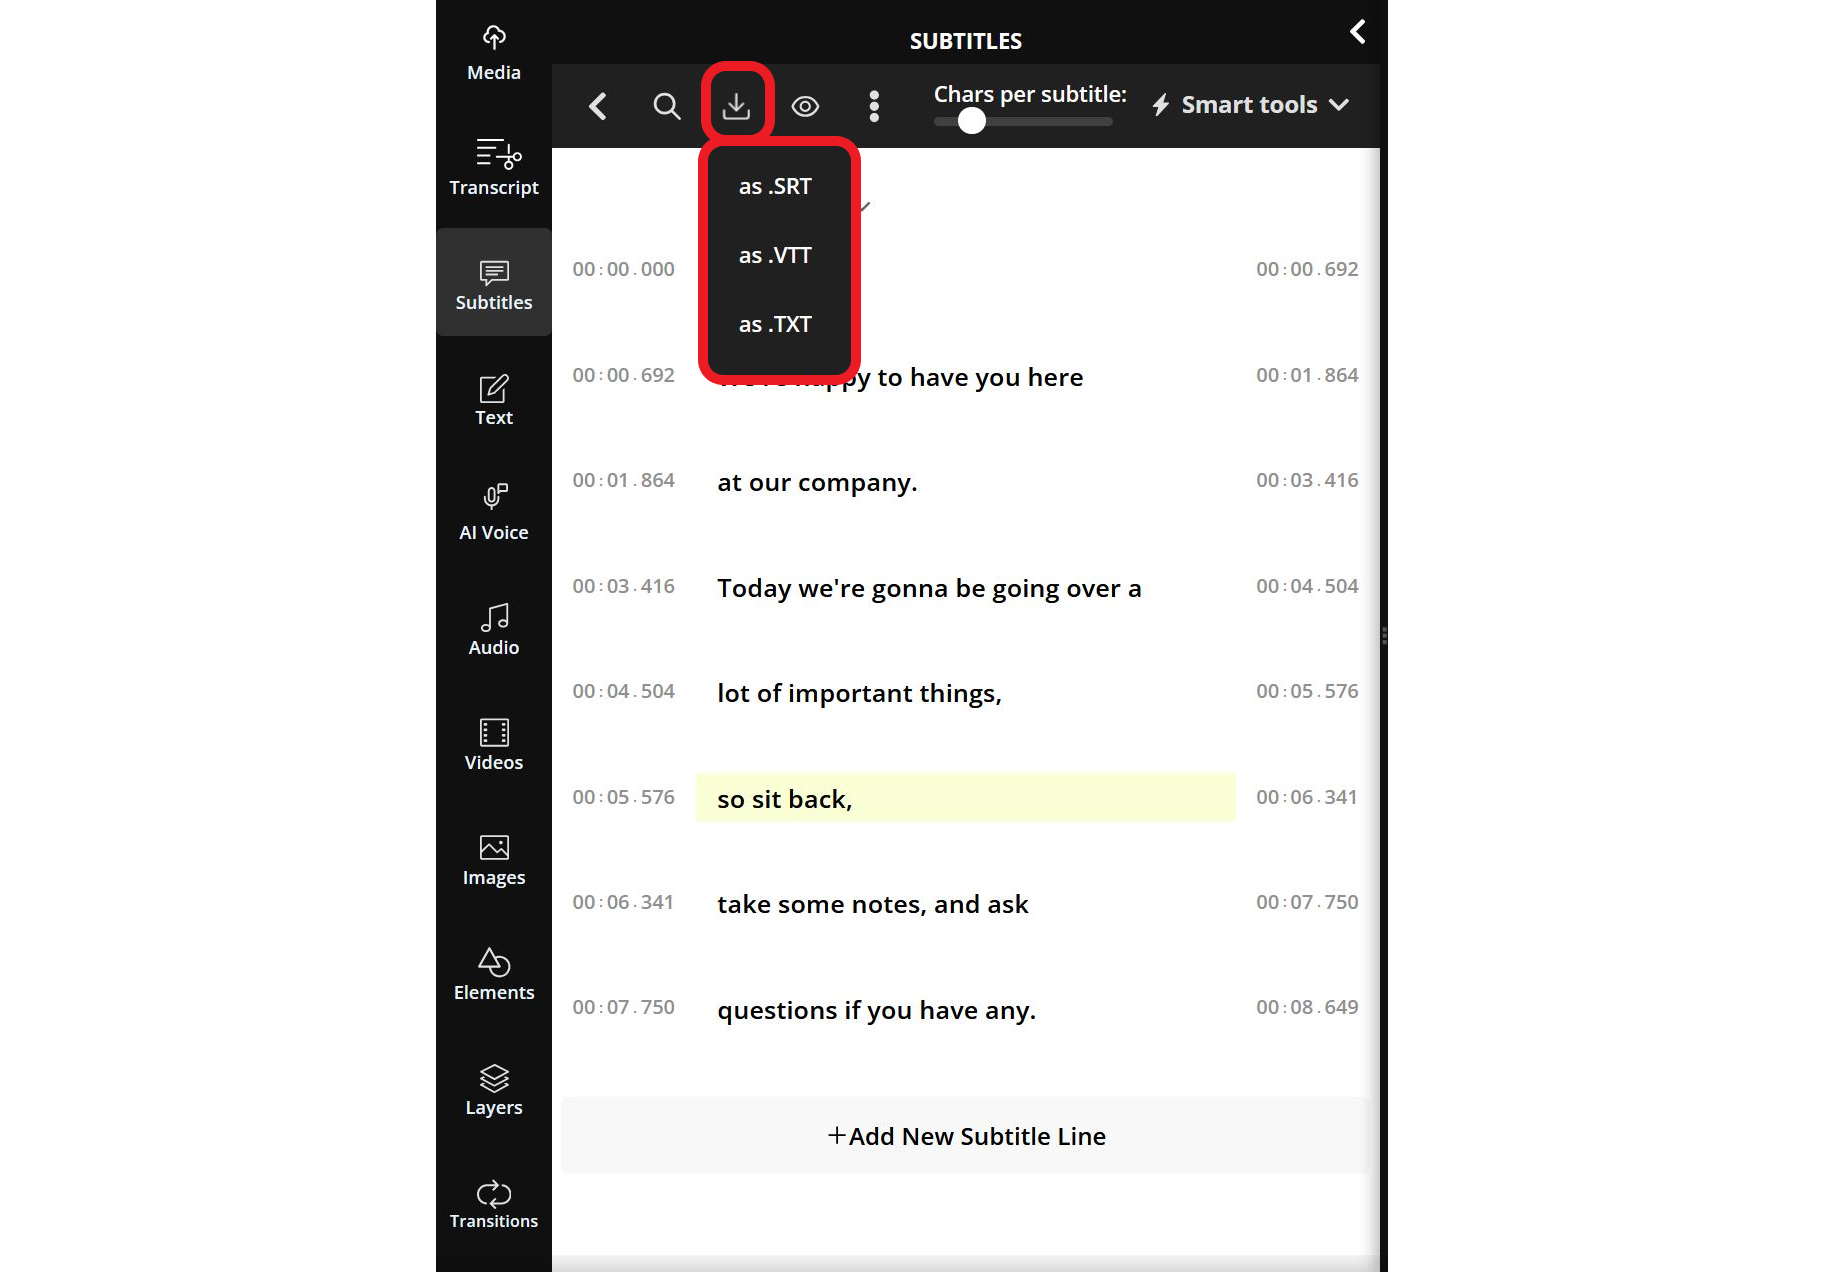
More social media platforms now support caption file imports like SRT, giving creators greater control over subtitles instead of relying on each platform’s built-in generator.
With Kapwing, you can fine-tune captions for better alignment and readability, then export them as an SRT, VTT, or TXT file for upload to platforms like Substack.
This ensures your captions remain consistent across platforms while allowing viewers to enable or disable them as needed for better accessibility.
How to Delete Video Posts on Substack
Deleting a video post on Substack is not an easy process for mobile users. While options for archiving are available, deleting a video post is not accessible from the mobile app and will have to be performed via desktop.
To delete a post on Substack, navigate to the post on your profile and find the three-dot icon. After selecting it, click Publisher Dashboard.
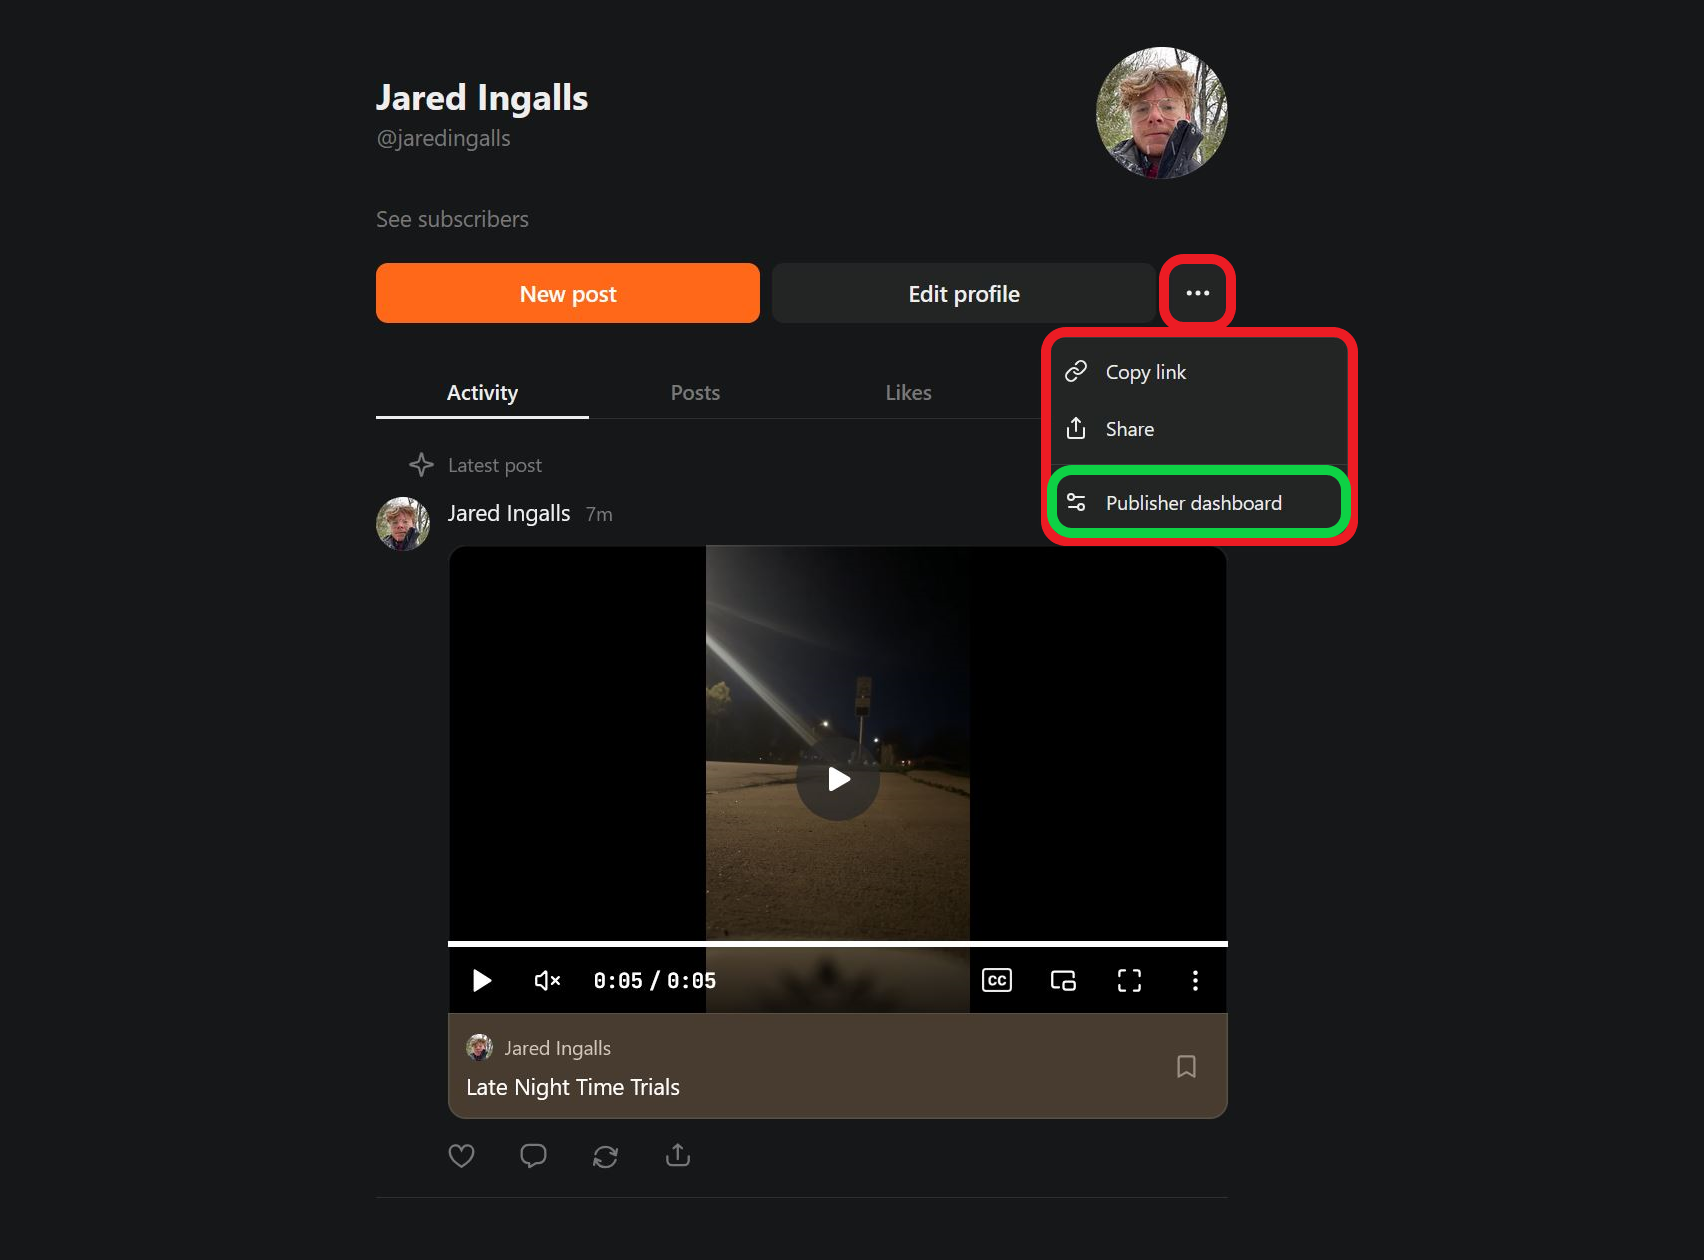
You'll then be brought to a menu where you can view video stats and access additional options. Select the three-dot icon again and choose Delete from the bottom of the menu to delete your post.
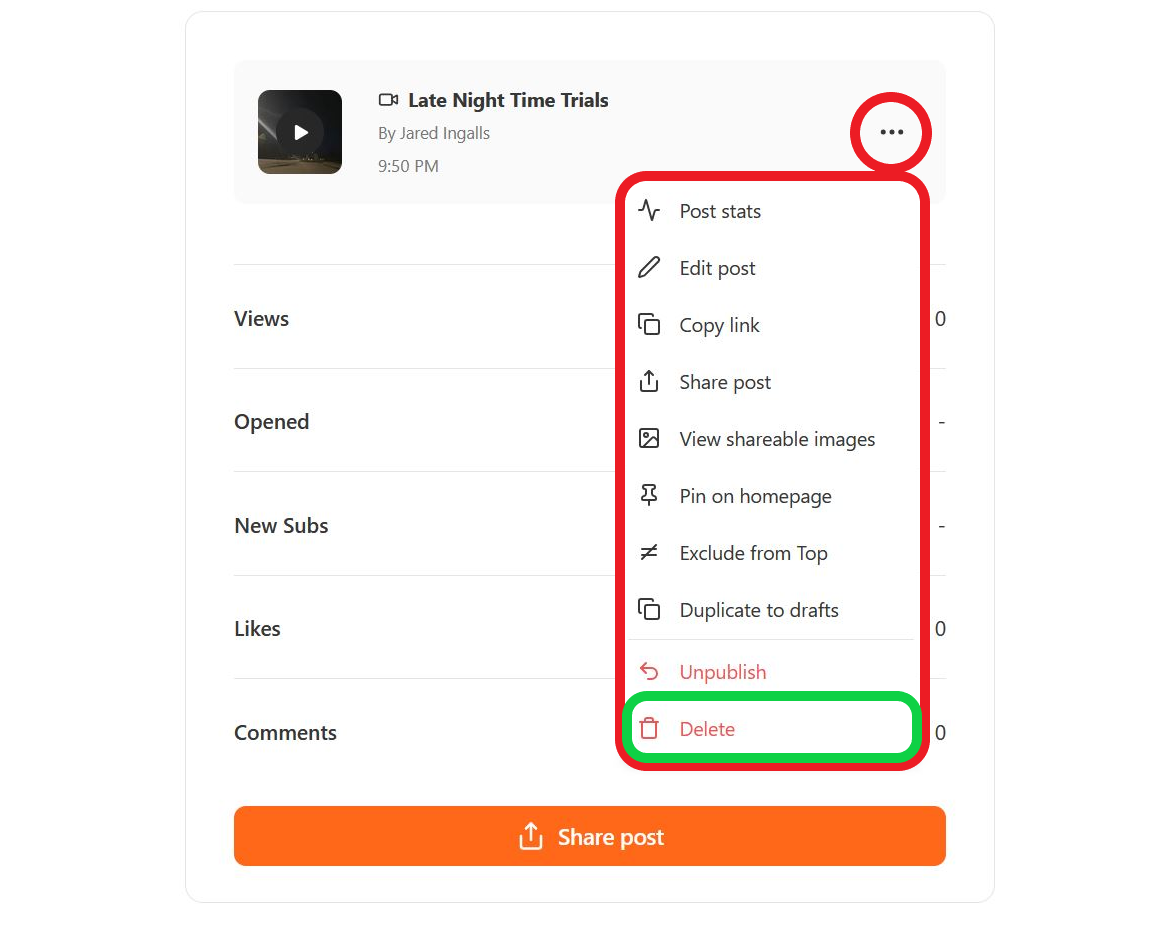
Deleted posts cannot be recovered, so you might find it better to select the Unpublish option to remove the post from your profile without deleting it completely.


