Using ChatGPT’s AI to Create, Edit, and Translate Subtitles
85% of internet users watch videos without sound — reach them with subtitles

ChatGPT remains one of the most recognizable names in AI, known for making advanced tools accessible to everyday users. Recent advancements — like the AI Image Generator that sparked the viral Studio Ghibli trend — highlight the platform’s versatility in helping creators produce high-quality content quickly.
For video creators, subtitles are a simple yet powerful way to boost engagement and give content a more polished, accessible feel. Subtitles not only encourage viewers to watch through to the end, but they can also enhance discoverability by improving SEO.
In this article, we’ll walk through how to use ChatGPT to create, edit, and translate your subtitles — streamlining the editing process and saving time.
Table of Contents
- Exporting Your Subtitles Before Editing with ChatGPT
- How to Edit Subtitles in ChatGPT
- How to Convert Subtitles Files in ChatGPT
- How to Translate Subtitles in ChatGPT
What ChatGPT Can and Can’t Do with Subtitles
ChatGPT is highly effective for certain types of subtitle editing, though it does have limitations.
While ChatGPT can help you edit or convert existing subtitle files, it cannot process audio or video directly, meaning it can’t generate subtitles from a media file on its own.
It works best when you provide a transcript or upload a subtitle file, such as an SRT, VTT, or TXT.
What can ChatGPT Do
✅ Translate subtitle files
For both SRT and VTT files, ChatGPT 4o can translate subtitle content into many languages while preserving the original file format. Users can upload an SRT file in their original language, specify a target language and dialect in the prompt, and ask GPT to preserve the formatting for their platform of choice.
Try the prompt: See the below SRT file. Can you translate this into conversational Spanish, a Mexico city dialect? Preserve the SRT format with timestamps and new lines.
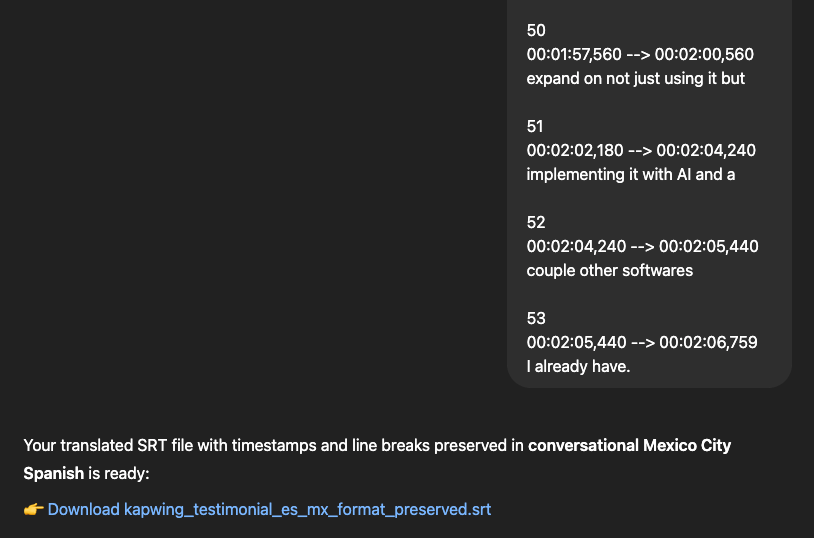
In the response, ChatGPT will generate a new SRT file for you to download. The files will have the timestamps from the original file preserved exactly.
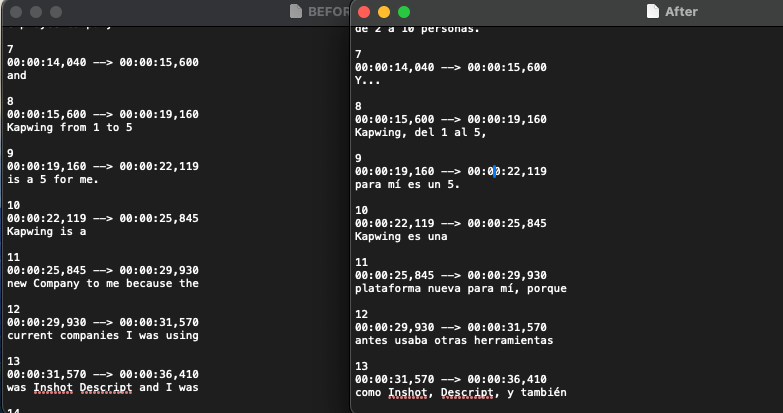
Most of the time, ChatGPT will preserve the exact timestamps that it's been given, translating only within that line. Because it has rigidity around not changing the caption timing, the localization can be subpar. It's also difficult to edit the output subtitles as ChatGPT does not enable you to edit the text before downloading the file.
To improve the translation, try using a side-by-side AI subtitle editor like Kapwing so that you can merge lines, change the length of the caption lines, and tweak the translation more fluidly. Or you could start by prompting GPT to combine every other line into one, making the lines longer.
✅ Convert between subtitle formats
There are small and tedious differences between difference closed caption formats like SRT (SubRip Subtitle) and VTT (Web Video Text Tracks). For example, a VTT must start with the string "WEBVTT" and uses periods in timestamps, whereas an SRT uses timestamps with commas. ChatGPT is a great assistant for handling these tedious conversions. Paste an SRT file, and ChatGPT can convert it into VTT format, or vice versa. ChatGPT will run a python script to easily handle the timestamp adjustments and formatting changes for you, then return the output to download.

✅ Summarize or rewrite subtitles for different audiences
Ask ChatGPT to make your subtitles shorter, simpler, or more aligned with a specific reading level. It’s a quick way to adapt your captions to different audiences.
✅ Fix common subtitle formatting issues
ChatGPT can help restructure line breaks, adjust timecode formatting, or match subtitles to a style guide if you provide the rules. If you run into an error when upload an SRT file to a social media platform like Twitter, LinkedIn, you can use ChatGPT to make timestamp tweaks to fix it and upload the corrected file.
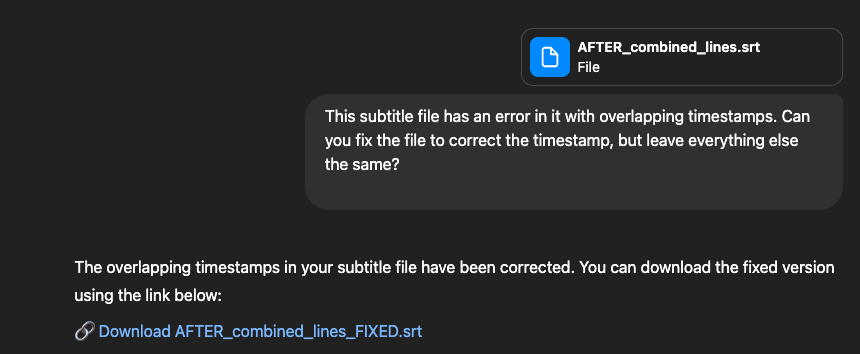
You can also change the timestamp formatting. For example, I used ChatGPT to make the subtitle lines longer, making them more appropriate for a landscape video with more horizontal space.

🟨 Edit and revise subtitles for clarity and grammar
ChatGPT can help clean up the text within a closed caption file. When you upload a file to ChatGPT or paste the full SRT text, it’ll generate a new version with improved readability, corrected typos, and tone adjustments according to your prompt and instructions.
However, I have found it to be a poor assistant when it comes to fixing punctuation issues in the captions. It tends to add a period at the end of every caption line, which is not appropriate for a closed caption file. You also cannot upload a brand glossary or translation guide to ChatGPT, so it's poor at recognizing and remembering brand terms compared to a marketing platform like Kapwing.
For a closer look at how your file was changed, you can click the [>_] icon to view a detailed breakdown of the edits ChatGPT performed.
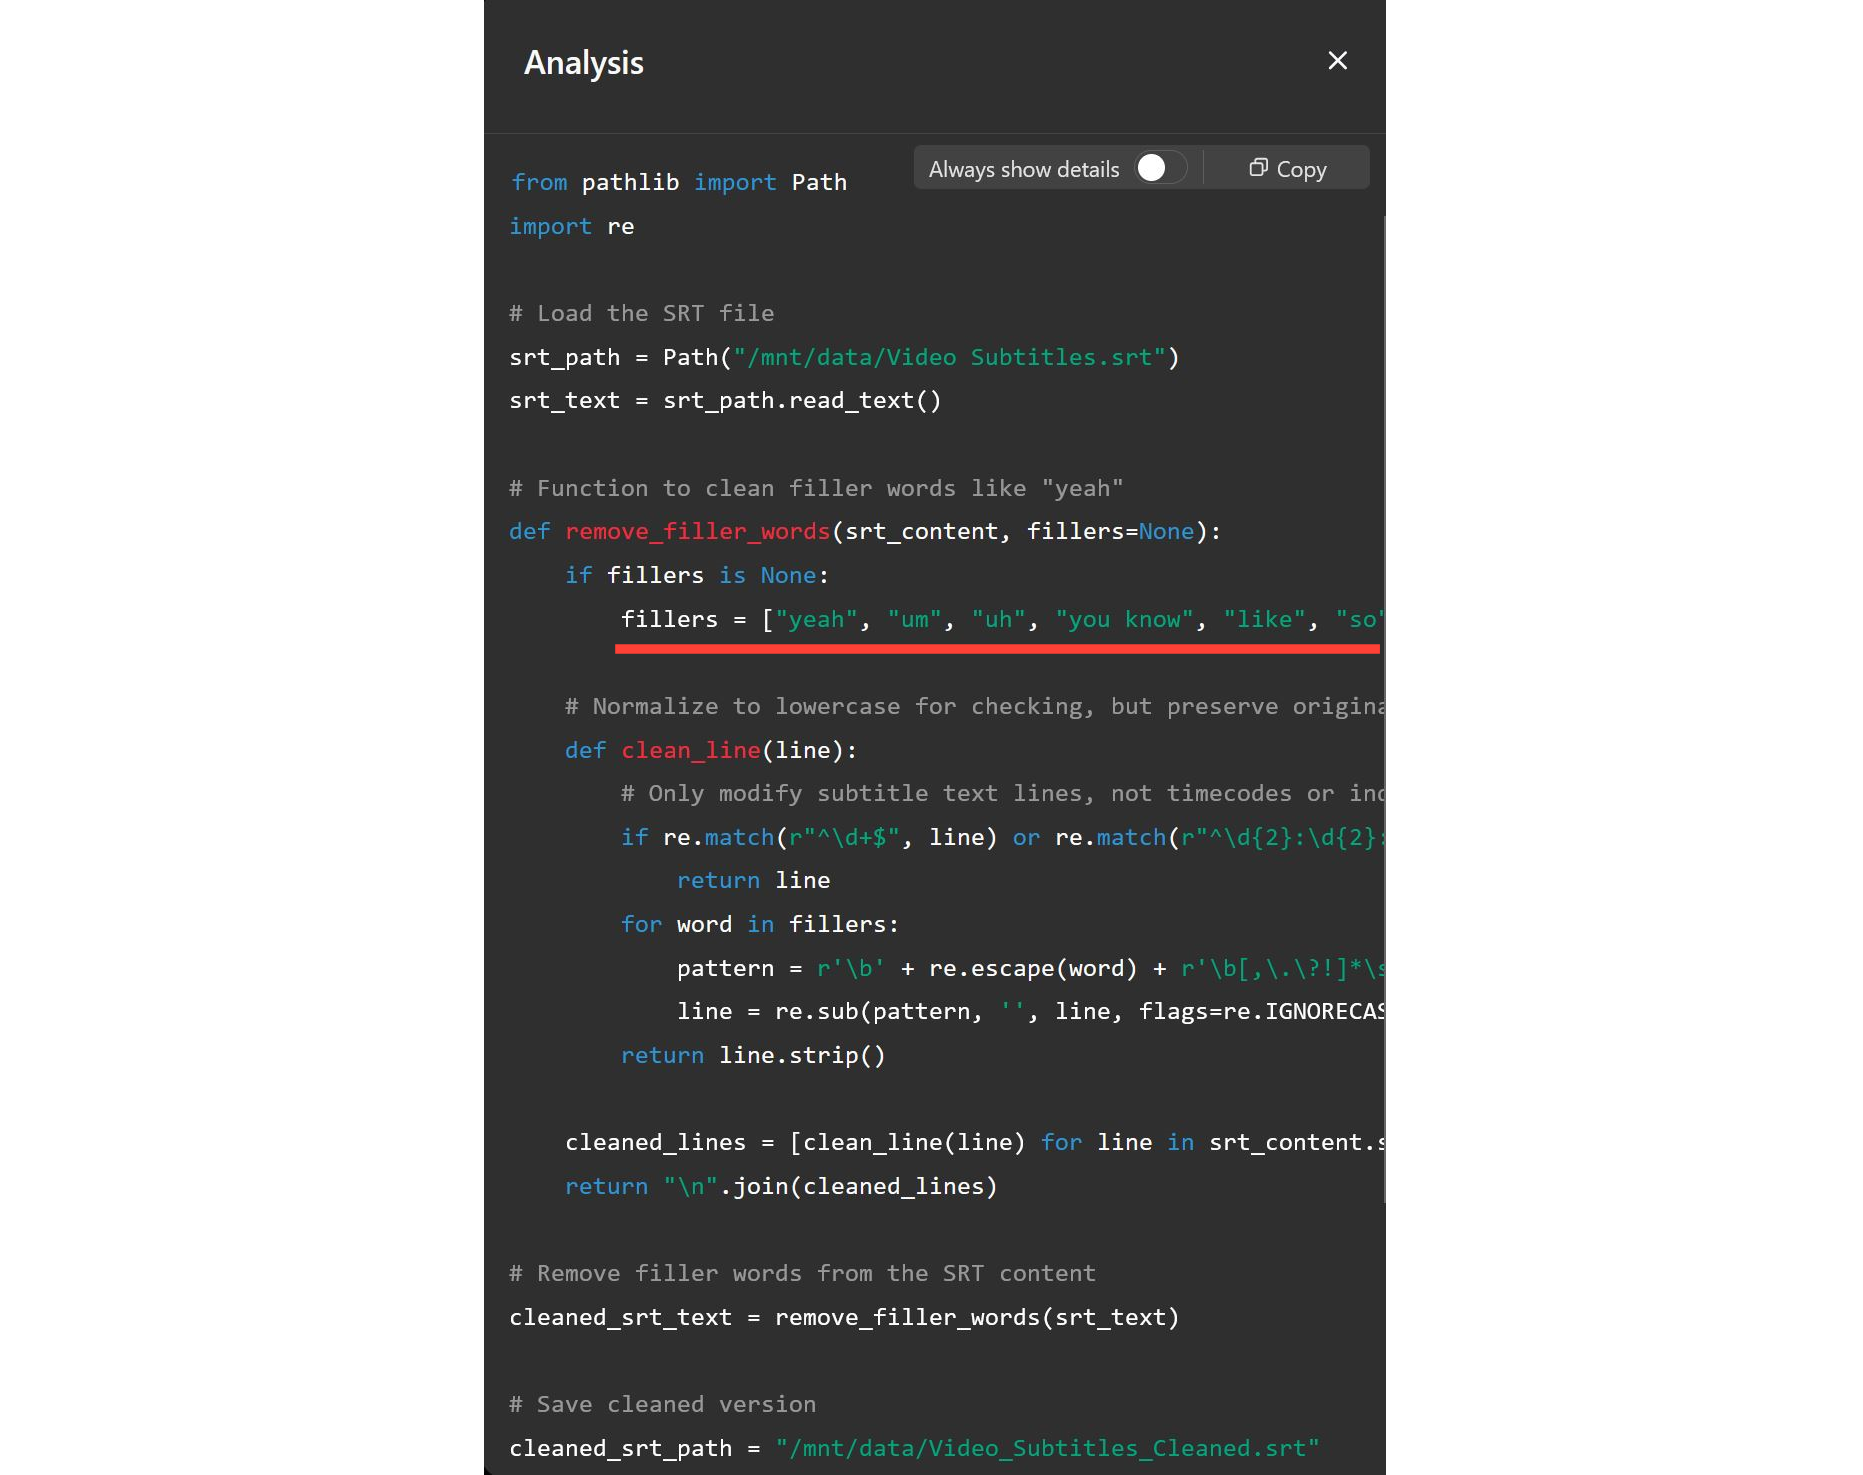
Even without a background in coding, I found it helpful to see exactly which words were removed or altered. For example, ChatGPT was able to clean up my SRT file by removing filler words like "yeah", "um", and "you know," even when I didn’t ask it to do so directly.
What ChatGPT Cannot Do
❌ Automatically transcribe audio or video
ChatGPT can’t watch or listen to content. It won’t generate subtitles from scratch. To create a transcript, you’ll need to use a tool like an automatic subtitle generator. According to Gartner's Top Rated Software of 2025 Report, creators selected Kapwing's Video Transcription tool is a fan favorite.
❌ Sync subtitles to audio or video
ChatGPT can adjust subtitle timing if you provide specific timecodes, but it cannot sync text to your video automatically. For that, you’ll need to use a dedicated video or audio editor that supports subtitle alignment.
❌ Directly edit files stored on your device or online
ChatGPT can’t access local or cloud-based files on its own. To make edits, you’ll need to either paste your content into the chat or upload the file directly.
❌ Embed captions directly into an MP4 Video file
ChatGPT thinks that it can do this, but if you upload a video and add it to embed the closed captions, the python engine will fail. ChatGPT will try to run an FFMPEG python script on the file, but every time I have tried it the script fails.
ChatGPT is not able to process video or audio files, so you'll need an external editor like Kapwing to burn the caption text into the MP4. Kapwing is fast and free to try for videos under 4 minutes, and it enables you to style and add animations on the captions when you embed them in the video.
How to Get an SRT File for a Video
ChatGPT AI is best at editing text, so the first step is to download your video subtitles as a text-based file. Start by uploading or linking your video in the Kapwing editor. Once it has finished uploading, open the Subtitles tab in the left-hand sidebar.
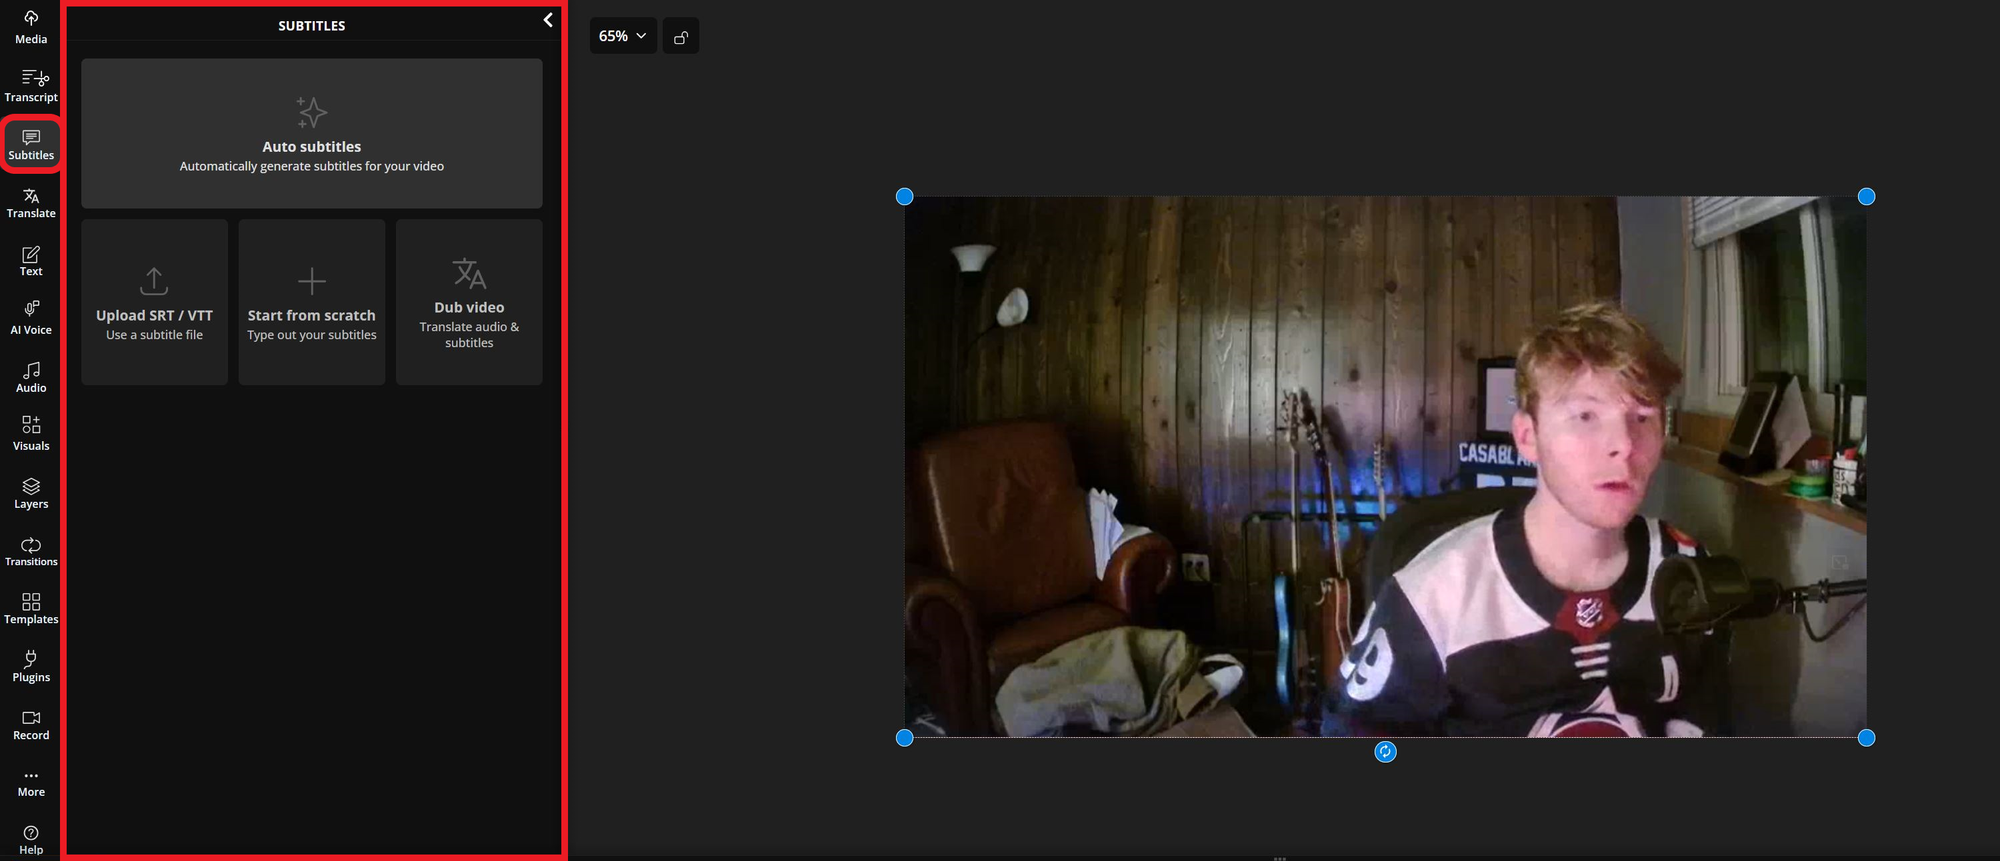
From there, click Auto Subtitles to automatically generate captions for your video. Kapwing will analyze the audio and create a full transcript, which you can then revise or download in a variety of formats.
Once the subtitles are generated, you’ll see the full transcript appear in the Subtitles panel. To export it, click the Download icon at the top of the panel.
You’ll be prompted to choose one of the following file formats: SRT, VTT, or TXT.
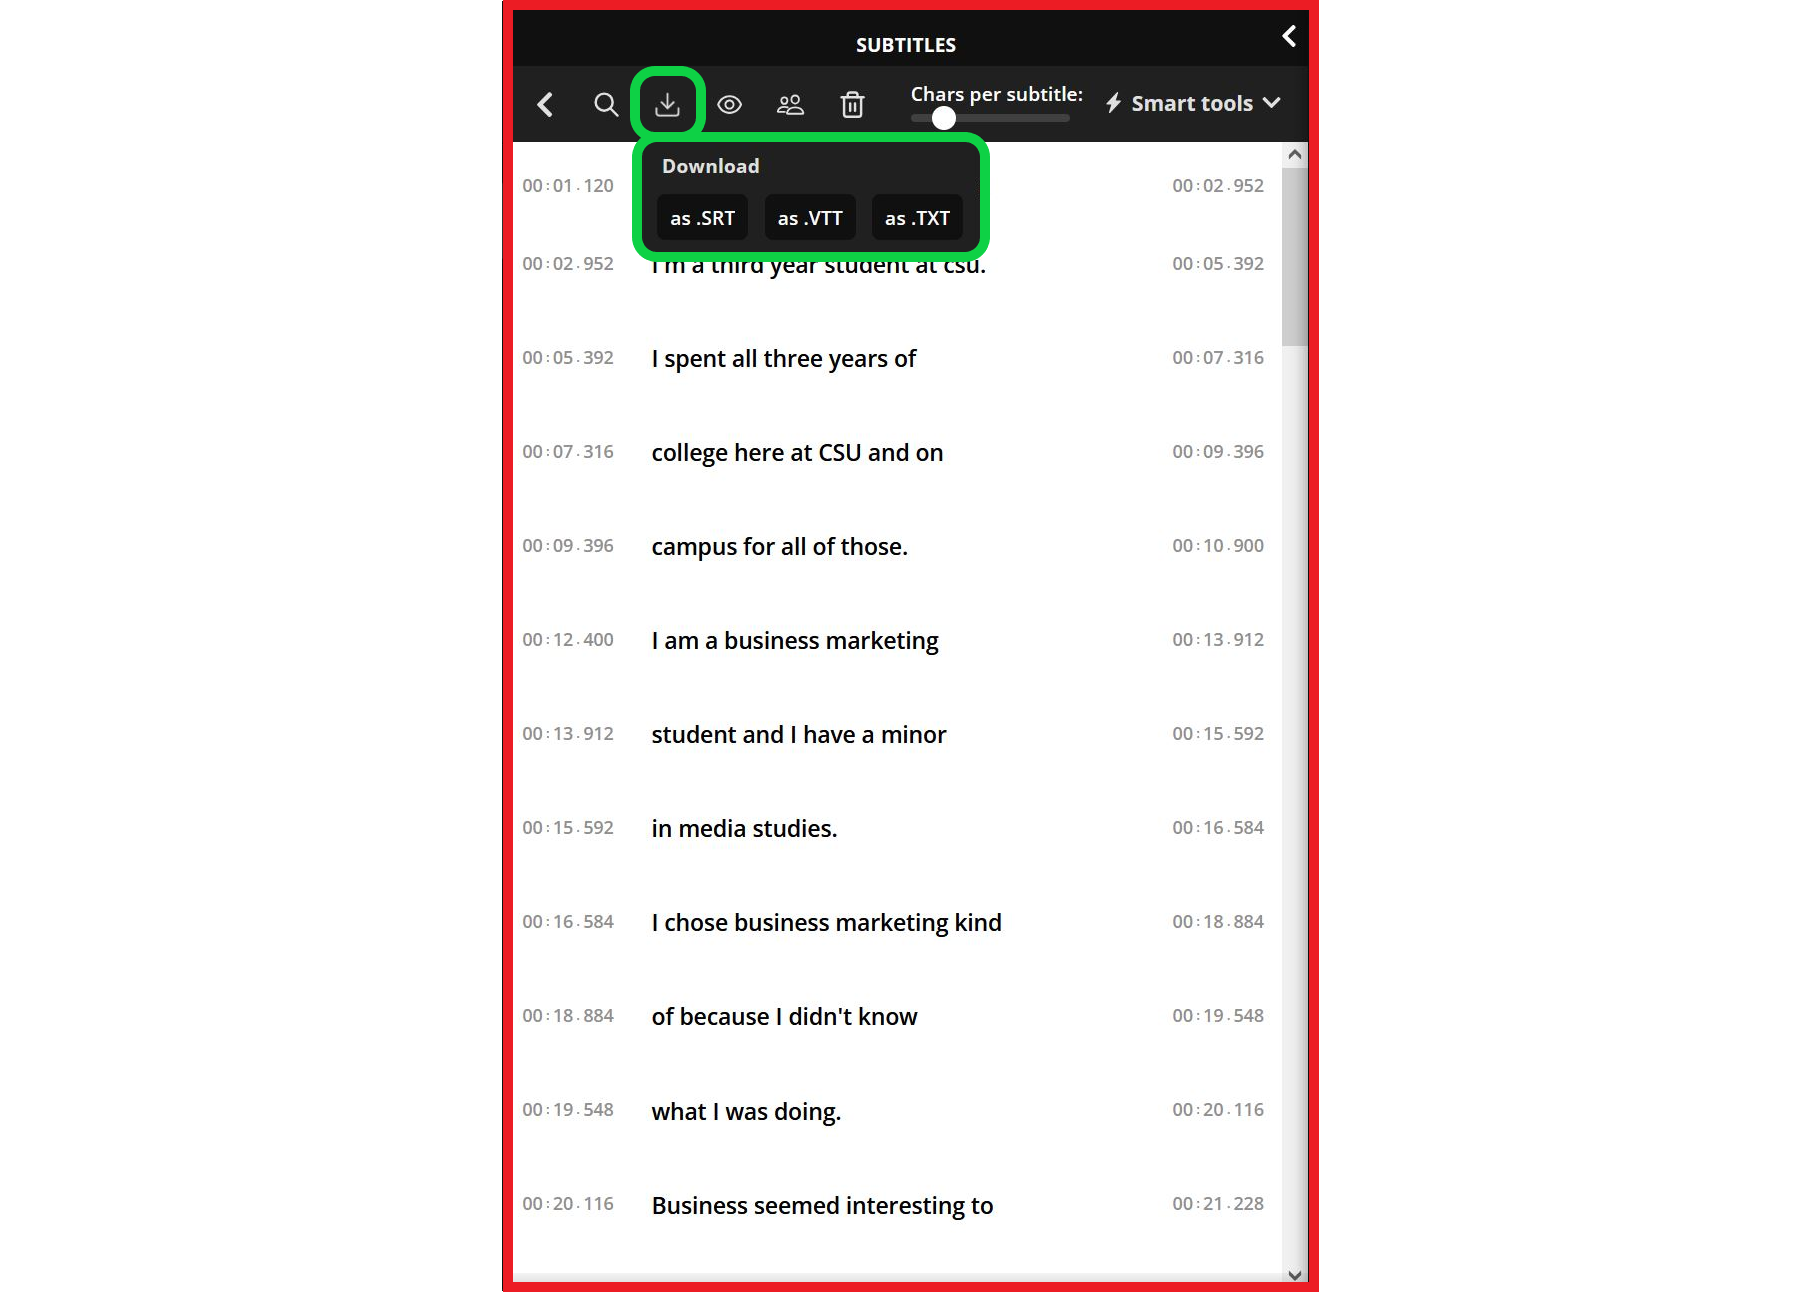
These three options are all editable and compatible with most video platforms, but each one serves a slightly different purpose:
- SRT: The most widely used subtitle format. It includes numbered sections, timestamps, and plain text. SRT files are supported by most major platforms and can be used to add closed captions to sites like YouTube, Bluesky, LinkedIn, and Vimeo.
- VTT: Similar to SRT files but with extra formatting options. VTT files are designed for web players and support features like italic text, positioning, and custom styling.
- TXT: A plain text file with no timestamps. This format is useful for editing the script itself or preparing a translation, but it cannot be synced directly with video timelines.
In most cases, exporting your captions as an SRT file is the best option. It’s accepted across nearly all video platforms, and it works seamlessly with ChatGPT for editing, translating, or rewriting your subtitles.
How to Edit Subtitles in ChatGPT
ChatGPT makes it easy to clean up, reformat, and translate subtitles — especially when working with structured files like SRT, VTT, or TXT. To make edits to a set of subtitles with ChatGPT, input these prompts:
- Paste captions directly: Paste your subtitle file into the chat. With clear, direct prompts, ChatGPT can revise the text while preserving your timestamps.
- Upload: If you have ChatGPT Pro, you can upload the closed caption file to ChatGPT directly.

Once editing is complete, you can copy and paste the subtitles back into your editing tool, or download them as a new SRT or VTT file for upload to your platform of choice. This workflow is popular with YouTubers, podcasters, educators, and marketing teams.
To get the best results:
- Provide structured input (with timestamps) so ChatGPT can maintain formatting
- For large subtitle files, consider splitting them into sections to avoid token limits
- Clearly state what you want (e.g., “translate only the dialogue,” or “fix grammar without changing timestamps”)
Below is an example of a prompt I used to ask ChatGPT to limit the number of characters per line in my SRT subtitle file.

Once you’ve started a conversation, ChatGPT can reference earlier messages to stay consistent with your style and goals.
To help refine results further, you can use the thumbs up or thumbs down icons beneath each response. Providing feedback in this way helps the tool better understand your preferences over time.
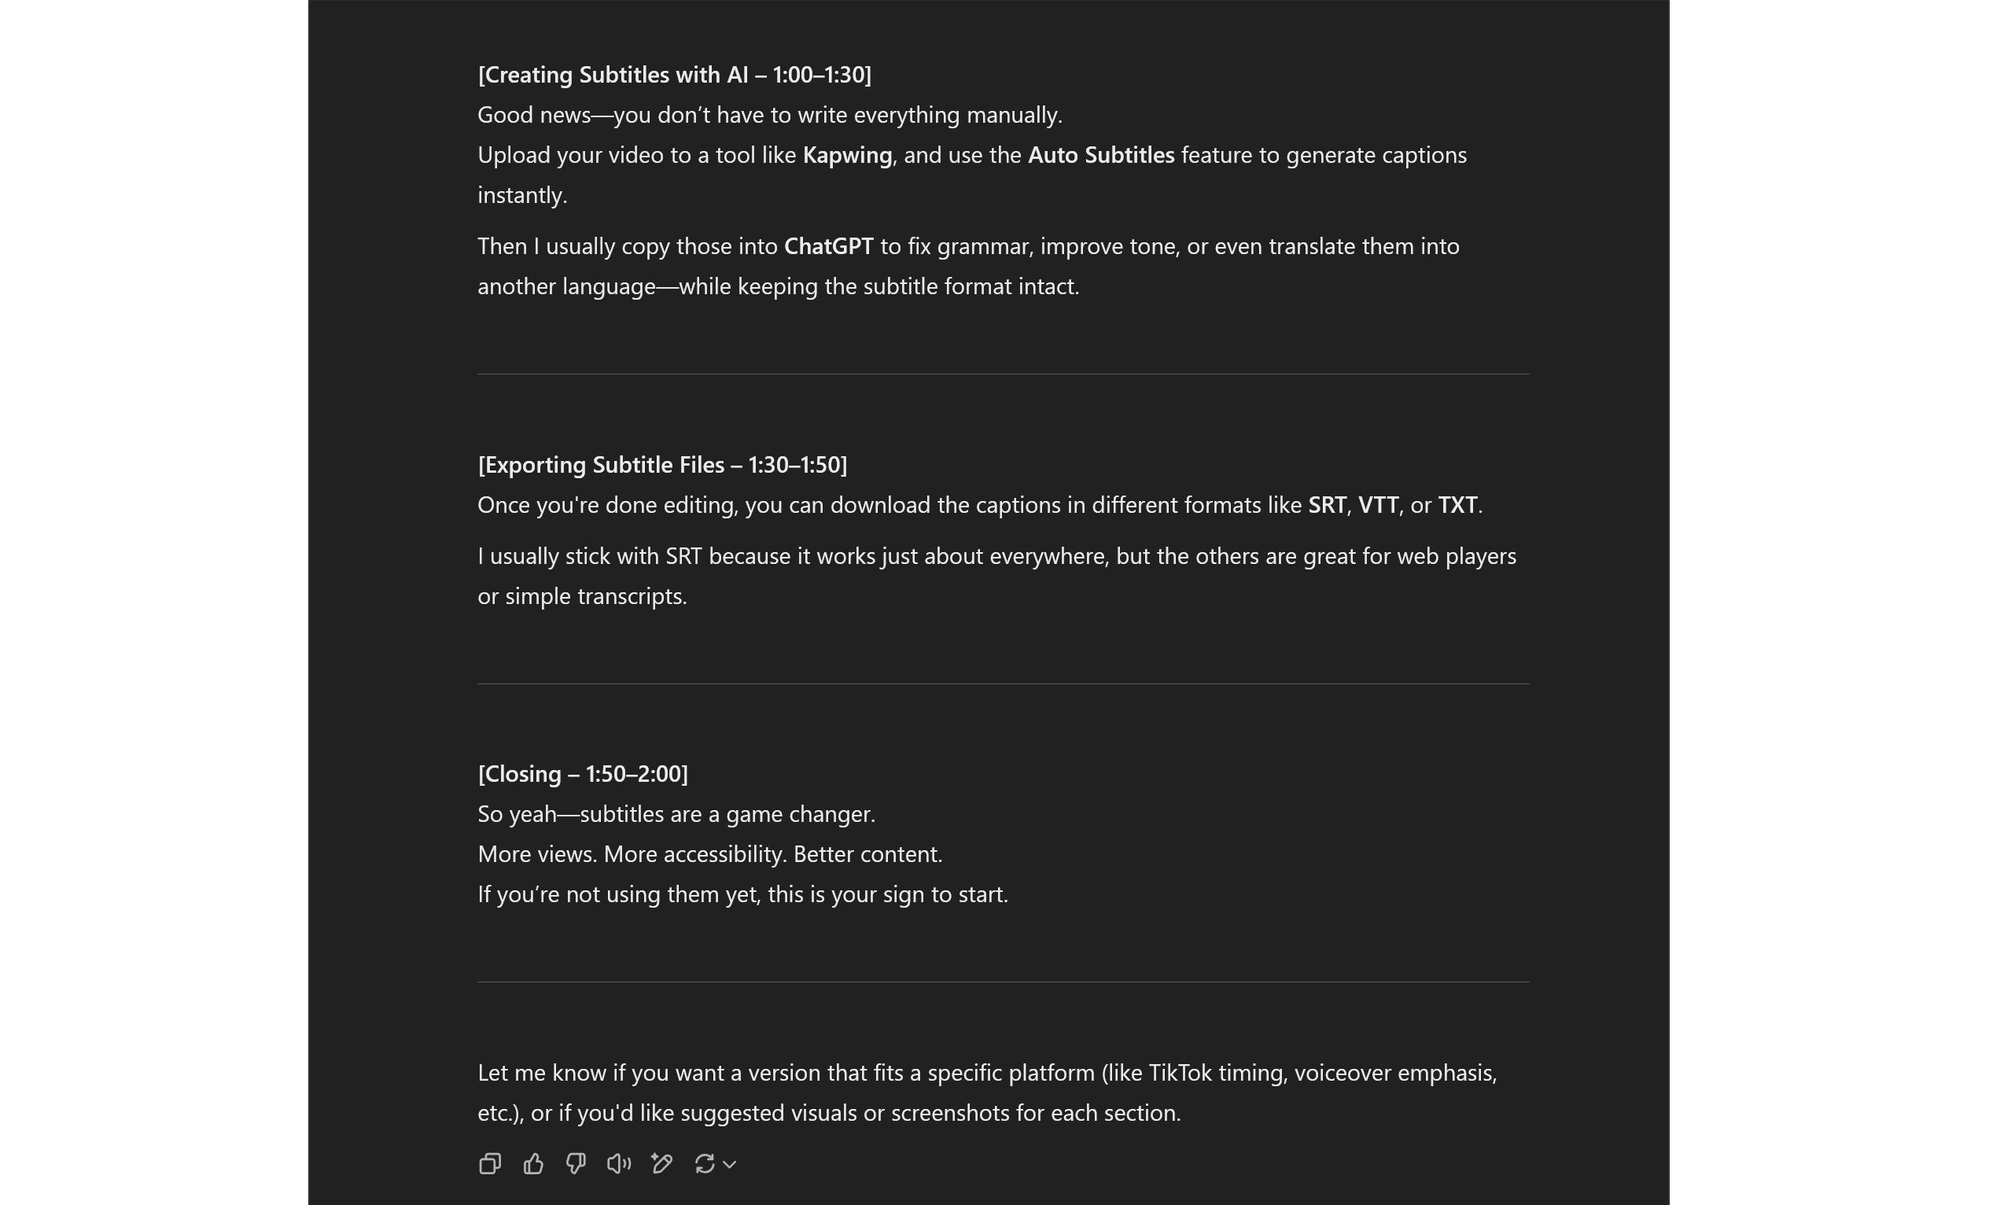
If you prefer to work with an actual file, you can upload your subtitles directly to ChatGPT. Use the + icon next to the prompt bar to attach a file like an SRT, VTT, or TXT document.
Then, just as before, write your editing request in the prompt bar and submit your file. Keep in mind that ChatGPT cannot modify files stored on your computer, so you will need to download the edited version provided.
This type of bulk editing is especially helpful when working on longer projects or applying repeat changes across multiple subtitle files. That said, altering your subtitle text can lead to slight mismatches between what’s written and the original audio.
To minimize this, consider using an AI video editor like Kapwing’s Smart Cut, which automatically removes filler words, silences, and long pauses from both your content and subtitles.
To use Smart Cut, upload your video or audio file to the editor and select Smart Cut from the AI Tools menu.
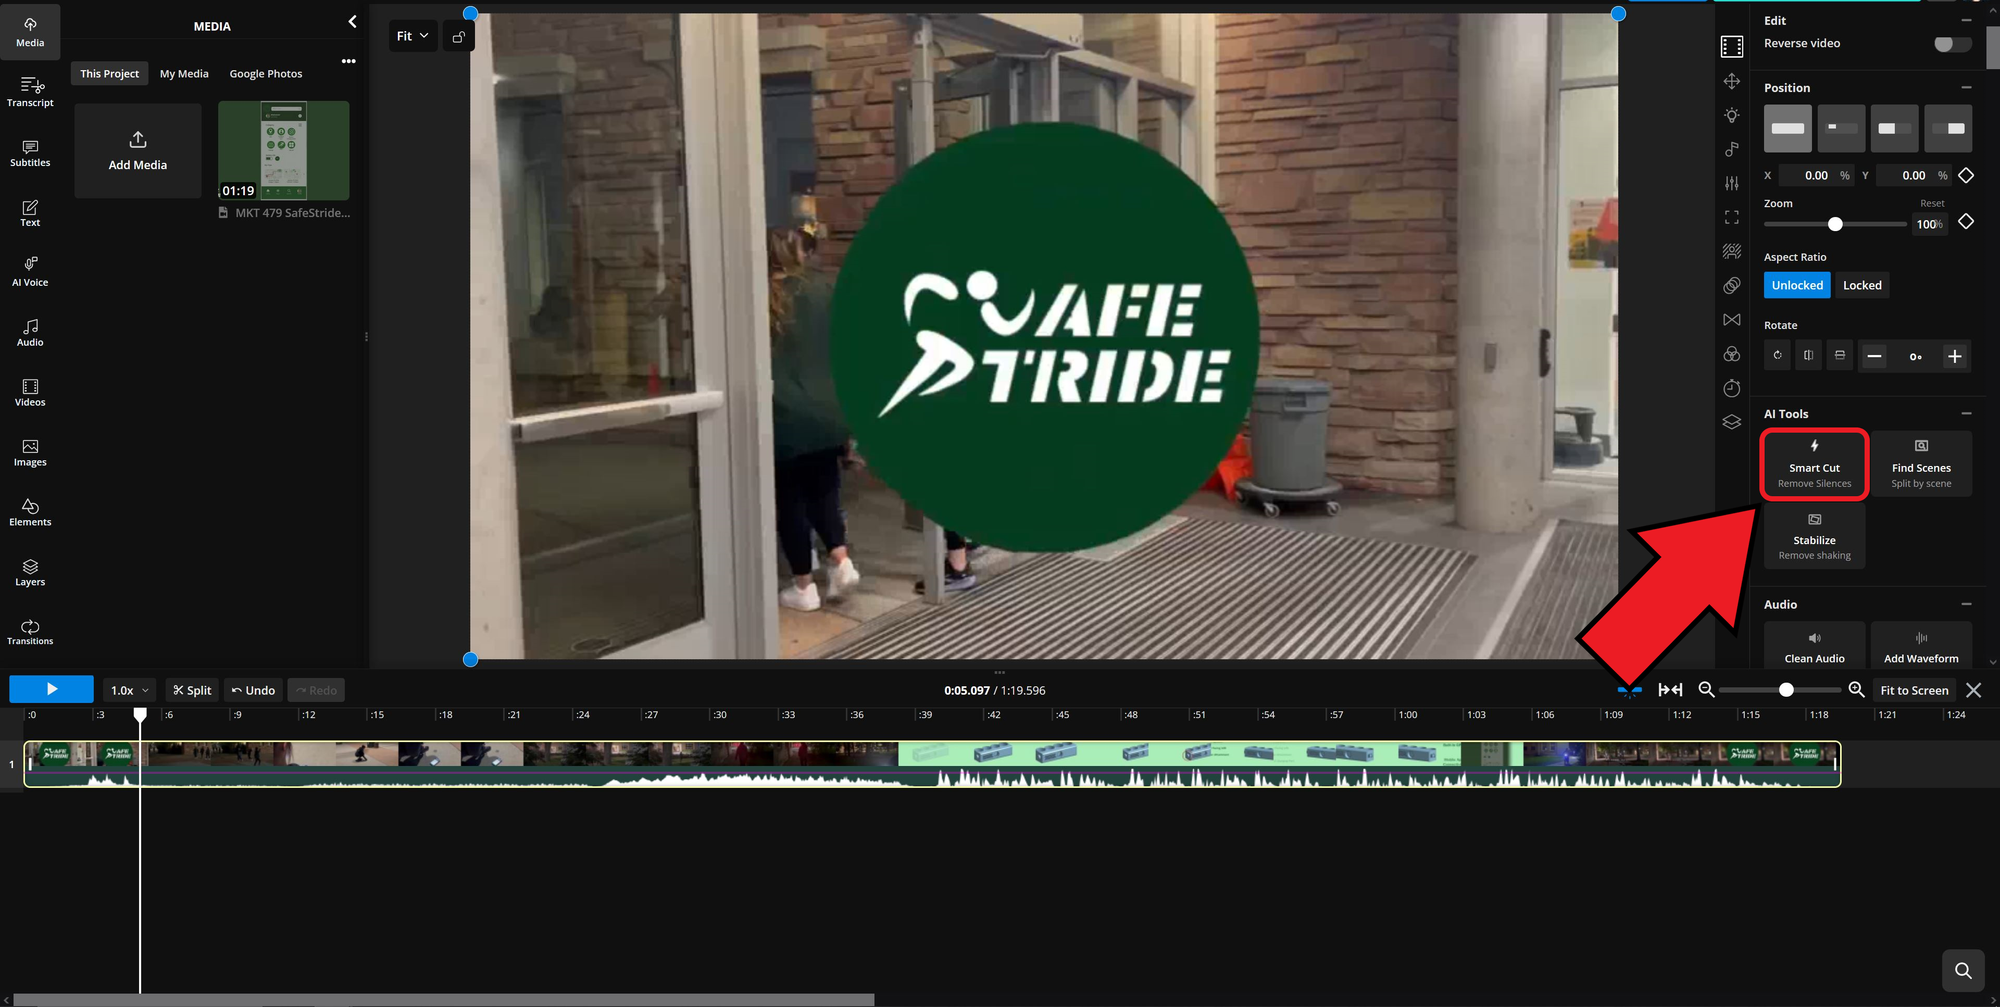
You can then fine-tune which parts get trimmed by adjusting the Silence Sensitivity slider in the bottom-left corner.
Sections highlighted in red will be cut from the timeline, giving you a cleaner, more concise edit without extra pauses or filler.
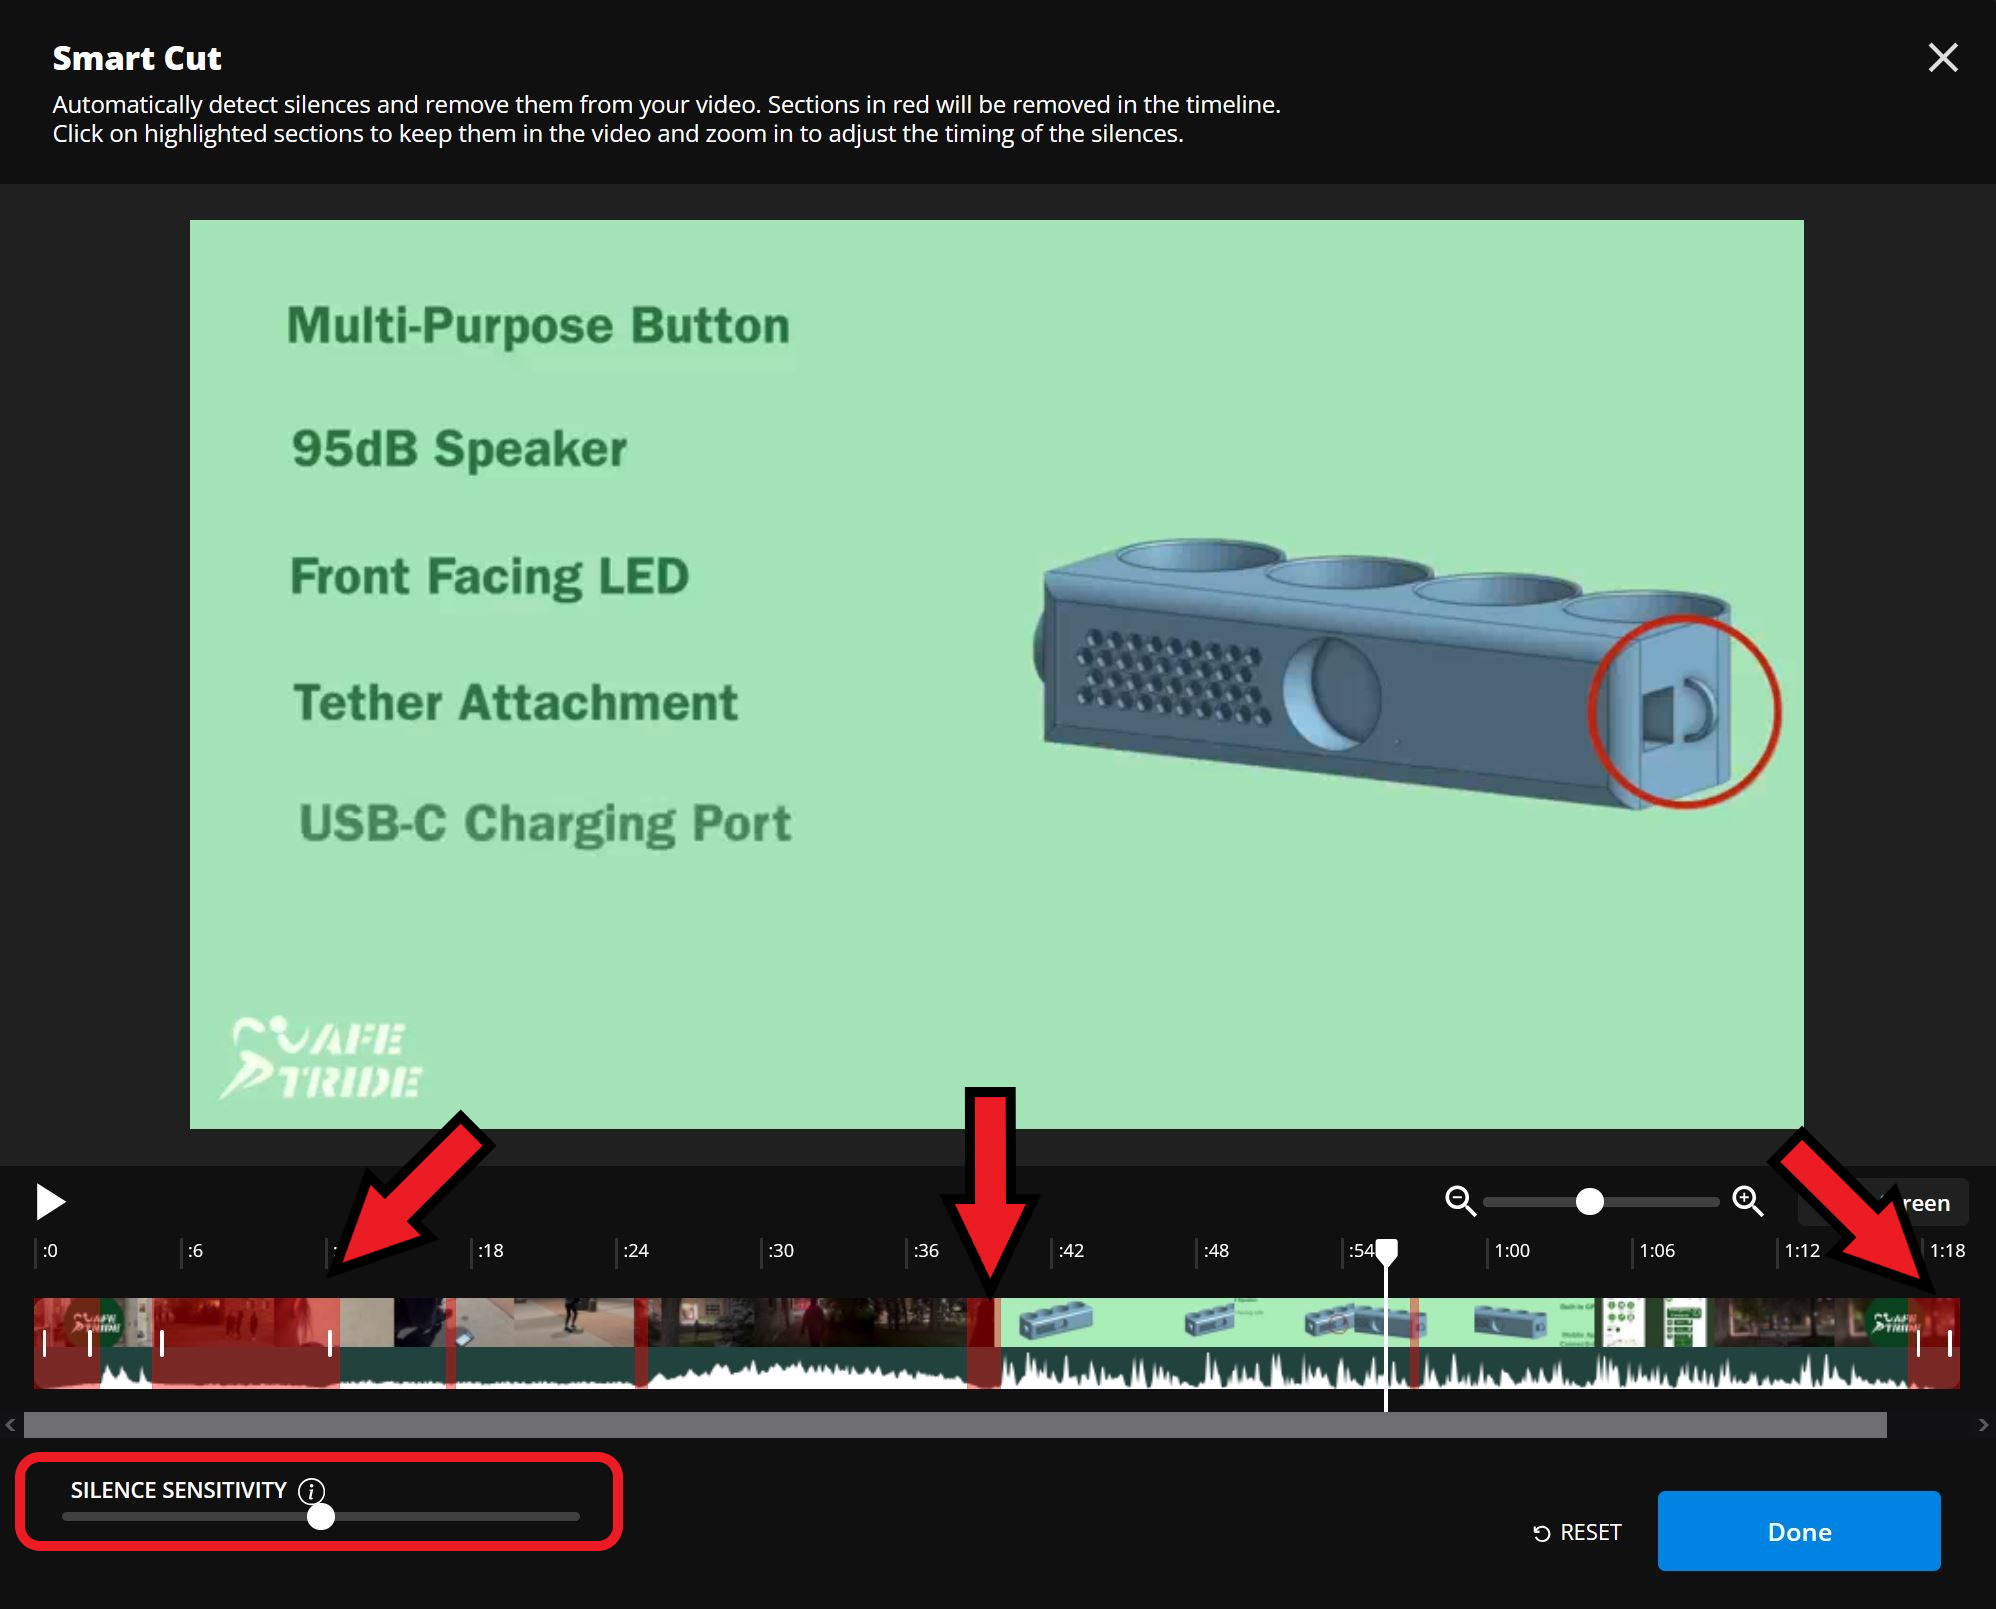
Pairing this method with automatic subtitles allows you to clean up filler language while maintaining proper alignment with your final edit.
How to Convert Subtitles Files in ChatGPT
If you’re working with subtitles and need to convert one file type into another, ChatGPT can help.
The process is simple: upload your existing file and request the format you’d like it converted to.
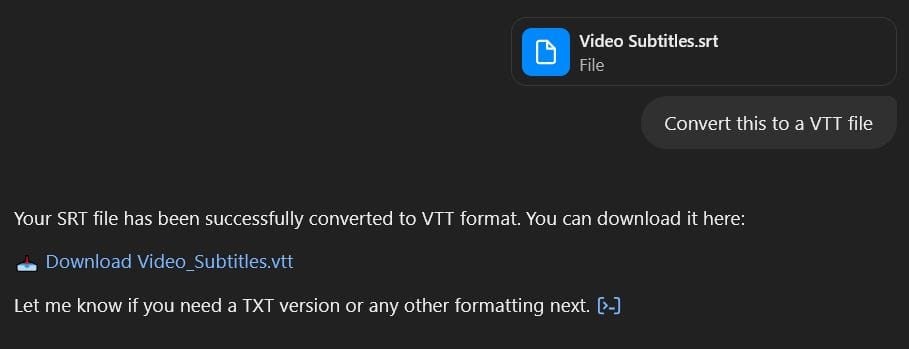
Since SRT files are one of the most common formats, here are several ways ChatGPT can convert or restructure them for you:
- VTT (WebVTT): Reformats your SRT into WebVTT format for use with modern web video players
- TXT: Removes timestamps and provides a plain text version of the transcript
- Paragraph-style transcript: Reformats subtitles into natural paragraphs based on dialogue flow — designed for easier reading
- Caption or summary highlights: Summarizes content and highlights key points
- Translated version: Preserves original format and timing while translating all content
To put this into practice, I uploaded an SRT file and simply asked ChatGPT to "convert this to a VTT file." Within seconds, it responded with a downloadable link formatted as a WebVTT file.
Below, you can see a side-by-side comparison showing a portion of the original SRT file and the final VTT version.
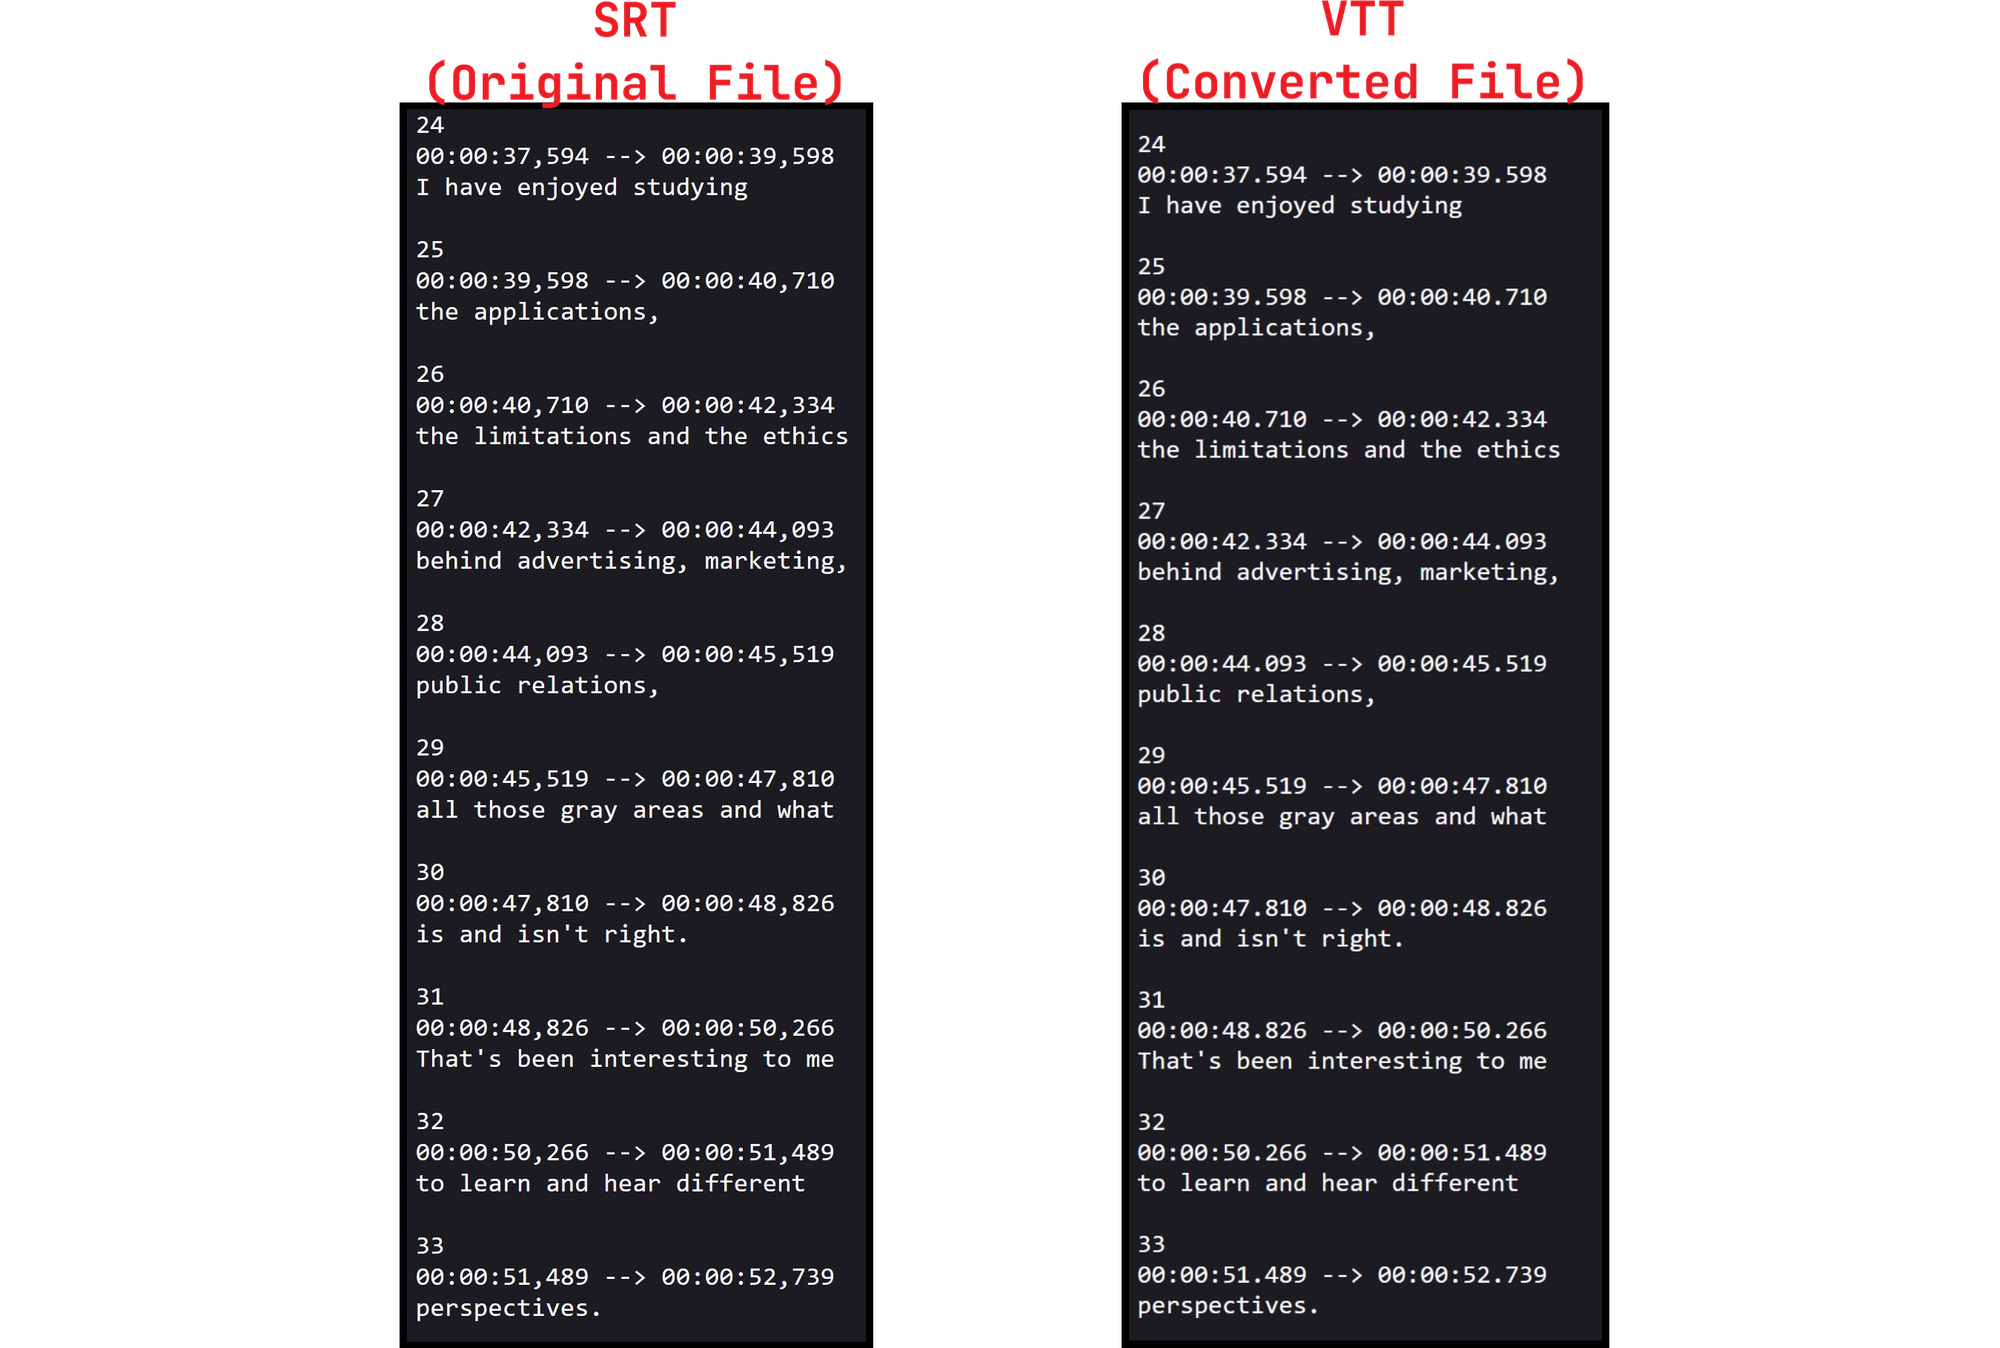
The changes may look subtle, but ChatGPT handled the conversion without any issues. Now I have subtitle files available in both SRT and VTT formats, ready for use across different platforms.
Using ChatGPT for Caption Translation
Whether you're working with a subtitle file that includes timestamps or just a plain-text script, ChatGPT can handle large amounts of content efficiently and speed up your video creation process.
Either upload a subtitle file or paste a script directly into the prompt box and ask ChatGPT to translate it into your desired language.

Using ChatGPT as a translator comes with several advantages. These include:
- Preserves subtitle formatting: ChatGPT can maintain the structure of subtitle files by keeping timestamps intact while translating only the dialogue text. This means you don’t have to manually reformat after translation, saving time and reducing the risk of errors.
- Wide language support: ChatGPT performs well across many translation tasks from mainstream pairs like English-Spanish or German-French to less commonly supported languages. For best results, include context in your prompt, especially for languages with formal/informal distinctions or regional variations.
- Enables tone and style consistency: By referencing earlier parts of your prompt or file, ChatGPT can apply consistent vocabulary, tone, and formatting rules across long documents or multiple projects. You can also guide it with prompts like “Translate this with a formal tone” or “Use casual, conversational language.
Even with these strengths, there are a few important limitations to keep in mind.
- Timing adjustments: When subtitles are translated, the line length may increase or decrease depending on the language. ChatGPT does not automatically adjust timestamps or re-sync subtitles to match video duration, so you may need to fine-tune the timing in a subtitle editor after translation.
- No Audio or Video Processing: ChatGPT cannot listen to or view media files. You must start with a transcript or a structured subtitle file (e.g., SRT, VTT, TXT).
- Token limitations: Large subtitle files may exceed ChatGPT’s token limit (roughly 4,000 tokens for GPT-3.5 or 25,000+ for GPT-4 Turbo)
To avoid timing issues and streamline your workflow, the best solution is to use a dedicated subtitle translator that handles both translating and syncing.
For example, in Kapwing, you can upload your video and navigate to the Translate tab in the left-hand sidebar.
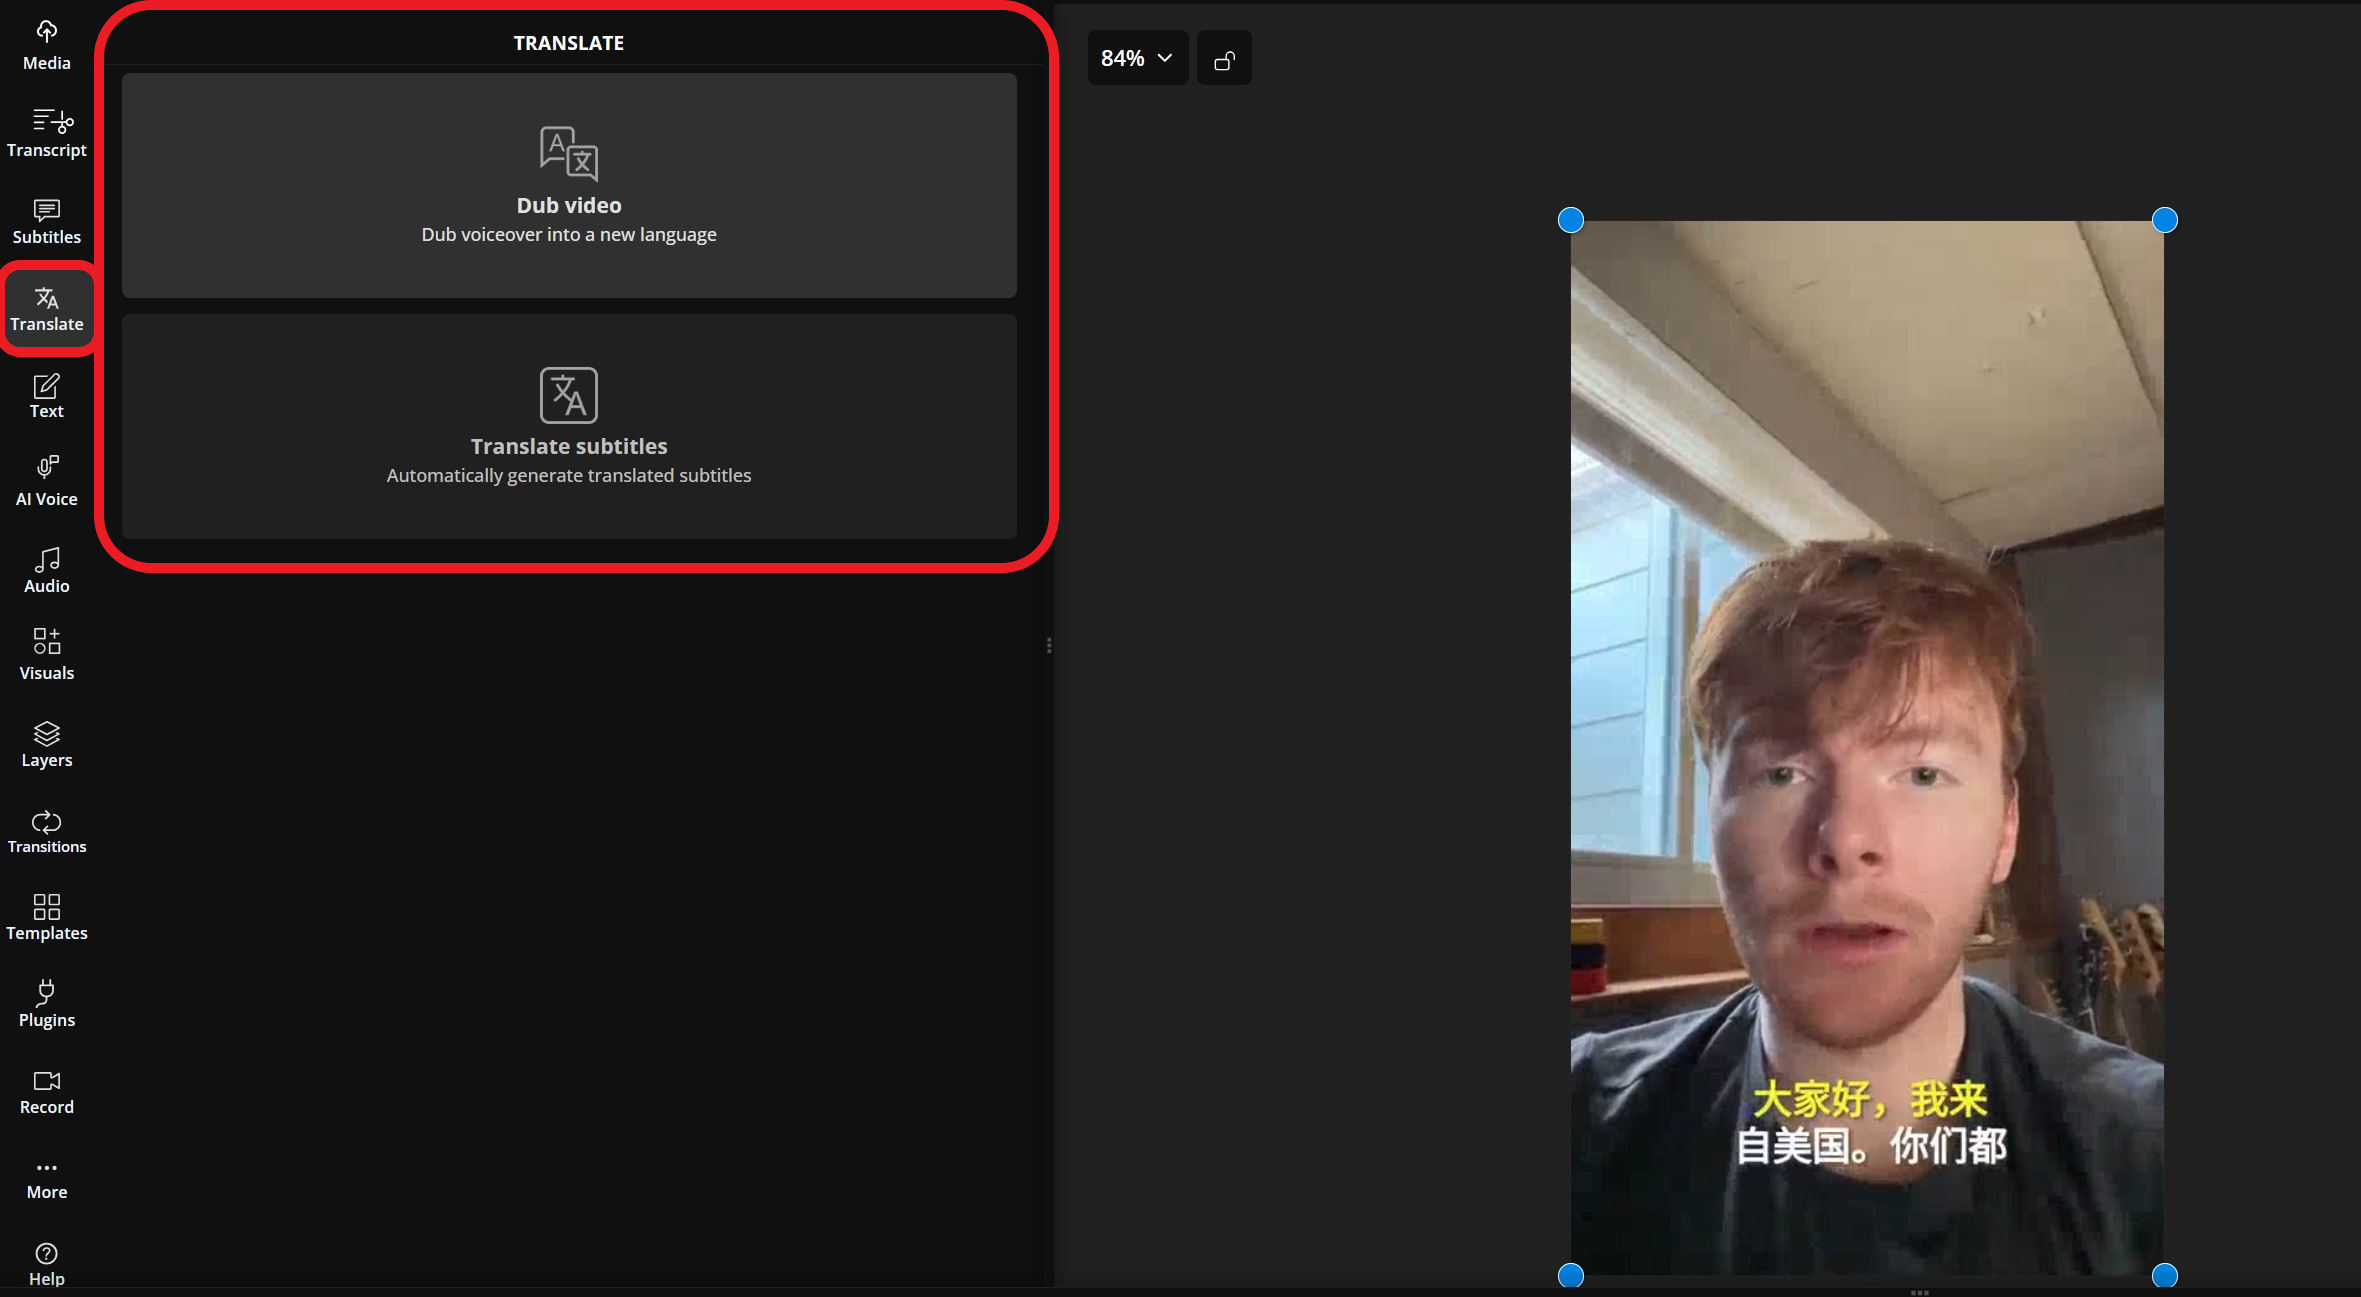
From there, you can choose to either translate the subtitles or dub the video using voice matching. For this walkthrough, select Translate Subtitles to begin.
Once selected, confirm the original and target languages, then click Auto Subtitle to generate the translation.
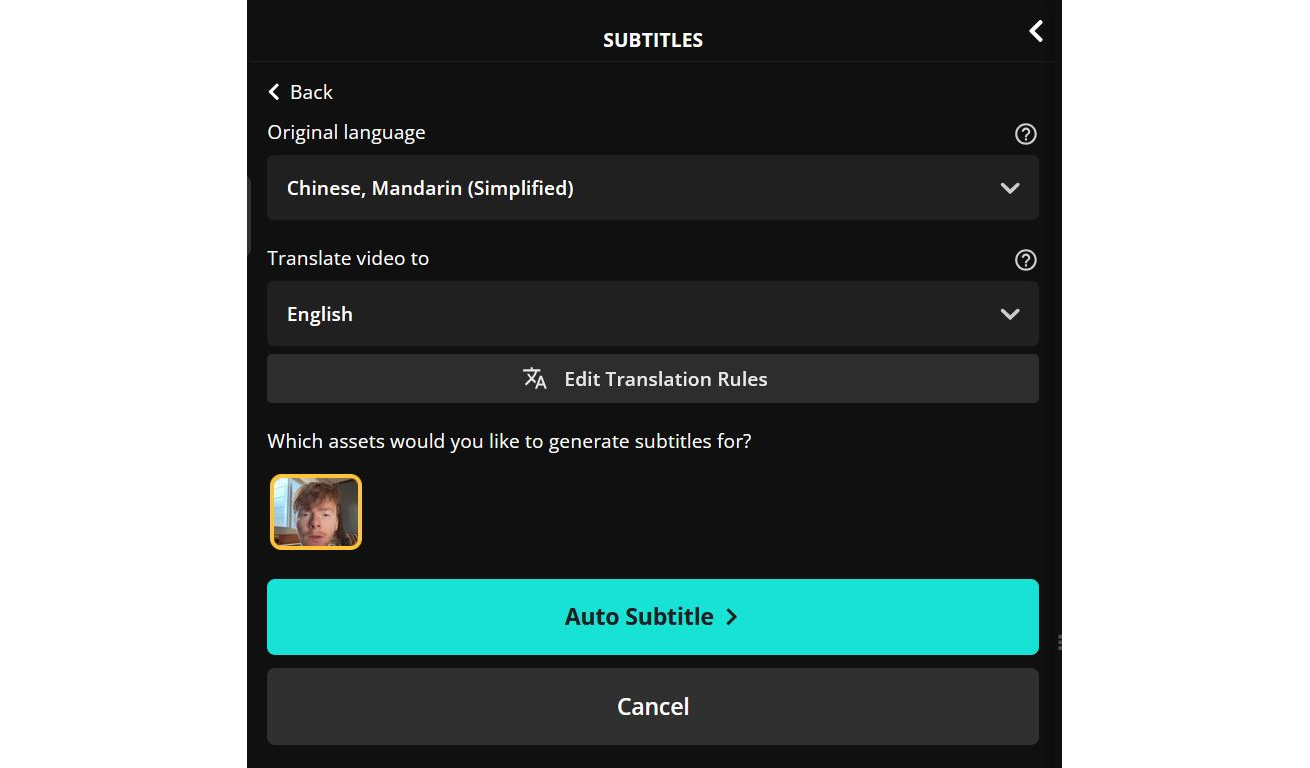
During this step, you also have the option to customize your translation using Brand Glossary, which allows you to preserve brand names, key terms, or specific phrasing across projects.
To access this tool, select Edit Translation Rules in the above image.
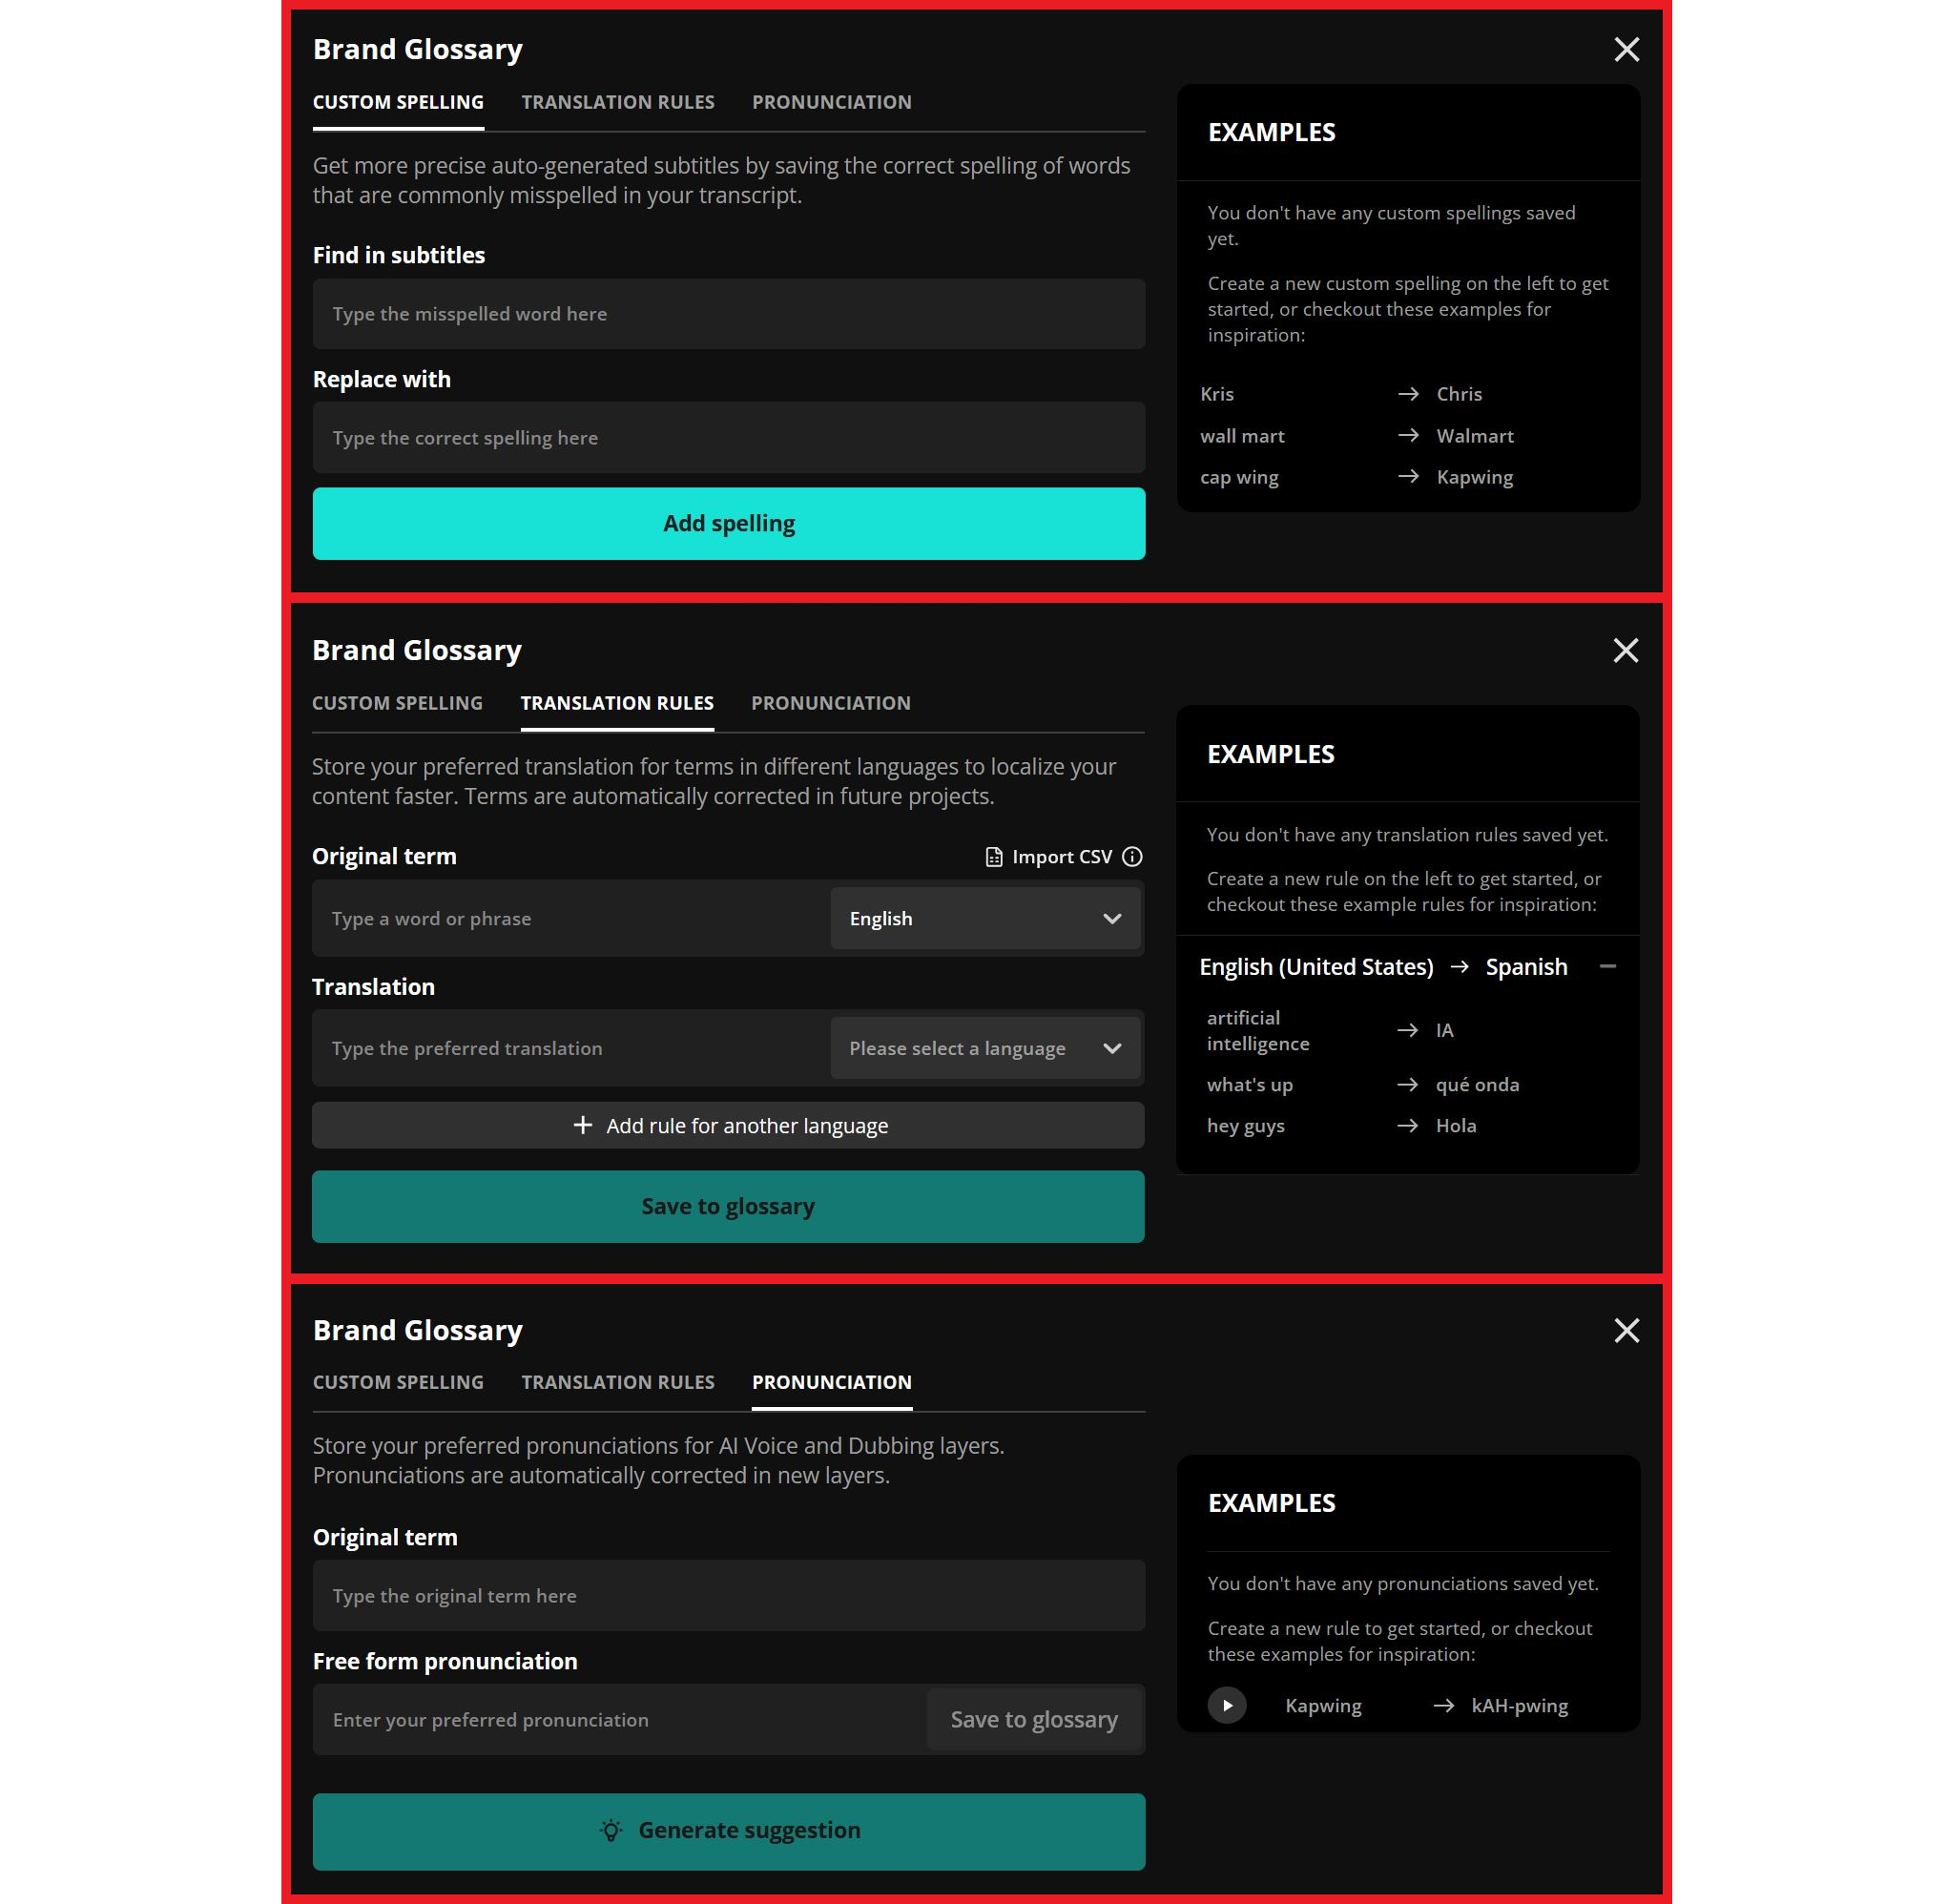
If you're working on a large batch of videos or using regional dialects, Brand Glossary ensures consistency in pronunciation for branded terms or uncommon pronunciations.
No matter how you configure your translated subtitles, Kapwing will automatically generate a transcript and align the subtitles with the video timeline. No manual syncing is required.

And finally, you can still bring ChatGPT into your process. After translating and exporting your subtitle file, you can upload it to ChatGPT for further editing, tone adjustments, or rewording to better match your target audience.


