What Are Cross Dissolves in Video Editing?
It's time to master a timeless classic

The cross dissolve transition, sometimes called a cross fade, is a video editing tool that blends two clips by smoothly fading one out while the other fades in. This transition is the default transition on many editing platforms, as its simplicity makes for easy editing with a studio-grade finish.
Below, this article will cover everything you need to know about the cross dissolve transition, including how to use it, examples in film, and when it should (and shouldn't) be used in your projects.
Whether you're editing a personal project for social media, making a detailed YouTube video, or a larger, professional video, understanding how to use video transitions like the cross dissolve will help your videos stand out and leave a lasting impression.
Example Cross Dissolve Transition from the film Citizen Kane.
Table of Contents:
- What is a Cross Dissolve in Video Editing?
- How the Cross Dissolve Transition Gained Popularity
- When to Use the Cross Dissolve Transition
- How to Add a Cross Dissolve Transition on Kapwing
- Cross Dissolve vs Other Video Transitions
What is a Cross Dissolve in Video Editing?
A cross dissolve is a video editing transition where one clip gradually fades out as the next clip fades in, creating a smooth and seamless blend between the two. Often used for a subtle effect, it’s commonly employed to indicate a passage of time (particularly in film) or a soft transition between scenes, making it a versatile tool in storytelling.
How the Cross Dissolve Transition Gained Popularity
The cross dissolve transition is a timeless editing technique that continues to resonate with filmmakers and content creators today. Its origins date back to 1899 when director Georges Méliès pioneered the effect in his famous film, Cinderella.
Originally achieved by physically rewinding film reels within cameras, the dissolve transition stood out for its subtle ability to blend clips without using flashy or gimmicky effects.
Since its creation, the cross dissolve transition has been in constant use in cinema, appearing in iconic films across many genres. It has been used to convey a passage of time, connect thematic elements, and enhance storytelling.
Notable features of the transition include the Indiana Jones series, Citizen Kane, The Man Who Fell to Earth, The Godfather Part II, and Star Wars: The Last Jedi.
The use of the cross dissolve transition in these films, along with countless other examples in popular media, highlights its versatility — whether it’s employed to evoke emotions, draw parallels, or guide the audience through seamless narrative transitions.
When to Use the Cross Dissolve Transition
Mastering the art of video editing starts with understanding when and how to use transitions effectively. The cross dissolve transition is a versatile tool, used to achieve different storytelling goals. Knowing the do’s and don’ts of transitions can help you tell more engaging stories that capture a wider audience.
The cross dissolve transition often serves as a bridge between two clips, offering visual cues to the audience. Its purpose changes depending on the duration:
- Longer durations typically signify a passage of time or a shift in the scene’s context.
- Shorter durations highlight similarities between the two clips, creating a sense of connection or continuity.
The transition shines in situations where subtlety is needed. Use it to transition between scenes or moments that share an emotional tone, and the audience has enough context to understand the connection between the clips.
A great example of this is found in Star Wars: The Last Jedi. In a pivotal scene, the cross dissolve transition links two characters, emphasizing their shared emotions. Combined with precise framing, this editing choice conveys meaning to the audience through visual queues, showcasing how effective editing choices can significantly enhance a story.
Short cross dissolve transition scene from Star Wars: The Last Jedi.
We're not all Hollywood video editors, however, and film editors use expensive video editing software kits that reach far beyond simple cross dissolve transitions. But for content creators like social media managers, influencers, tutorial makers, TikTokers, YouTubers, and online advertisers, the cross-dissolve is still just as invaluable.
It’s perfect for transitions in product showcases, before-and-after shots, or step-by-step tutorials, where smooth continuity keeps the viewer engaged. In social media ads, cross dissolves can add a subtle, refined touch when transitioning between products or features, while for influencers and YouTubers, it helps maintain a cohesive flow between scenes without distracting from the content. The cross dissolve’s versatility makes it a go-to choice for enhancing storytelling in any type of video, whether it's a quick TikTok or a detailed how-to guide.
Still, there are times when it's better to avoid the cross dissolve. In high-energy edits or dramatic scene changes, it might feel too soft or understated. Likewise, overusing this transition can make your video feel repetitive or amateur. To keep your content engaging, mix it with other transitions and use it when subtlety is key.
Understanding fundamental video editing techniques greatly improves the potential of your projects to connect with a broader audience and increase engagement.
The Godfather Director, Francis Ford Coppola, explains why editing choices such as transitions are vital in shaping meaningful content that resonates with its audience.
"The Essence of cinema is editing. It's the combination of what can be extraordinary images of people during emotional moments, or images in a general sense, put together in a kind of alchemy," — Francis Ford Coppola
How to Add a Cross Dissolve Transition on Kapwing
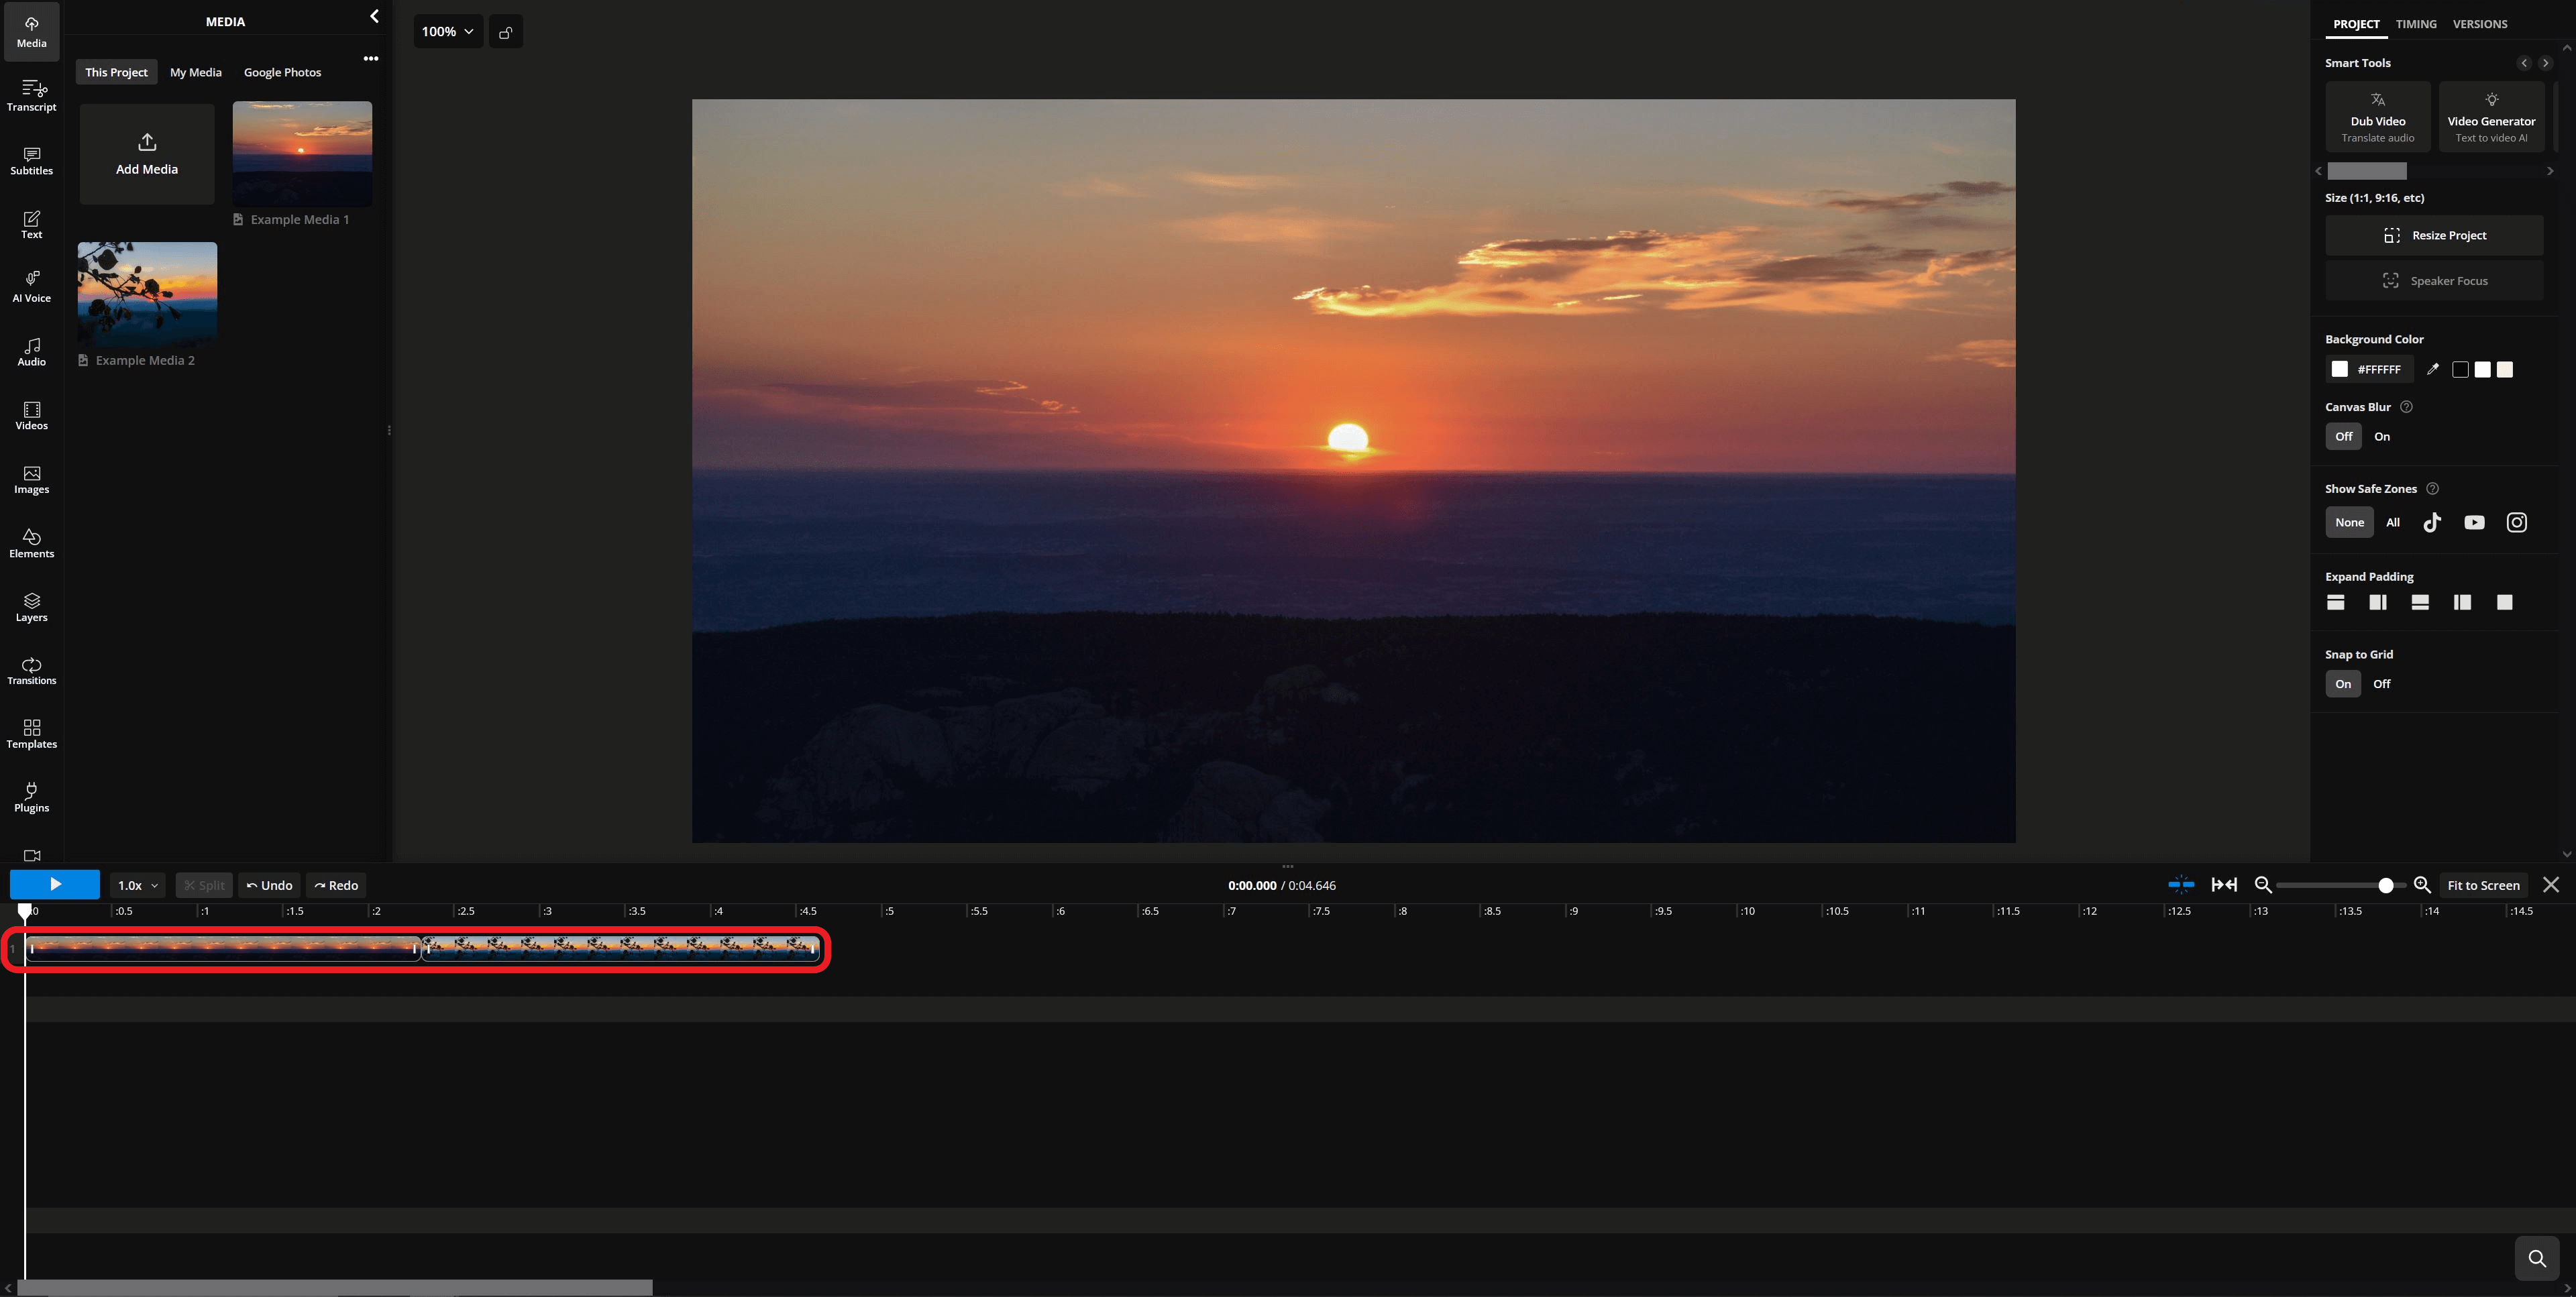
Step 1) Upload Your Media
To get started, upload two or more media files to the Kapwing video editor. While transitions are typically used to join two video clips, they can also be applied to photos for a smoother, polished finish.

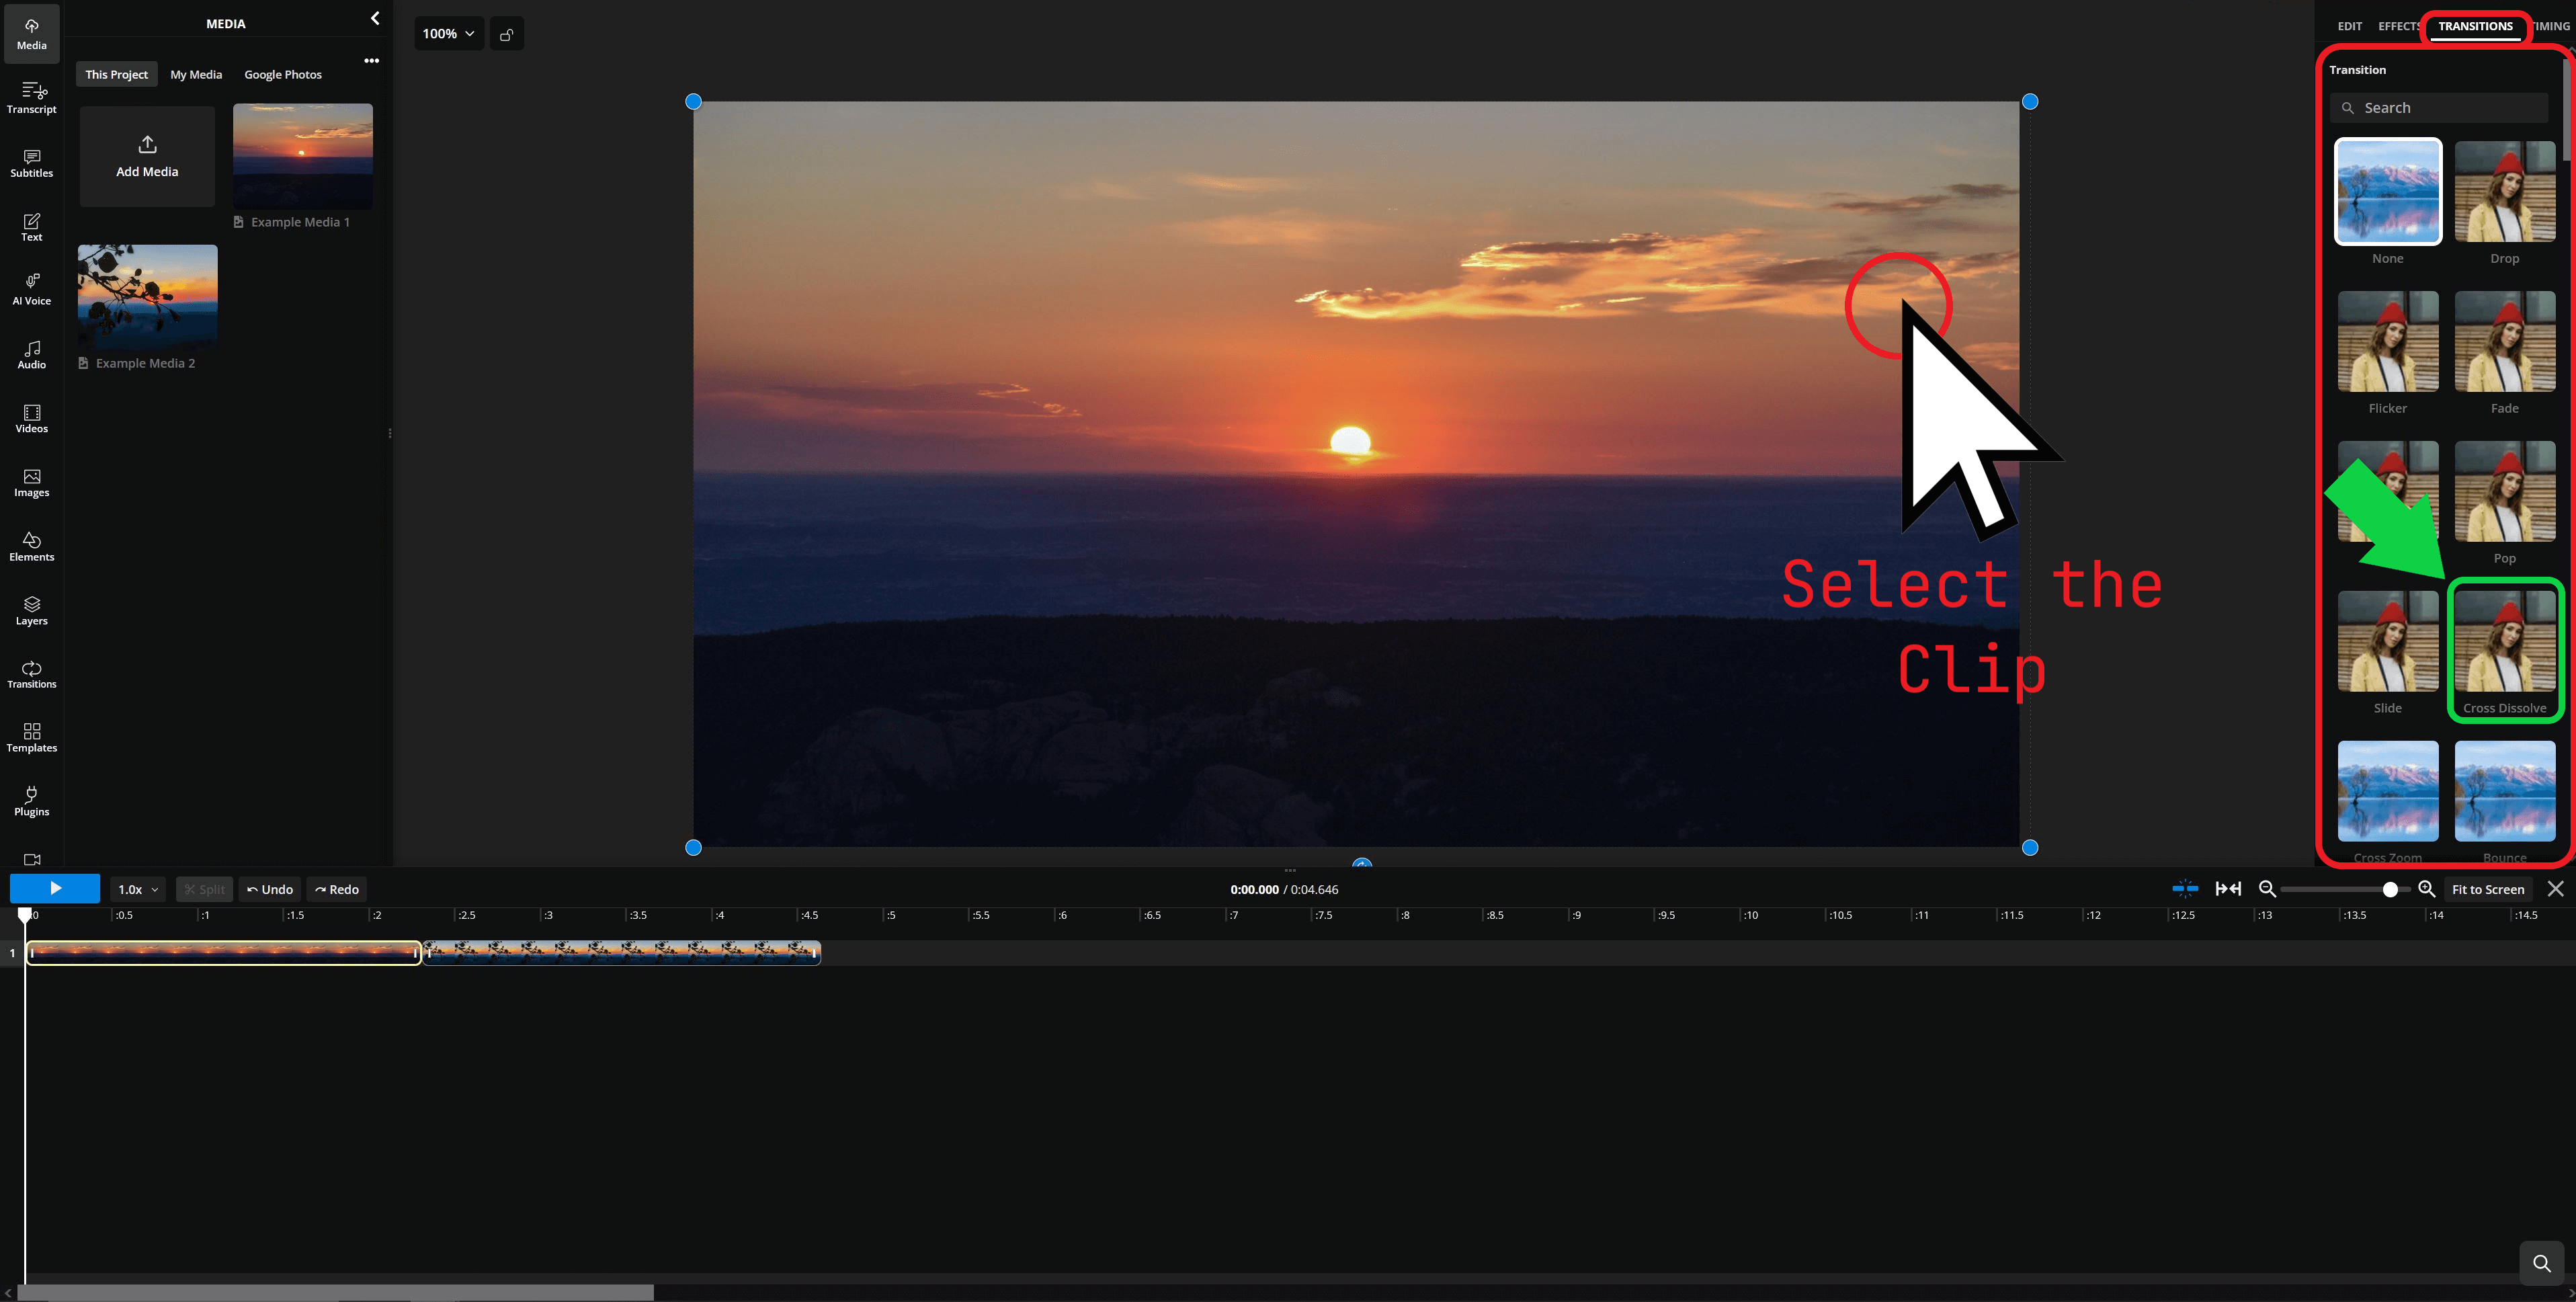
Step 2) Open "Transitions"
Once your clips are uploaded, arrange them on the timeline in the desired order. To add transitions, select a clip and navigate to the Transitions menu on the right-hand side of the editor.

Step 3) Add Cross Dissolve
In the Transitions menu, you can search for specific transitions by name or scroll through the available options. To add the cross dissolve transition, simply select it from the list.

Step 4) Customize Cross Dissolve
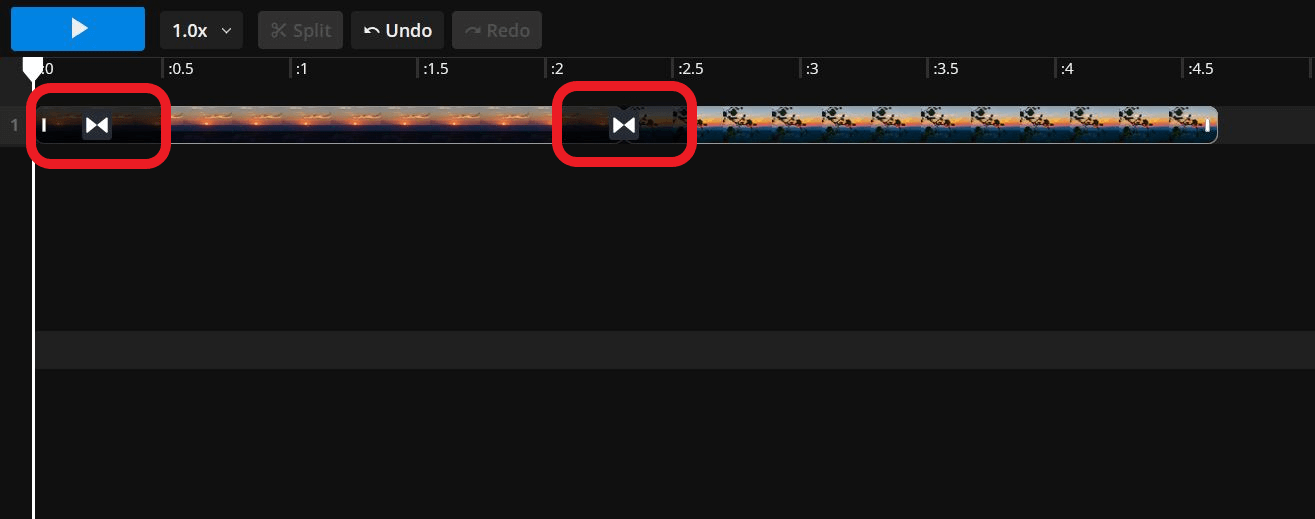
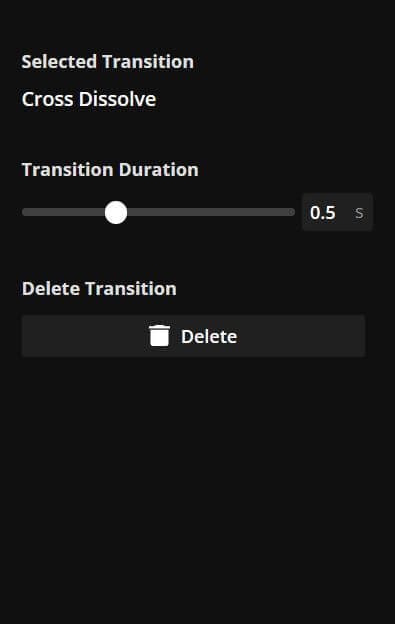
By default, the cross dissolve transition will be applied to both the beginning and end of the selected clip. To customize the transition, click the transition icon on the timeline. This will open the settings menu, where you can view the transition name, adjust its duration, or delete it if needed.

Step 5) Finalize and Export
Once complete, the transition seamlessly blends your clips or photos for a polished look. You can adjust the duration to control the pace, ensuring it matches the desired flow of your video. Click "Export project" in the top right-hand corner and then "Download" to save the project to your device.
A cross dissolve transition created using the Kapwing video editor.
Cross Dissolve vs Other Video Transitions
The cross dissolve transition is a timeless and versatile choice, but relying on one transition too often can make your content feel repetitive.
Exploring a variety of transitions will help you add diversity and creativity to your projects. Here's a comparison of a few alternatives to the cross dissolve, each with a duration of one second for a direct side-by-side evaluation. All of these transitions are available for free on Kapwing.
The first comparison showcases transitions that share similarities with the cross dissolve but include movement to blend the clips. These transitions are effective but do not bridge clips as subtly as the cross dissolve.
Transition comparison: Cross dissolve (top left), fade (top right), cross zoom (bottom left), and cross warp (bottom right).
Next, these video transitions feature creative animations that combine clips in bold and unique ways. These options are ideal when you want the transition itself to make a statement or contribute to the visual style of your project.
Transition comparison: Cross dissolve (top left), circle open (top right), displacement (bottom left), and pixelize (bottom right).
Finally, the third set highlights geometric transitions, such as the Wipe Down effect located in the bottom right of Kapwing's "Transitions" section.
These types of transitions — part of the broader “wipe” category — are straightforward and ideal for signaling a clear introduction of a new scene without distracting animations.
Transition comparison: Cross dissolve (top left), pinwheel (top right), luma (bottom left), and wipe down (bottom right).
Of course, this list is just a starting point. With countless editing techniques to explore, taking the time to experiment will give you a more rounded understanding of how to add varied video transitions using Kapwing.
Whether you're aiming for a polished, professional look or a more expressive style, transitions can help you create a unique and engaging video.
Start experimenting today with the over 70 video transitions available in the Kapwing video editor.


